
The Sample Project
Now that you have a basic grasp of the Revit API, let's build a project from scratch. The sample in this section contains both an external command and an external application. The command generates 3D workset views for each user-created workset found in the model. This type of view is commonly used to diagnose workset assignments for elements in the model. Each of these 3D views has all worksets turned off except for the workset for which the view is named. The external application adds a tab to the ribbon where you can access your custom command.
The code samples in this section are all written in VB.NET using Visual Studio 2010 Premium. If you prefer to work in C#, you can translate the code by pasting it into www.developerfusion.com/tools/convert/vb-to-csharp (some cleanup may be required). See Figure 25.5.
FIGURE 25.5 Converting VB to C#

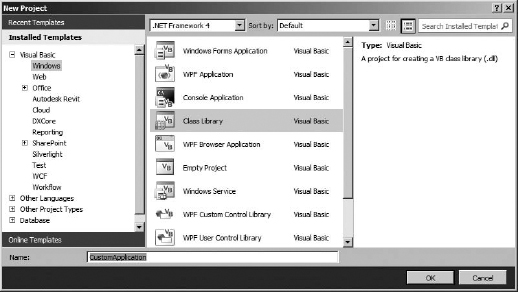
Open a fresh session of Visual Studio 2010 and select New Project to get started. Select Class Library and name the project CustomApplication (Figure 25.6). This project will contain the code for both of our API samples. Be sure to save the project before you get too far along and something goes wrong.
FIGURE 25.6 Creating the application project
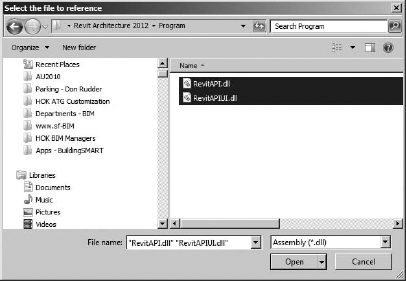
With the project created, the next thing to do is add the required namespace references to RevitAPI.dll and RevitAPIUI.dll. All Autodesk Revit 2012 IExternalCommands and IExternalApplications require namespace references to these two libraries.
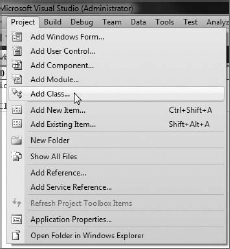
You add namespace references in VB projects by right-clicking the title of the Visual Studio 2010 project name in the Solution Explorer and selecting Add ![]() Reference. Alternatively, you can select Project
Reference. Alternatively, you can select Project ![]() Add Reference from the main menu. Navigate to the Program folder of your Revit installation (usually in C:Program FilesAutodeskRevit Architecture 2012Program), and add these two references to your project, as shown in Figure 25.7.
Add Reference from the main menu. Navigate to the Program folder of your Revit installation (usually in C:Program FilesAutodeskRevit Architecture 2012Program), and add these two references to your project, as shown in Figure 25.7.
FIGURE 25.7 Adding API references to your Visual Studio project
SETTING CopyLocal TO False
The CopyLocal property for Revit API references added to a project defaults to True. This property should be set to False.
Select the RevitAPI.dll and RevitAPIUI.dll references and set their CopyLocal property to False in the Properties palette, as shown here:

The ExternalApplication sample requires three additional references to Presentation Core, System.xaml, and Windows Base for the ribbon image functionality, so be sure to add these as well. Each of these references is available from the .NET tab of the Add References dialog box.
The User Form
You may find it easier to start designing your Revit API utilities from the user interaction point, and in just about all cases this will be the user form. This approach helps keep you on track with what you're trying to accomplish and less distracted with the minor details, such as how to get the application to actually work, until you're ready.
Add a new Windows User Form to the project by selecting Project ![]() Add Windows Form from the main menu, name this form form_Main, and click OK. Add the two required Revit namespaces to this form class so you have access to the functionality you need:
Add Windows Form from the main menu, name this form form_Main, and click OK. Add the two required Revit namespaces to this form class so you have access to the functionality you need:
Imports Autodesk.Revit.DB
Imports Autodesk.Revit.UI
CONTROLS LAYOUT
It is usually easier to start designing an application by immediately laying out the controls that your user will need to interact with. In this case, the entire form design consists of only four controls and is going to be pretty easy to work with. The final form controls layout is shown in Figure 25.8.

Button Control: CheckedListBoxExistingWorksets The topmost control is a checked list box control, named CheckedListBoxExistingWorksets, used to display the user-created worksets in the form of a proposed 3D view name.
Progressbar Control: ProgressBar This control is used to report progress information to the user at runtime. Place this control along the bottom of the form as illustrated earlier. Set the display so that it appears behind the two button controls.
Button Control: ButtonCancel The bottom-right button, named ButtonCancel, is used to close the command without performing any changes to the model. Set the text for this control to Cancel. Double-click the Cancel button and enter the following code:
''' <summary>
''' Cancel and Close the Command
''' </summary>
''' <param name="sender"></param>
''' <param name="e"></param>
''' <remarks></remarks>
Private Sub ButtonCancel_Click(ByVal sender As System.Object, _
                               ByVal e As System.EventArgs) _
                           Handles ButtonCancel.Click
   Me.Close()
End Sub
Button Control: ButtonDoWorksetViews The bottom-left button, named ButtonDoWorksetViews, is used to perform the view configurations to the model. Set the text for this control to Create/Update 3D Workset Views. Double-click the ButtonDoWorksetViews button and enter the following code:
''' <summary>
''' Create and/or Update Selected Workset Views
''' </summary>
''' <param name="sender"></param>
''' <param name="e"></param>
''' <remarks></remarks>
Private Sub ButtonDoWorksetViews_Click(ByVal sender As System.Object, _
                                       ByVal e As System.EventArgs) _
                                       Handles ButtonDoWorksetViews.Click
DoWorksets()
    ' We're done... close the form
    Me.Close()
End Sub
THE CLASS CONSTRUCTOR
The next step is to create the routine that constructs the form class before displaying it to the user. This routine is used to crunch the information you are interested in displaying to the user, such as listing the available worksets. The construction of our form class will require one argument for our clsSettings class, explained later in this chapter.
Any time you create a constructor for a form class, you must call InitializeComponent() immediately within the constructor routine. This function calls the default form construction preclass before running your custom constructor code on the form.
The completed list of private class variables and completed class constructor code for our form is shown in Listing 25.7.
LISTING 25.7 The form constructor and class private variables
Private m_Settings As clsSettings
Private m_Worksets As New List(Of Workset)

''' <summary>
''' Form class constructor
''' </summary>
''' <param name="Settings">Application Settings Class</param>''' <remarks></remarks>
Public Sub New(ByVal Settings As clsSettings)
   InitializeComponent()
   ' The settings class
   m_Settings = Settings
   ' Hide the progress bar
   Me.ProgressBar.Visible = False
   ' Get list of worksets
   Dim wsets As New FilteredWorksetCollector(m_Settings.Document)
   m_Worksets = wsets.ToList
   ' Only add user generated worksets to the listbox
   For Each x As Workset In m_Worksets
       If x.Kind = WorksetKind.UserWorkset Then
           Me.CheckedListBoxExistingWorksets.Items.Add _
               ("3D WS - " & x.Name, True)
       End If
    Next
End Sub
THE HELPER SUBROUTINES
Our form class utilizes two helper subroutines. SetViewWorksets is used to churn through the worksets in the model and build up the list of required 3D workset views. It then calls SetViewWorksets to make the required workset visibility settings to the actual views.
The completed DoWorksets subroutine is shown in Listing 25.8. The completed SetViewWorksets subroutine is shown in Listing 25.9.
LISTING 25.8 The completed DoWorksets subroutine
''' <summary>
''' Build up the Workset views
''' </summary>
''' <remarks></remarks>
Private Sub DoWorksets()
   ' Hide the buttons and show the progressbar
   Me.ButtonCancel.Visible = False
   Me.ButtonDoWorksetViews.Visible = False
   With Me.ProgressBar
       .Minimum = 0
       .Maximum = CheckedListBoxExistingWorksets.CheckedItems.
                      Count + 1
       .Value = 0
       .Visible = True
   End With
   ' Collect all Existing 3D Views
   Dim CollectorViews As New FilteredElementCollector
                      (m_Settings.Document)
   CollectorViews.OfCategory(BuiltInCategory.OST_Views)
   CollectorViews.OfClass(GetType(View3D))
   Dim m_3Dviews As New List(Of Element)
   m_3Dviews = CollectorViews.ToElements
   Dim viewExists As Boolean = False
   ' Iterate all collected worksets
   For Each ws As Workset In m_Worksets
       ' The target workset view name
       Dim wSetViewName As String = "3D WS - " & ws.Name
       Dim view3D As View3D = Nothing
       ' Check to see if it was selected
       If CheckedListBoxExistingWorksets.CheckedItems.Contains
                      (wSetViewName) Then
           ' Create if view doesn't exist
           For Each tView As View In m_3Dviews
               viewExists = False
               If tView.Name = wSetViewName Then
                   ' The View Exists
                   viewExists = True
view3D = tView
                 Exit For
             End If
          Next
          ' Create missing views as coordination type
          If viewExists = False Then
              ' Create the view
               Dim vDir As New XYZ(0, 0, −1)
               view3D = m_Settings.Document.Create.NewView3D(vDir)
               view3D.Name = wSetViewName
               ' Set the VIEW_DISCIPLINE parameter to coordination
           End If
           ' Set the worksets in the view and turn on all categories
           SetViewWorksets(view3D, ws)
           Me.ProgressBar.Increment(1)
       End If
    Next
End Sub
LISTING 25.9 The completed SetViewWorksets subroutine
''' <summary>
''' Turn off all worksets except the target workset and
''' turn on all categories
''' </summary>
''' <param name="myView">View Object</param>
''' <param name="wSet">Workset to Isolate</param>
''' <returns></returns>
''' <remarks></remarks>
Private Function SetViewWorksets(ByVal myView As View, _
                                 ByVal wSet As Workset) As Boolean
    Try
        ' Turn on all categories
        For Each x As Category In _
                        m_Settings.Document.Settings.Categories
            Try
               myView.setVisibility(x, True)
            Catch ex2 As Exception
            End Try
       Next
       ' Iterate all worksets
       ' and turn all off except the matching wSet
       For Each ws As Workset In m_Worksets
           Try
               If ws.Id = wSet.Id Then
                   myView.SetWorksetVisibility(ws.Id, _
WorksetVisibility.Visible)
               Else
                   myView.SetWorksetVisibility(ws.Id, _
                                   WorksetVisibility.Hidden)
               End If
           Catch ex3 As Exception
           End Try
        Next
        Return True
    Catch ex As Exception
        Return False
    End Try
End Function
The clsSettings Class
Another trick that you should find handy is to use a generic settings class to manage your Revit objects, such as the application and documents collection. You can then just pass this class around as an argument to construct other classes, making it easy to make the Revit API functionality accessible throughout the development project. A class like this comes in especially handy when working with large development projects.
Add a new class to the project by selecting Project ![]() Add Class from the main menu. Name this class clsSettings, and click OK. Add the two required Revit namespaces to this class so you have access to the Revit API functionality:
Add Class from the main menu. Name this class clsSettings, and click OK. Add the two required Revit namespaces to this class so you have access to the Revit API functionality:
Imports Autodesk.Revit.DB
Imports Autodesk.Revit.UI
THE CLASS CONSTRUCTOR
In order for the class to generate and manage references to the Revit objects, you need to feed it some arguments to chew on. The settings class will construct everything you need from two arguments.
An ExternalCommandData argument is used to extract a reference to the Revit application, current document, and the workshared model name. The application version is then passed as a second argument as a string. The application version string is used to display version text alongside the title of the form to quickly identify version information for your users.
Public Sub New(ByVal commandData As ExternalCommandData, _
                ByVal myAppVersion As String)
End Sub
Private Class Variables Our class requires four private class variables. The m_App variable holds a reference to the Revit application information. The m_Doc variable holds a reference to the active Revit document and everything in it. The m_RecordedModelName holds a reference to the central model filename and path. The m_ProgramName holds the string value to our application version. Add these four lines just below the beginning of the class:
Private m_App As UIApplication
Private m_Doc As Document
Private m_RecordedModelName As String
Private m_ProgramName As String = ""
The New Subroutine This New subroutine is where the class gets instantiated and turned into something usable. As described earlier, you only require two arguments to build the class and all of its thunder. The New routine code is shown in Listing 25.10.
LISTING 25.10 The clsSettings class constructor
''' <summary>
''' Class Constructor
''' </summary>
''' <param name="commandData">Revit Command Data Object</param>
''' <param name="myAppVersion">Application Version </param>
''' <remarks></remarks>
Public Sub New(ByVal commandData As ExternalCommandData, _
               ByVal myAppVersion As String)
     ' Program Version... to track updates
     m_ProgramName = "Workset View Manager " & myAppVersion
     ' Revit Application and Document
     m_App = commandData.Application
     m_Doc = m_App.ActiveUIDocument.Document
     ' Central model name or document title
     If m_Doc.IsWorkshared Then
         ' Test for a valid file name
         If m_Doc.WorksharingCentralFilename <> "" Then
             ' Only use central file name if the model has been saved
             m_RecordedModelName = m_Doc.WorksharingCentralFilename
         Else
             ' Use the document title
             m_RecordedModelName = m_Doc.Title
         End If
    Else
         ' Use the document title
         m_RecordedModelName = m_Doc.Title
    End If
End Sub
ADDING THE PUBLIC CLASS PROPERTIES
This class serves the purpose of maintaining a reference to our utility name and version, the active application, document object, and the workshared model name. So in order to access these objects external to this class, you need to expose them using public properties. The public properties code is shown here in Listing 25.11.
LISTING 25.11 The public class properties
''' <summary>
''' The application version string
''' </summary>
''' <value></value>
''' <returns></returns>
''' <remarks></remarks>
Public ReadOnly Property ProgramName() As String
    Get
    Return m_ProgramName
    End Get
End Property

''' <summary>
''' Revit Application Object
''' </summary>
''' <value></value>
''' <returns></returns>
''' <remarks></remarks>
Public ReadOnly Property Application() As UIApplication
    Get
        Return m_App
    End Get
End Property

''' <summary>
''' Revit Document Object
''' </summary>
''' <value></value>
''' <returns></returns>
''' <remarks></remarks>
Public ReadOnly Property Document() As Document
    Get
        Return m_Doc
    End Get
End Property

''' <summary>
''' The local or shared revit model name with full path
''' </summary>
''' <value></value>
''' <returns></returns>
''' <remarks></remarks>
Public ReadOnly Property SharedDocumentName() As String
    Get
        Return m_RecordedModelName
    End Get
End Property
The Command Class
Now with all of the main utility components basically built and ready to go, you can focus on how you will connect our utility up to function inside the Revit user interface. You will do just this by adding a new command class that will implement the IExternalCommand interface.
Add a new class to the project by selecting Project ![]() Add Class from the main menu, name this class Command, and click OK (see Figure 25.9).
Add Class from the main menu, name this class Command, and click OK (see Figure 25.9).
FIGURE 25.9 Adding a new command class
Open the Command class and add the following namespace imports to the top above the main class declaration:
Imports Autodesk.Revit.UI
Imports Autodesk.Revit.DB
Imports Autodesk.Revit.Attributes
The next step is to implement the IExternalCommand interface. Add the following line just below the main class declaration:
Implements IExternalCommand
Once you press Enter, a function named Execute, with all required arguments and structure, automagically appears for you. Don't forget to add the required Transaction attribute immediately before the class declaration and after any namespace imports. The transaction serves as a container of changes that can be rolled back if a failure occurs.
Your Command class should now look something like the example in Listing 25.12.
LISTING 25.12 The IExternalCommand interface
Imports Autodesk.Revit.UI
Imports Autodesk.Revit.DB
Imports Autodesk.Revit.Attributes

<Transaction(TransactionMode.Manual)> _
Public Class Command

    Implements IExternalCommand

    Public Function Execute(ByVal commandData As ExternalCommandData, _
                            ByRef message As String, _
                            ByVal elements As ElementSet) _
                        As Result Implements IExternalCommand.Execute
    End Function
End Class
Now that you have the interface implementation all set up, you should add a reference to the settings class and user form. The user form class requires the settings class as an argument to generate it and give it access to your Revit document. The now completed Command class with all references to your settings class and user form is shown in Listing 25.13.
LISTING 25.13 The completed Command class
Imports Autodesk.Revit.UI
Imports Autodesk.Revit.DB
Imports Autodesk.Revit.Attributes

''' <summary>
''' Mastering Autodesk Revit Architecture 2012 Sample Code
''' Generate 3D Diagnostic Workset Views
''' </summary>
''' <remarks>Worksharing must be enabled</remarks>
<Transaction(TransactionMode.Manual)> _
Public Class Command
    ' Required implementation to access the Revit database
    Implements IExternalCommand

    Public Const m_AppVer As String = "V2011.03.07"

    ''' <summary>
    ''' The required Execute function
    ''' </summary>
''' <param name="commandData">ExternalCommandData</param>
    ''' <param name="message">Failure message</param>
    ''' <param name="elements">Elements Argument</param>
    ''' <returns>Result</returns>
    ''' <remarks></remarks>
    Public Function Execute(ByVal commandData As ExternalCommandData, _
                            ByRef message As String, _
                            ByVal elements As ElementSet) As Result _
                        Implements IExternalCommand.Execute
         ' Main Settings
         Dim m_Settings As New clsSettings(commandData, m_AppVer)
         If m_Settings.Document.IsWorkshared = False Then
            ' Our function requires that worksharing be enabled
            message = "Worksharing must be enabled for this command"
            Return Result.Failed
         End If
         ' Start a model transaction
         Dim m_Transaction As New Transaction(m_Settings.Document, _
"MARA2012 Workset Views")
         m_Transaction.Start()
         Try
             ' An inline dialog constructor
             Using m_Dlg As New form_Main(m_Settings)
                 ' Show the dialog to the user
                 m_Dlg.ShowDialog()
                 m_Transaction.Commit()
                 Return Result.Succeeded
             End Using
         Catch ex As Exception
               ' If this line ever runs, we've run into an error
               m_Transaction.RollBack()
               message = "Error Message: Something went horribly awry"
               Return Result.Failed
         End Try
     End Function
 End Class
The Application Class
The application sample only adds a button to the Add-Ins tab of the Revit ribbon so you can access our sample command that you learned about in the previous section.
Add a new class to the project by selecting Project ![]() Add Class from the main menu, name this class Application, and click OK. Open the Application class and add the following namespace imports to the top, above the main class declaration:
Add Class from the main menu, name this class Application, and click OK. Open the Application class and add the following namespace imports to the top, above the main class declaration:
Imports System.Windows.Media.Imaging
Imports System.Reflection
Imports Autodesk.Revit.DB
Imports Autodesk.Revit.UI
Imports Autodesk.Revit.Attributes
The next step in setting up the Application class is to implement the IExternalApplication interface. Open the Application class and enter the following line beneath the class declaration:
Implements IExternalApplication
Pressing the Enter key at the end of the line autogenerates two functions for you: OnShutdown and OnStartup. These two functions are targeted at the Revit session shutdown and startup events, respectively. Your Application class should now look something like the one shown in Listing 25.14.
LISTING 25.14 The IExternalApplication interface
Imports Autodesk.Revit.UI
Imports Autodesk.Revit.DB
Imports Autodesk.Revit.Attributes

<Transaction(TransactionMode.Manual)> _
Public Class Application

    Implements IExternalApplication


    Public Function OnShutdown(ByVal app As UIControlledApplication) _
        As Result Implements IExternalApplication.OnShutdown

    End Function

    Public Function OnStartup(ByVal app As UIControlledApplication) _
        As Result Implements IExternalApplication.OnStartup

    End Function
End Class
As you can see in Listing 25.14, you are not calling any functionality in either OnStartup or OnShutdown. The OnStartup function simply calls a helper function named AddRibbonPanel that will perform the action of adding the command button to the ribbon, as shown in Listing 25.15.
LISTING 25.15 The completed OnStartup function
''' <summary>
''' Revit Startup Event
''' </summary>
''' <param name="app"></param>
''' <returns></returns>
''' <remarks></remarks>
Public Function OnStartup(ByVal app As UIControlledApplication) _
    As Result Implements IExternalApplication.OnStartup
    Try
        ' Add the Ribbon Panel!!
        AddRibbonPanel(app)
        Return Result.Succeeded
    Catch ex As Exception
        Return Result.Failed
    End Try
End Function
The completed OnShutdown code is quite simple in that it only returns a result of success, as shown here in Listing 25.16.
LISTING 25.16 The completed OnShutdown function
''' <summary>
''' Revit Shutdown Event
''' </summary>
''' <param name="app"></param>
''' <returns></returns>
''' <remarks></remarks>
Public Function OnShutdown(ByVal app As UIControlledApplication) _
    As Result Implements IExternalApplication.OnShutdown
    Return Result.Succeeded
End Function
The Helper Subroutine
Our sample application uses only one helper function named AddRibbonPanel (Listing 25.17). This function adds a button to the Add-Ins tab of the Revit ribbon interface.
LISTING 25.17 The completed AddRibbonPanel helper function
''' <summary>
''' Add the Ribbon Item and Panel
''' </summary>
''' <param name="a"></param>
''' <remarks></remarks>
Public Sub AddRibbonPanel(ByVal app As UIControlledApplication)
    Dim m_Path As String = Assembly.GetExecutingAssembly.Location
                        .Substring( _
        0, (Assembly.GetExecutingAssembly.Location.LastIndexOf("") _
                        + 1))
    Dim m_RnPanel As RibbonPanel = app.CreateRibbonPanel("MARA2012")
    Dim m_Button As New PushButtonData("Samples", _
                           "Workset" & vbCr & "Views", _
                           m_Path & "MARA2012.Application.dll", _
                                       "MARA2012.Application.Command")
    ' Use Images for the Button!
    m_Button.Image = New BitmapImage(New Uri(m_Path & "MARA2012_16.png"
                        ))
    m_Button.LargeImage = New BitmapImage(New Uri(m_Path & _
                        "MARA2012_32.png"))
    ' Why not add a tooltip too...?
    m_Button.ToolTip = "Check out my cool button!, it does stuff!"
    ' Add the button to our Ribbon Panel
    Dim m_BtnAdd As PushButton = m_RnPanel.AddItem(m_Button)
End Sub
Setting Up the .addin Manifest Installation
Our sample application and command is all ready to go. It is now time to set up the .addin manifest file so you can run and debug the sample utility. Start by right-clicking on the main project name in the Solution Explorer and selecting Project ![]() Add New Item from the main menu, name this item MARA2012.addin, and click OK.
Add New Item from the main menu, name this item MARA2012.addin, and click OK.

You will use this single manifest file to load the sample command as well as our sample application. Fill in the manifest file with the code shown in Listing 25.18.
LISTING 25.18 The completed MARA2012.addin installation file
<?xml version="1.0" encoding="utf-8" standalone="no"?>
<RevitAddIns>
   <AddIn Type="Command">
      <Assembly>MARA2012.Application.dll</Assembly>
      <AddInId>93749a2c-aa68-4331-a3a9-0e334d2a2653</AddInId>
      <FullClassName>MARA2012.Application.Command</FullClassName>
      <Text>MARA2012 - Workset Views Sample</Text>
      <VisibilityMode>NotVisibleInFamily</VisibilityMode>
      <LongDescription>Workset Views</LongDescription>
      <VendorId>MARA2012</VendorId>
      <VendorDescription>Mastering Revit Architecture 2012
Code Sample</VendorDescription>
   </AddIn>
   <AddIn Type="Application">
      <Assembly>MARA2012.Application.dll</Assembly>
      <ClientId>356CDA5A-E6A5-412f-A9EF-B3233116B8C3</ClientId>
      <FullClassName>MARA2012.Application.Application</FullClassName>
      <Name>MARA2012 Sample</Name>
      <VendorId>MARA2012</VendorId>
      <VendorDescription>Mastering Revit Architecture 2012
Code Sample</VendorDescription>
   </AddIn>
</RevitAddIns>
Automating the Installation of the Add-in
It is possible to have this .addin manifest file copied automatically for you from your development project directory into the required installation directory for Revit Architecture 2012, and here's how to do it.
Open the project's Properties palette and click the Compile tab. Click the Build Events button in the lower right and enter the following lines:
copy "$(ProjectDir)MARA2012.addin"
"$(AppData)AutodeskREVITAddins2012MARA2012.addin"
Figure 25.10 shows the dialog box where custom build events are accessed and modified.
FIGURE 25.10 The Build Events dialog box, where you can build an event to copy the manifest file

Running the Sample from the Debugger
You're almost ready to run the sample project. The only thing left to do is set up the debug configurations that will launch the Revit.exe file and open your sample model document.
Open the project's Properties palette and select the Debug tab. Select the Start External Program radio button and enter the full path to your Revit.exe file (commonly C:Program FilesAutodeskRevit Architecture 2012ProgramRevit.exe). You can optionally enter a full path enclosed in quotes to a sample model to open when you start the debugger. Figure 25.11 shows these settings in better detail.
FIGURE 25.11 Enter the full path to your Revit.exe file.

That's all you need to do to configure your debug environment, so press the F5 key to start the debugger. After Revit starts up, navigate over to the Add-Ins tab of the ribbon and you should now have a button that looks like the one in Figure 25.12.
FIGURE 25.12 The sample button

The utility scans the entire user-created workset collection and displays the worksets inside our dialog box as view names. Click the Create/Update 3D Workset Views button to generate the views. You should now have new views added to your model, similar to the views shown in Figure 25.13.
