
Despite your best efforts, points will often be placed in the wrong location or need additional editing after their initial creation. It’s common for property-corner points to be rotated to match a different assumed benchmark or for points used in a grading design to need their elevations adjusted.
Physical Point Edits
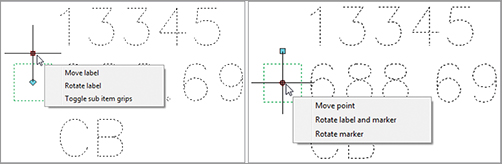
Points can be moved, copied, rotated, deleted, and more using standard AutoCAD commands and grip edits. Rotate a point with the special Point-Rotation grip, as shown in Figure 3-17.
Figure 3-17: The new top grip allows label modifications (left); the center grip allows marker modifications (right).
Panorama and Prospector Point Edits

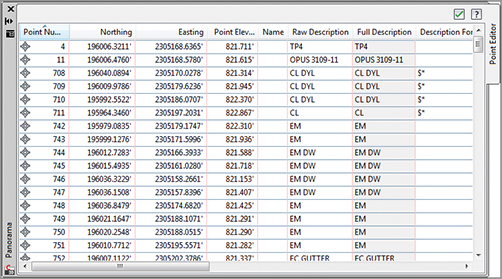
You can access many point properties through the Point Editor in Panorama. Choose a point (or points), and then select Edit/List Points from the contextual Ribbon. Panorama brings up information for the selected point(s) (see Figure 3-18).
Figure 3-18: Edit points in Panorama
You can access a similar interface in the Prospector tab of Toolspace by highlighting the Points collection (see Figure 3-19).
Figure 3-19: Prospector lets you view your entire Points collection at once.

Zoom To Point
Right-click on a point number as shown in Figure 3-19 and notice the Zoom To option. This is especially handy for quickly finding important points as denoted by field crews.
Point Groups: Don’t Skip This Section!
Working with point groups is one of the most powerful techniques you will learn from this chapter. Want to turn all your points off without touching layers? Make a point group! Want to move last week’s survey up by the blown instrument height difference? Make a point group! Want to show all your Topo shots as a dot rather than an X? Want to prevent invert shots from throwing off your surface model? Point group! Point group!
A point group is a collection of points that has been filtered for a certain criterion. You can use any property of the points, such as description, elevation, and point number, or you can select points in the drawing.
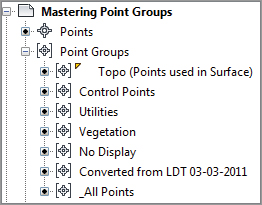
Civil 3D creates the _All Points group for you, which contains every point in the drawing. It cannot be renamed, deleted, or have its properties modified to exclude any points. Create point groups for a collection of points you might wish to separate from others, as shown in Figure 3-20.
Figure 3-20: An example of useful point groups in Prospector
Point groups can (and should!) be created upon import of a text file, as shown back in Figure 3-6. That way, if a problem comes to light about that group of points (such as incorrect instrument height) they can be isolated and dealt with apart from other points. Create a new point group by right-clicking on the main point group category and pick New.
In this exercise, you’ll learn how to use point groups to separate points into usable categories:
1. Open the drawing Mastering Point Groups.dwg, which you can download from this book’s webpage.
2. In Prospector, right-click Point Groups and select New.
3. On the Information tab, name the point group Vegetation.
4. Set Point Style to Tree.
5. Set Point Label Style to Description Only.
6. Switch to the Include tab and place a check mark next to With Raw Descriptions Matching.
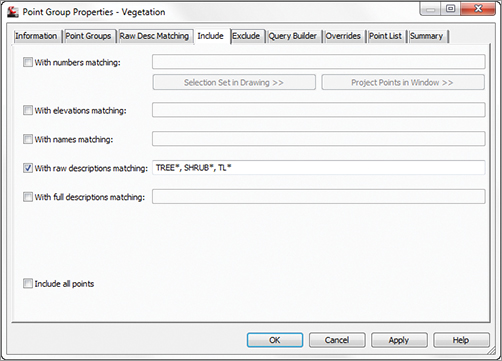
7. In the Raw Descriptions Matching field, type TREE*, SHRUB*, TL*. The asterisk acts as a wildcard to include points that may have additional information after the description. We are adding multiple descriptions by separating them with a comma, as shown in Figure 3-21.
Figure 3-21: The Include tab of the Vegetation point group
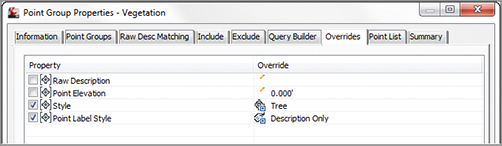
8. Switch to the Overrides tab. Place a check mark next to Style and Point Label Style, as shown in Figure 3-22. Doing so ensures that the point group will control the styles instead of the description keys.
Figure 3-22: Overrides forces the styles to conform by point group rather than description key.
9. Switch to the Point List tab and examine the points that have been picked up by the group. Only points beginning with SHRUB, TREE, and TL should appear in the list. Click OK.
10. Again, right-click on Point Groups and select New.
11. On the Information tab, name the group NO DISPLAY, as shown in Figure 3-23. Set both Point Style and Point Label Style to <none>.
Figure 3-23: Most drawings should contain a NO DISPLAY point group with styles set to <none>.

12. Switch to the Include tab. At the bottom of the dialog box, put a check mark next to Include All Points.
13. Switch to the Overrides tab and place a check mark next to Style and Point Label Style.
14. Click OK. All the points are hidden from view as a result of the point group.
15. Create another point group called Topo. Set Point Style to Basic X (BLACK) and Point Label Style to Elevation And Description.
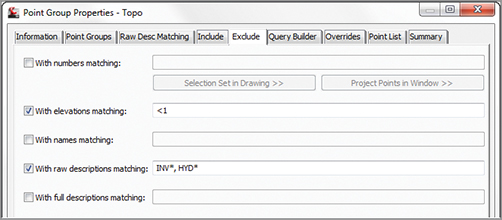
16. Switch to the Exclude tab and place a check mark next to With Elevations Matching. Type <1 in the accompanying field. Place a check mark next to With Raw Descriptions Matching. Type INV*, HYD* in the accompanying field, as shown in Figure 3-24. Click OK.
Figure 3-24: Use Exclude to create a Topo point group.
Best Practice: Control Point Display Using Point Groups Rather than Layers
Civil 3D drawings will have many layers in them. It is much easier to switch the display of the point groups rather than create layer states for each point visibility scenario.
A point can belong to more than one group at once. For instance, a water valve cover with elevation may be in a Topo group, a Utilities group, and the _All Points group. In these cases, the order in which the point group is displayed in Prospector determines which point group a point is “listening to” for its properties.
In this exercise, we will walk you through an example of how point group display order works:
1. Open the drawing Mastering Point Display.dwg, which you can download from this book’s webpage.
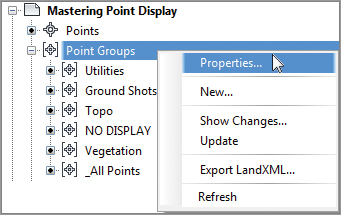
2. In Prospector, right-click Point Groups and select Properties (see Figure 3-25).
Figure 3-25: Select Point Groups Properties to change point group display precedence.
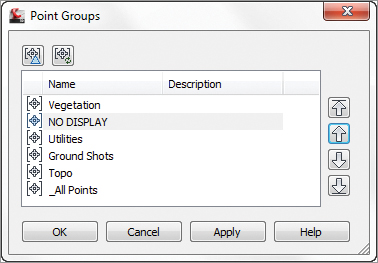
3. Using the arrows on the far right of the Point Groups listing, move Vegetation to the top of the list. Move NO DISPLAY so that it is listed directly below Vegetation, as shown in Figure 3-26.
Figure 3-26: The order in which the point groups appear in this list controls precedence.
4. Click OK. Notice that only the Vegetation group is visible.
5. Experiment with changing the order of the point groups using the properties.
Changing Point Elevations
Points placed on or along an object that has elevation will automatically inherit the object’s elevation. Points placed with tools in the Surface flyout will automatically inherit the elevation of a surface model. If you have chosen to place points with manual elevation entry and press ↵ when prompted to specify an elevation, the elevation will be null (no elevation).
You are never stuck with a COGO point’s elevation. They can be changed individually or as a group using the Panorama window. Additional tools are available for manipulating points (see Figure 3-27), in the contextual panel that opens when you select a point object.
Figure 3-27: Point-editing commands in the Ribbon
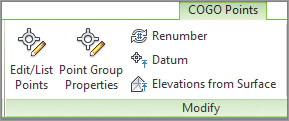
Elevations From Surface is an extremely handy tool for forcing points to a surface elevation (see Figure 3-28).
Figure 3-28: Shrub points as placed (a); shrub points moved up surface elevation (b)

When you change the datum, you are most likely going to move a group of points’ elevations. Right-click on the name of the point group in Prospector and select Edit Points. Panorama will appear for your point-editing delight.
Use Windows keyboard tricks to control which points are selected for modification. Ctrl+A will select all points in the Panorama listing, as shown in Figure 3-29. When you are done selecting points, right-click to choose Datum. The command line will prompt you to specify the change in elevation you require.
Figure 3-29: Right-click to access point modification tools from Panorama.
