
A parcel area label is placed at the parcel centroid by default, and it refers to the parcel in its entirety. When asked to pick a parcel, you pick the area label. An area label doesn’t necessarily have to include the actual area of the parcel.
Area labels can be customized to suit your fancy. Figure 5-54 shows a variety of customized area labels.
Figure 5-54: Sample area labels
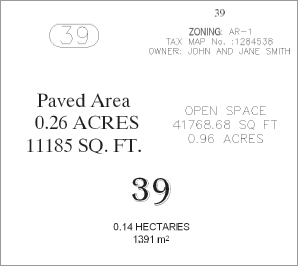
Area labels often include the parcel name or number. You can rename or renumber parcels using Renumber/Rename from the Modify panel after selecting a parcel.
The following exercise will teach you how to renumber a series of parcels:
1. Open ChangeAreaLabel.dwg. Note that this drawing contains many subdivision lot parcels.
2. Select Lot 25 and select Renumber/Rename from the Modify panel. The Renumber/Rename Parcels dialog appears.
3. In the Renumber/Rename Parcels dialog, make sure Subdivision Lots is selected from the drop-down menu in the Site selection box. Change the value of the Starting Number selection box to 1. Click OK.
4. At the Specify start point or [Polylines/Site]: prompt, pick a point on the screen anywhere inside the Lot 25 parcel, which will become your new Lot 1 parcel at the end of the command.
5. At the End point or [Undo]: prompt, pick a point on the screen anywhere inside the Lot 20 parcel, almost as if you were drawing a line; then, pick a point anywhere inside Lot 20 (be sure not to cross other parcel lines); and finally, pick a point inside Lot 23. Press ↵ to stop choosing parcels. Press ↵ again to end the command.
Note that your parcels have been renumbered from 1 through 15. Repeat the exercise with other parcels in the drawing for additional practice if desired.
The next exercise will lead you through one method of changing an area label using the Edit Parcel Properties dialog:
1. Continue working in the ChangeAreaLabel.dwg file.
2. Select parcel Lot 1 and select Multiple Parcel Properties from the Modify panel. At the Specify start point or [Polylines/All/Site]: prompt, pick a point on the screen anywhere inside the Single-Family: 1 parcel.
3. At the End point or [Undo]: prompt, pick a point on the screen anywhere inside Lot 2, almost as if you were drawing a line. Press ↵ to stop choosing parcels. Press ↵ again to open the Edit Parcel Properties dialog (see Figure 5-55).
Figure 5-55: The Edit Parcel Properties dialog

4. In the Area Selection Label Styles portion of the Edit Parcel Properties dialog, use the drop-down menu to choose the Parcel Number area label style.
5. Click the Apply To All Parcels button.
6. Click Yes in the dialog displaying the question “Apply the area selection label style to the 2 selected parcels?”
7. Click OK to exit the Edit Parcel Properties dialog.
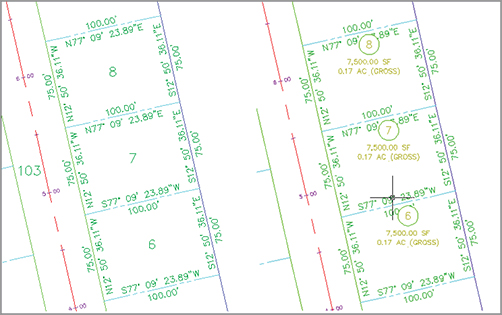
The two parcels now have parcel area labels that call out numbers only. Note that you could also use this interface to add a second area label to certain parcels if required.
This final exercise will show you how to use Prospector to change a group of parcel area labels at the same time:
1. Continue working in the ChangeAreaLabel.dwg file.
2. In Prospector, expand the Sites Subdivision Lots Parcels collection.
3. In the Preview pane, click the Name column to sort the Parcels collection by name.
4. Hold down the Shift key, and click each Single-Family parcel to select them all. Release the Shift key, and your parcels should remain selected.
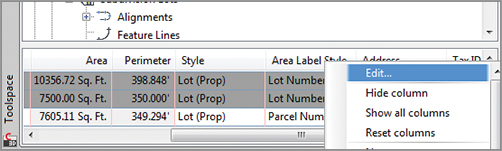
5. Slide over to the Area Label Style column. Right-click the column header and select Edit (see Figure 5-56).
Figure 5-56: Right-click the Area Label Style column header and select Edit.
6. In the Select Label Style dialog, select Parcel Number from the drop-down menu in the Label Style selection box. Click OK to dismiss the dialog.
7. The drawing will process for a moment. Once the processing is finished, minimize Prospector and inspect your parcels. All the Single-Family parcels should now have the Parcel Number area label style.
What If the Area Label Needs to Be Split onto Two Layers?
You may have a few different types of plans that show parcels. Because it would be awkward to have to change the parcel area label style before you plot each sheet, it would be best to find a way make a second label on a second layer so that you can freeze the area component in sheets or viewports when it isn’t needed. Here’s an example where the square footage has been placed on a different layer so it can be frozen in certain viewports:
You can accomplish this by creating a second parcel area label that calls out the area only:
1. Change to the Annotate tab. From the Labels & Tables panel, select Add Labels Parcel Add Parcel Labels.
2. Select Area from the drop-down menu in the Label Type selection box, and then select an area style label that will be the second area label.
3. Click Add, and then pick your parcel on screen.
You’ll find a second parcel area label to be a little more automatic when you place it (it already knows what parcel to reference).
You can also use the Edit Parcel Properties dialog, as shown in the “Editing Parcels by Deleting Parcel Segments” section earlier in the chapter, to add a second label.