
Applying Superelevation to the Design
In releases of Civil 3D prior to 2011, superelevation parameters were tucked in with alignment properties. Today, superelevation is primarily tied to alignment curves, but Civil 3D also takes into account other factors such as curve station locations and assembly geometry.
Start with the Alignment
To begin applying superelevation to the design, select your alignment.
1. Open the Highway 10 Super.dwg file, which you can download from this book’s web page.
2. Select the Highway 10 alignment that already exists in the drawing. From the context tab, select Superelevation ⇒ Calculate/Edit Superelevation.
3. When prompted by the dialog box, click Calculate Superelevation Now.
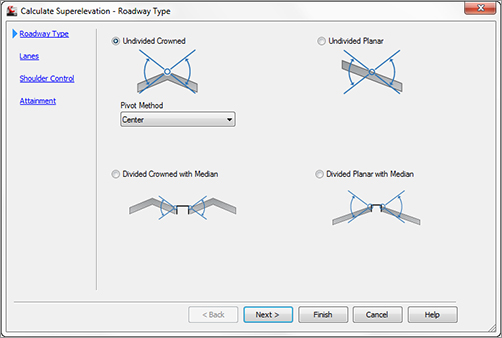
4. On the Calculate Superelevation - Roadway Type screen, select the Undivided Crowned radio button. From the Pivot Method drop-down, choose Center, as shown in Figure 11-13. Click Next.
Figure 11-13: Roadway type specification for superelevation
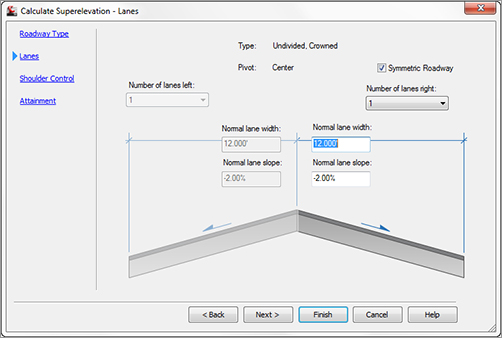
5. On the Lanes screen, verify that the Symmetric Road check box is selected. Set Normal Lane Width to 12′. Set Normal Lane Slope to -2.00%, as shown in Figure 11-14, and click Next.
Figure 11-14: Lane information
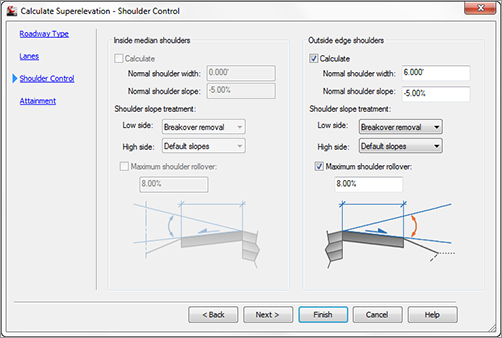
6. On the Shoulder Control screen, make sure that Calculate is selected. Set Normal Shoulder Width to 6′. Set Normal Shoulder Slope to -5.00%.
7. For Shoulder Slope Treatment, set the Low Side option to Breakover Removal. Set the High Side option to Default Slopes. Set the maximum rollover to 8.00%. Your Shoulder Control screen should look like Figure 11-15. Click Next.
Figure 11-15: Shoulder Control and Breakover Removal parameters
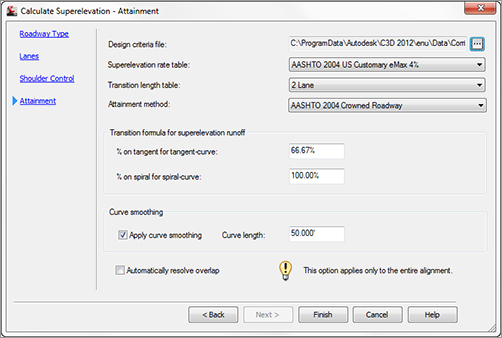
8. On the Attainment screen, verify that the design criteria file is set to AASHTO 2004 Standard. Set the superelevation rate table to AASTO 2004 US Customary eMax 4%.
9. Set the transition length table to 2 Lane. Set the Attainment method to AASHTO 2004 Crowned Roadway. Leave all other settings at their defaults, as shown in Figure 11-16. Click Finish.
Figure 11-16: Finalizing the superelevation on the Attainment screen
10. You should now see the superelevation table appear with the data resulting from the wizard. Examine your alignment, as you should now have labels showing the superelevation critical stations created by the wizard.
As you click in the table, you will see helpful glyphs showing you which superelevation station and corresponding curve you are editing, as shown in Figure 11-17.
Figure 11-17: Superelevation table with glyphs in the graphic

Transition Station Overlap
It is not uncommon to have overlap warnings in your superelevation table. You should resolve the transition station overlap before you continue your design.
Overlap occurs when there is not enough room between curves to fully transition out of one curve and back into the next. Transition station overlap will always occur when a reverse curve or compound curve exists in your alignment. As you can see in Figure 11-18, Curve 1 does not complete its transition out until station 16+82.56, but according to the attainment calculations, Curve 2 will begin affecting the shoulder starting at station 15+35.24.
Figure 11-18: Superelevation table showing overlap between two curves

You have several options for fixing superelevation overlap. You can choose to have Civil 3D rectify the overlap for you, or you can manually modify the stations in the table. You can also change the stationing for superelevation by modifying the superelevation view, which we will discuss later in this chapter.
To have Civil 3D clear the overlap for you, click the warning symbol that appears in the Superelevation Tabular Editor. Civil 3D resolves overlap by omitting noncritical stations and/or by compressing the transition length between certain stations. In the case of a reverse curve, Civil 3D will pivot the road from full-super to full-super, without transitioning back to normal crown. Be sure to verify that the software has made the update that meets the requirements of your locale.
Preserving Your Delicate Manual Edits
You may spend hours getting your superelevation stations to work out correctly. However, it just takes one wrong button click to blow away all your time-consuming edits to the tabular input. To save you from yourself (or the click-happy intern), back up your superelevation tables by exporting them to a file. You’ll find the Export Superelevation Data button at the top of the tabular input.

When you need to reimport the superelevation data, clear any data and click Import From File.