
Using the Free Form Create Tool
A site plan is more than just single-family lots. Areas are usually dedicated for open space, stormwater-management facilities, parks, and public utility lots. The Free Form Create tool can be useful when you’re creating these types of parcels. This tool, like the precise sizing tools, creates an attached parcel segment with the special diamond-shaped grips.
The lot numbers were designed by the authors for the exercises. Your lot numbers may vary from those shown in the exercises.
In the following exercise, you’ll use the Free Form Create tool to create a new parcel:
1. Open the CreateFreeForm.dwg file. Note that this drawing contains a series of subdivision lots.
2. Pan over to Lot 17. You can see the lot line that was drawn automatically in the previous exercise that obviously will not work (Figure 5-30).
Figure 5-30: Delete the highlighted parcel line.
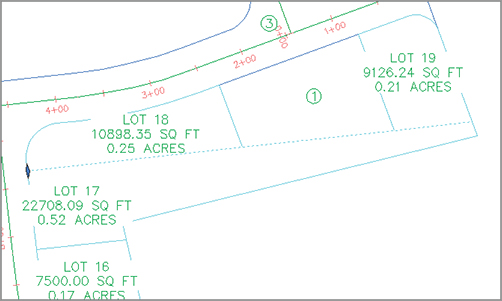
3. Delete the parcel line highlighted in Figure 5-30. The parcels readjust but Lot 20 is now much larger than needed. Let’s add a line using the Free Form Create tool.
4. Select Parcel Parcel Creation Tools on the Create Design panel. Select the Free Form Create tool. The Create Parcels – Layout dialog appears.
5. Select Subdivision Lots, Lot (Prop), and Name Square Foot & Acres from the drop-down menus in the Site, Parcel Style, and Area Label Style selection boxes, respectively. Keep the default values for the remaining options. Click OK to dismiss the dialog.
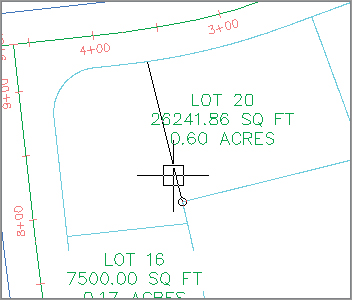
6. Slide the Free Form Create attachment point around the Lot: 20 area. At the Select attachment point: prompt, use your Endpoint osnap to pick the endpoint, as shown in Figure 5-31.
Figure 5-31: Use the Free Form Create tool to select an attachment point.
7. At the Specify lot line direction: prompt, press ↵ to specify a perpendicular lot line direction.
8. A new parcel segment is created from your Open Space Limit point, perpendicular to the ROW parcel segment, as shown in Figure 5-32.
Figure 5-32: Attach the parcel segment to the marker point provided.
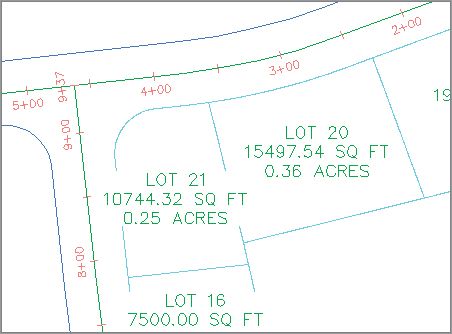
9. Note that a new lot parcel has formed.
10. Press ↵ to exit the Free Form Create command. Enter X, and then press ↵ to exit the toolbar.
11. Pick the new parcel segment so that you see its diamond-shaped grip. Grab the grip, and slide the segment along the ROW parcel segment (see Figure 5-33).
Figure 5-33: Sliding an attached parcel segment

12. Notice that when you place the parcel segment at a new location the segment endpoint snaps back to the rear parcel segment. This is typical behavior for an attached parcel segment.