
Managing Workflow with Worksets
Once worksharing is enabled, there is always a single central file that is used to manage element permissions and create local files. This is the file that will collect all the work done by your team members and allow the team to see regular updates of changes being made to the model or documents. After initializing worksharing, there are a few more steps to complete before all the team members can begin working in a multiuser environment.
THE GOOD THINGS ABOUT LOCAL FILES
Using Revit in a worksharing environment requires you to do something your IT department typically asks you not to do: work directly off your C: drive. Although working off a network file is typically a good idea, in Revit there are several reasons why a local copy offers additional benefits:
- It allows more than one user to make changes to the central file by editing local files and synchronizing those changes with the central file.
- Your local copy will be more responsive than a networked local file because your access speed to your hard drive is much faster than it is across most networks.
- If anything bad happens to your network or your central file, such as file corruption, each local file is basically a backup that can be used to create a new local file by performing a Save As operation.
Creating a Central File
Before starting worksharing, put a copy of your Revit file in a central location that future files can access (like on a network server). It's also a good idea to name the file with some clarity that helps identify it as a central file, such as ***-Central.rvt. This will help people identify the central files when creating local copies. After you've renamed the file, open it from this network location and initiate worksharing.
Now that you've activated worksharing, you'll establish this file as the central file. To do this with the default settings, save the central file on your network; then create the local files that the team will be using. Select Save from the Application menu. You'll be presented with a warning telling you that you're about to create the central file, as shown in Figure 6.7. Select Yes to save the file in this location.

If you want to modify the default settings when saving the central file, select Save As. You can click the Options button in the Save As dialog box to access the options shown in Figure 6.8.
FIGURE 6.8 File Save Options dialog box
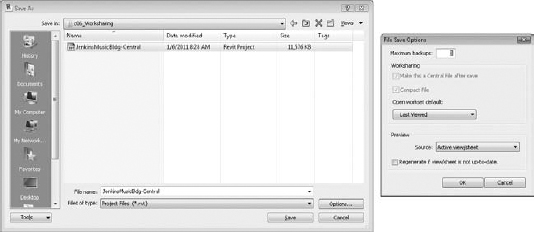
This dialog box contains some important settings. At the top, you can set the number of backups the file will keep in the folder history after saves. The default value is 20. Depending on the storage availability on your network, how often your network is backed up, and the number of people working in the model (remember, local files are also backups), you might want to reduce this number. Because of our space limitations, we've reduced this number to three.
Also note here that the Make This A Central File After Save check box is selected and grayed out. This is because we've activated worksharing in this file and Revit assumes that we will be making a central file on the next save. Click OK to exit the dialog box.
Back in the Save As dialog box, choose a network location for your central file that everyone on the team has access to. Be sure that when you are naming your new central file, you choose a new name. Do not save over the existing Revit file. There are two reasons for this. First, it automatically gives you a backup of your pre-workshared file in case you need to revert to a non-multiuser file for some reason. Second, saving over an open Revit file can sometimes cause corruption, even if it is the same model.
Once you've entered a new name for the file, click OK to save the file. Now that your file is saved to the network, close all the open windows. Make sure that you never work directly within the central file. Doing so will change the file attributes on the server and prohibit anyone with a local file from being able to synchronize with the central file. The possibility of losing a lot of work and effort from team members exists, so it is safer to err on the side of simply never opening the file.
As one final step, make sure that as the person who has created the central file, you don't accidentally retain any rights over the objects and elements within the central file, thereby prohibiting anyone from editing those elements.
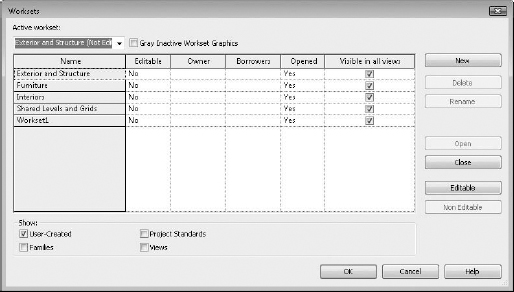
To do this, select the Collaborate tab and click the Worksharing button again to open the Worksets dialog box. In the Editable column, change all the Yes entries to No, as shown in Figure 6.9. This will ensure that you have relinquished all the permissions over elements before creating any local files. Now close the central file.
FIGURE 6.9 Relinquishing permissions
Creating the Local File
Now that you've made a central file, you'll need to create a local file to work from. To do this, simply open the network location of the central file and drag a copy from the network to your desktop or anywhere on your C: drive. Be careful not to move the file—only copy it. It's also a good idea to rename the file to something that identifies it as a local file, such as ***-Local.rvt.
Now, open the new local file. The first time any local file is opened, you'll see a warning message alerting you that you are opening a local file (Figure 6.10). All this means is that you've made a local file and you'll be the owner of the local file. Click Close to dismiss the warning and continue the file-opening process.
FIGURE 6.10 Opening a local file for the first time

Each local file is owned by the local machine and username, and once it's opened, Revit will pair the local machine and username with that local file. By default, Revit assigns a username to the local file that matches the login name on the active workstation. So, a typical Windows login might be first initial and the last name, such as ekrygiel. That user would then become the owner of the local file. In this case, the local login is Administrator, which you can see in the Owner column of Worksets dialog box (Figure 6.11).
FIGURE 6.11 Workset and element ownership

It can be a good idea to adjust this naming convention to help team communication and identification of who owns what on a project. In a smaller office, it might not be as necessary, but in a larger office or if you're working across multiple offices, clarification of ownership is vital. A good workflow is to change this name to a first name, last name, and phone extension. This way, team members can quickly identify and contact you if they need you to relinquish permission over a given element. To make this modification, follow these steps:
- First of all, close all your open projects. You can only change the default username when no workshared projects are open (you can't change your username while it's active in open projects). After you change your workset username, you'll need to create new local files, since the old local file is associated with a different workset username.
- Navigate to the Application menu, and choose Options at the bottom.
- In the Options dialog box, select the General tab.
- In the Username field, enter a new value (Figure 6.12). Click OK to exit.
FIGURE 6.12 Changing the default username

Once in a worksharing environment, every element in the file and added to the file belongs to a workset. To make sure that you are placing elements in the proper workset while working, there are a couple places to ensure the right workset is selected.
One such location is on the Collaborate tab, where we originated worksharing to begin with. In Figure 6.13, our active workset is Exterior And Structure. Note that this also tells us that the Exterior And Structure workset is not editable. What this means is that as a user, we have not taken ownership of this workset. However, as we mentioned earlier, you don't need to own a workset to add elements to the workset. It just needs to be active in this window.
FIGURE 6.13 Changing the active workset
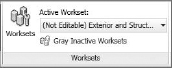
The second location is in the status bar at the bottom of the application (Figure 6.14). This drop-down menu serves the same function as the Collaborate tab, but it allows you to visually verify the proper workset is active without having to bounce between tabs and interrupt your workflow. From this location you can also change the active workset and even open the Worksets dialog box using the small button to the left of the drop-down menu.
FIGURE 6.14 Changing the active workset from the status bar
![]()
A helpful tool located on the Collaborate tab is the Gray Inactive Worksets button. This disables all the elements that aren't active, helping you identify what elements are in your current, active workset. This is a temporary view state and will not affect any printing or other output.
Once in a workset environment, you can see or change an object's workset by accessing its element properties. At the bottom of the Element Properties dialog box, you can view which workset an object or group of objects belongs to, and you can modify that workset. Note that you can move elements to other worksets only if you own the elements. You do not need to own the entire workset to do this—just the individual elements.
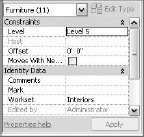
Additionally, you can always tell what workset an object belongs to by hovering your mouse pointer over the object and viewing its workset in the status bar. This location will also display an object's family and category. In the example shown here, the chair is in the Interiors workset, in the Furniture category, and its type is an Armless Chair.

Saving Work
Once you begin working in a worksharing environment, it will eventually become necessary to save your work and share your progress with others in the model. There are three ways for you to both save work and view others' efforts:
Save The Save button saves the work you've done to your local copy only; the work isn't shared or published back to the central file. This can be a useful step if you're in the middle of a process, want to make sure your work is saved, but aren't ready to share the changes with the rest of the team. You can find the Save tool either by choosing Application ![]() Save or by clicking the save icon on the Quick Access toolbar (QAT).
Save or by clicking the save icon on the Quick Access toolbar (QAT).

Synchronize With Central You can use the Synchronize With Central (SWC) command when you are ready to publish your work to the central file for the rest of your team to see. Using SWC also acquires all the changes that other team members have made and loads those into your local file. You can access this command in a couple of ways. The first is on the Collaborate tab in the Synchronize panel, as shown in Figure 6.15. The Synchronize With Central button is located on the left of this panel.
FIGURE 6.15 Synchronize With Central command on the ribbon

Alternatively, you can use the Synchronize With Central button located on the QAT. Both buttons perform the same action and will open the Synchronize With Central dialog box (Figure 6.16). This dialog box gives you some additional tools to assist your workflow:
- The Compact Central File check box allows you to compact the model to save on disk space. It will take some additional save time, but it can temporarily decrease your file size significantly. This should not be seen as a permanent solution to managing a large file, however. Compaction will decrease the file size, but use of the file will expand the compacted elements. Reducing file size is discussed in Chapter 5.
- There are five additional check boxes that will be available (depending on what work you've done to the file) to allow you to relinquish or keep permission over the elements you've previously edited. Unchecking these boxes means that you will retain ownership over all the elements you currently own with the model. This can be useful if you are planning to continue working on the same elements and only want to publish recent changes of the model.
- A final check box, Save Local File Before And After Synchronizing With Central, allows you to save your changes locally, get any new changes from the central file, and then save locally again, ensuring your local copy is up-to-date. This is the longest of the save options, and you might choose to uncheck this periodically if you're pressed for time or have a large file that typically takes longer to save.
FIGURE 6.16 Synchronize With Central dialog box

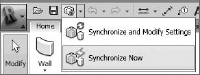
Synchronize With Central ![]() Synchronize Now By selecting the flyout from the Synchronize With Central button on the QAT, you'll see another save option, shown in Figure 6.17. Choosing this option allows you to bypass the Synchronize With Central dialog box and simply sync your file immediately. Keep in mind that when choosing this option, you'll be saving your changes to the central file and relinquishing all your permissions over any elements you happen to own.
Synchronize Now By selecting the flyout from the Synchronize With Central button on the QAT, you'll see another save option, shown in Figure 6.17. Choosing this option allows you to bypass the Synchronize With Central dialog box and simply sync your file immediately. Keep in mind that when choosing this option, you'll be saving your changes to the central file and relinquishing all your permissions over any elements you happen to own.
FIGURE 6.17 Using the Synchronize Now option
Saving at Intervals
Revit will remind you to save your work at regular intervals. Once worksharing is enabled, you will receive an additional reminder to synchronize with the central file as well as to save your work (Figure 6.18). You can dismiss these dialog boxes by clicking Cancel at the lower right, but remember, it's a good idea to save regularly so you don't lose any work.
FIGURE 6.18 Changes Not Saved dialog box

When the Save To Central dialog box appears, you'll have three options to choose from:
- Synchronize With Central, which will save identically to the Synchronize Now command
- Synchronize With Central And Set Reminder Intervals, which will synchronize your file, then pull up the Options dialog box, allowing you to set the intervals in which you receive this message
- Do Not Synchronize And Set Reminder Intervals, which will cancel all future reminders for the remainder of your Revit session
You can modify the reminder time shown in the dialog box at any time by clicking the Application menu and selecting Options and then choosing the General tab.
Loading Work from Other Team Members
It is possible to update your model and review or load work from other team members without publishing your own work back to the central file. This process, called Reload Latest, basically updates your model and refreshes the content so you can continue working with current information. Since you are downloading content from the central file, this process takes only a portion of the time a full SWC does. To do this, click the Collaborate tab on the ribbon, and choose Reload Latest from the Synchronize panel (Figure 6.19).
FIGURE 6.19 Using Reload Latest

Moving Elements between Worksets
Once your worksets have been established, you'll need to separate your existing model elements between those worksets. The easiest way to move elements between user-defined worksets is by subtracting them from a 3D view. The following exercise will walk you through moving elements from Workset1 to the worksets we have established using a subtractive method to locate and move the model geometry. Note this should be done by a single person who owns all the elements. Doing so will ensure there are no permissions issues when elements are being moved between worksets.
- Open the default 3D view, {3D}, so you can see the entire model. By selecting a 3D view, you can't accidentally select view-specific elements (like elevation or sections) or datum—you'll only be selecting elements that can be assigned to user-defined worksets. Now open the Visibility/Graphic Overrides dialog box and choose the Worksets tab. Choose to hide all the worksets except for Workset1, and click OK. This will turn off any elements that are visible on those worksets and allow you to “subtract” elements from this view as you move them to the nonvisible worksets.
- Now, depending on your model size, you have a few options:
- For a smaller model, in your 3D view, select a comfortable number of elements and click the Element Properties button (if it is not active in your Project Browser). What constitutes a “comfortable” number of elements depends on your computer capabilities. Then use the Filter tool located to the far right of the contextual Modify
 Multiselect tab to filter out all the elements that are in opposing worksets. As an example, if we select a series of elements in our Jenkins model, we can choose to keep the furniture and casework active and uncheck the remaining items. Click OK. Finally, in the Element Properties dialog box, choose a new workset (Figure 6.20).
FIGURE 6.20 Moving objects between worksets

- For a larger model, it might first be necessary to select some individual components and move them separately. Although the process remains the same (select elements, change the workset using the Element Properties), the selection system can vary. Another example of moving elements by selection would be to highlight an exterior wall and use the Tab key to select a chain of exterior walls. Those exterior walls can be moved to the Exterior And Structure workset.
- For a smaller model, in your 3D view, select a comfortable number of elements and click the Element Properties button (if it is not active in your Project Browser). What constitutes a “comfortable” number of elements depends on your computer capabilities. Then use the Filter tool located to the far right of the contextual Modify
- Using the same technique, you can move the remainder of the site elements to their respective worksets. When the default 3D view is empty, you'll know that all the elements have been reassigned to new worksets.
At any point in this process, you can check your work by opening the Workset tab in the Visibility/Graphic Overrides dialog box and clearing all the boxes but one to see what is in each workset. Figure 6.21 shows the Furniture workset with all its elements.
FIGURE 6.21 The Furniture Workset
MOVING EVERY INSTANCE OF AN ELEMENT
A quick way to move every instance of an element type to a new workset is to use the Select All Instances option from the context menu. For example, select a chair in the model and right-click it. From the context menu, choose Select All Instances ![]() In Entire Project. This selects all the family elements in the entire model, allowing you to quickly move them all to the same workset with the Element Properties dialog box.
In Entire Project. This selects all the family elements in the entire model, allowing you to quickly move them all to the same workset with the Element Properties dialog box.
Another way to select all instances of an element is to right-click the family name in the Project Browser under the Family node. Simply navigate to your family in its proper category.