
Using Worksharing in Your Project
The worksharing feature is designed to accommodate a variety of ways to group elements within your model. There are few restrictions in how you use worksharing. For example, you can use worksharing to divide a model into one workset for the shell and core and another workset for interior partitions. You can turn worksharing on during any stage of the project, create and remove worksets, or move elements between worksets.
WORKSHARING IN THE PROJECT PROCESS
When you choose to enable the worksharing feature, make sure that the team is aware of the change to the file and that it is planned within the project process.
Revit's worksharing feature is designed to accommodate just about any division of labor you see fit. There are few restrictions in how you use worksharing to divide up a model. For example, you can break up a model and have one group work on the shell and another work on the interior core of a building. You can turn worksharing on at any stage of the project, and you can create or remove individual worksets during the project cycle.
You can find the worksharing feature on the Worksets panel of the Collaborate tab, as shown in Figure 6.2.
FIGURE 6.2 The Collaborate tab

You can initiate worksharing by clicking the Worksets button, as shown in Figure 6.3. It will initially be the only active button on the panel.
FIGURE 6.3 The Worksets button

Selecting this button opens the Worksharing dialog box alerting you that you are about to enable worksharing for your project (Figure 6.4). Click OK to confirm you want to enable worksets. Depending on the size of your model and your processor speed, this process can take a few minutes for Revit to complete.
FIGURE 6.4 Activating worksharing

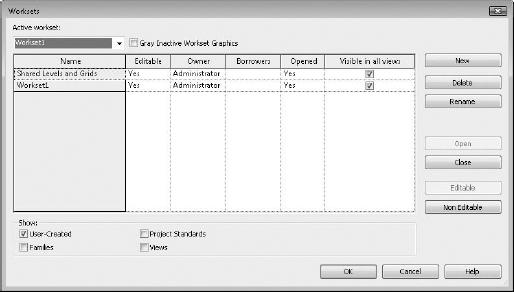
Once that is done, Revit will open the Worksets dialog box and automatically create two worksets within your project: Shared Levels And Grids, which contains only the levels and grids within the model, and Workset1, which contains any project geometry (Figure 6.5). New levels and grids created in the project should be placed on the Shared Levels And Grids workset (as long as the workset is active). These are user-defined worksets.
FIGURE 6.5 The Worksets dialog box
Revit creates a couple of worksets that are not user defined and are automatically managed by Revit. Project standards and views worksets are created and don't need to be managed by users. Anything that is view specific—even text and 2D detail components—is automatically assigned to the views workset. This is terrific, since it would create quite a management burden if the design team had to manage all of these minutiae. For the most part, you only need to manage worksets for building elements (host and system components) and datum (levels and grids).
Types of Worksets
There are four types of worksets in any project: user-created, families, project standards, and views. User-created worksets such as Shared Levels And Grids and Workset1 are shown by default, and you have the option to make the others visible by selecting the check boxes at the bottom of the Worksets dialog box.
User-Created Worksets Besides the Shared Levels And Grids and the Workset1 worksets that Revit created for you, all of the worksets created in the Worksets dialog box will fall under this category. The user-created worksets are the only ones by default that will appear in the Worksets dialog box when it is first opened. Only elements on user-created worksets can be moved between other user-created worksets.
Families Worksets For each family type created or loaded in the project, a workset is automatically created. When editing the properties of a family, you will automatically take ownership over that family. You cannot make changes to a family or family type without first having permission over the family itself.
Project Standards Worksets The project standards workset type is dedicated to all the project settings such as materials, dimension styles, annotations, tags, line styles, and so on. Any time you need to edit a project standard, such as modifying the graphics of a dimension string, you will be taking ownership of the element's workset.
Views Worksets Every view created in a project has its own view workset type. The Views workset type controls ownership of the View Properties and any view-specific elements such as annotations, dimensions, tags, detail lines, and so on. You can take ownership of a particular view workset by selecting it from the workset list and clicking the Editable button. Alternatively, you can also take permission of a view by right-clicking the view in the Project Browser and choosing Make Workset Editable from the context menu. This can be a helpful shortcut in construction documents when much of the effort on the project is more view specific. Regardless of ownership, any team member always has the ability to add elements, components, annotations, or whatever to any view.
The Worksets dialog box lets you add and remove user-created worksets and take and relinquish permissions over existing worksets. By default, when a new workset is created, it does not contain any model elements or components.
MANAGING WORKSET STRUCTURE
Worksets are groupings of elements logical to a three-dimensional, virtual building. One of the biggest challenges facing teams new to Revit is conceptualizing the difference between layers in 2D CAD and worksets in Revit. These teams typically want to try to manage worksets in Revit as they managed layers in 2D CAD, which can result in worksets named Doors, Windows, Walls, and so on. Although this is effective management in a 2D CAD environment, you don't want to create all of this structure for worksets in Revit. Not only is it time consuming, but it also doesn't provide any benefit.
However, much like layers, the workset is a standard that the team will need to understand and follow to use it successfully. Worksets should be structured by a team's BIM manager or project manager familiar with a BIM workflow. Ultimately, though, it is up to the team members to place elements on the proper worksets and ensure project standards are being followed.
Organizing Worksets
When dividing your project into worksets, it's important to think about the holistic building rather than trying to isolate its individual components. A good way to think about dividing up worksets is to consider the building elements and the number of people working on each of these elements. A basic breakdown of a project's elements might include the following:
- Exterior skin
- Core
- Interior partitions (in a larger building, by floor)
- Site
- Furniture, fixtures, and equipment (FF&E)
This breakdown mirrors some of the roles and responsibilities on the project as well. There might be a small group working on exterior skin design and detailing, another group working on interior partitions, and a third working on FF&E. And for larger projects where you have linked files (possibly from other disciplines like mechanical, electrical, and plumbing [MEP] or Structure) it's helpful to associate those linked files with their own worksets.
HOW MANY WORKSETS DO YOU NEED?
A good rule of thumb is that you should have one or two worksets for every person working on the project (besides Shared Levels And Grids). On a small project with two or three people, you might only have three or four worksets. On larger projects, you could have a dozen or so.
Also keep in mind that once you have six to eight people working in a project, Revit's performance slows somewhat, not to mention that you spend a bit more time saving local files since each person actually saves twice (once to save changes to central and another to download everyone else's changes). If your project is large enough to warrant more than six to eight people concurrently in the model, consider dividing the model into multiple files, as we discussed in Chapter 5, “Managing a Revit Project.”
For the Jenkins Building, we have divided the model into five worksets, as shown in Figure 6.6.
Exterior And Structure This workset contains all the exterior skin of the building as well as the elevator, stair, slabs, and columns.
Furniture This workset contains all the furniture, fixtures, casework, and appliances.
Interiors This workset contains all the interior walls, furniture, and other items are managed with this workset.
Shared Levels And Grids This workset contains the level and grid information from the model, as was originally established when worksharing was enabled.
Workset1 Why keep Workset 1? Well, it's a great holding place when users new to Revit need to work on the project but they aren't certain to which workset they should assign the new elements they create. Tell them not to worry! Simply ask them to make Workset1 their active workset. After they've finished their work, they can isolate all the elements they've created and then assign them to the right workset later (maybe with some oversight).
FIGURE 6.6 Workset organization for the Jenkins Building

The worksets we've set up demonstrate how a typical breakdown might occur in a project of this size, but creating, defining, and assigning worksets is by no means limited to this scheme. Depending on how you structure work in your office, the worksets might be quite different.