
Understanding Element Ownership in Worksets
One of the fundamental processes in working in a workshared model is taking ownership of an element. You can do this to directly edit the element, or take ownership to keep other team members from editing an element key to your area of responsibility or your design process.
Determining whether you own an element is fairly easy. Simply select it. It will highlight in blue. If you do not own it, you will see three blocks, as shown in Figure 6.22. To take permission of an unowned element, simply click the stack of blocks. If you already own an element, you won't see any blocks, but the element will still highlight in blue.
FIGURE 6.22 Making an element editable

There are a few other ways you can obtain ownership of an element or group of elements:
- Using the Worksets dialog box, you can obtain permission of any workset and all the elements contained within it.
- Using the technique we just discussed, you can highlight any element or series of elements and take permission of them by clicking the blue stack of boxes.
- If you edit, move, or modify any element in Revit, Revit will automatically grant you permission over the element.
- You can right-click any element and choose Make Elements Editable from the context menu (see Figure 6.23). Note that you also have the ability to make editable the entire workset this object is on.
- You can right-click any element in the Project Browser under the Family node. In the context menu that appears, you can take ownership of a group or name of elements.
FIGURE 6.23 Making an element editable using the context menu

Using any of these options, if it is already owned by another team member, Revit will alert you and you will not be able to modify the element or take permission of it.
![]() Real World Scenario: ACCIDENTS HAPPEN
Real World Scenario: ACCIDENTS HAPPEN
It's human nature: Eventually an accident will occur on a project, and elements will get modified or deleted unexpectedly. It's important to know how to recover when these accidents occur.
On one project we worked on, someone new to Revit and new to the team was working on detailing windows in a three-sided building. In the detailing process, he somehow deleted one of the walls in the project. By deleting the wall, he also deleted the elevation as well as all the wall sections associated with that wall, along with any of the details in plan and section. When the new team member deleted the element, he wasn't aware of the mistake and then performed Synchronize With Central, publishing all the deletions to other team members. Fortunately, we caught the mistake before everyone performed a Synchronize With Central, and we did not have to resort to restoring the model from the previous night's backup. We were able to use another team member's local file to create a new central file, thereby minimizing the loss of work. Once everyone on the team made a new local copy, we were back in business.
Had the deleted elements been more isolated (like a conference room layout), recovery would have been much less invasive. In such a case, you simply group all the elements you would like to save, then right-click the group in the Project Browser. You'll have the option to save the group out of the file, which can then be inserted into a different file and ungrouped again.
Borrowing Elements
When working in a worksharing project, it is not always necessary to take ownership of an entire workset in order to begin editing elements. As we discussed earlier in this chapter, it is possible to take permission of singular elements (one by one or in groups). This process is referred to as borrowing.
By borrowing elements, team members can take ownership of only portions of a workset, leaving the remainder of the workset to be edited by someone else. Taking permission of elements in this style creates a more “take what you need” approach to editing and usually results in less overlap between team members.
If you need to work on an element that already belongs to someone else, Revit will alert you that the element(s) have already been checked out, and you'll be given the option to request permission.
Borrowing is a critical concept in Revit for multiuser teams; it allows users to transfer permission of objects without having to constantly save all their work to the central file and relinquish all worksets. Let's look at this interchange of permissions in more detail.
Requesting Permission
Imagine you are happily working away on your model in a workshared environment and you realize that someone else is an owner of an element that you need to modify. What do you do? When that situation occurs, you will be presented with a dialog box that allows you to request permission of that element from the other user (Figure 6.24). This will happen every time you are working in a model with worksharing enabled and you attempt to modify (even if it's indirectly) an element owned by another team member.
FIGURE 6.24 Placing a request for permission

Looking at the dialog box, you have two options:
- You can click Cancel and not take permission of the element and then focus your efforts on another part of the design.
- You can click Place Request to ask your team member to relinquish permission over the element in question. When you click Place Request, the dialog box shown in Figure 6.25 opens.
FIGURE 6.25 Editing Request Placed dialog box

Once you have placed your request, you're in a bit of a holding pattern. You cannot continue to edit this element until the other user has granted permission over it, and you cannot continue working on other portions of the project. It is also important to note that the other team member will not receive any notification through Revit that you have placed a request. You will need to contact the team member so your permission can be granted, and you can get back to work.
Once you've made your request known to your team member, you can click Check Now and see whether the request has been granted or whether there are additional steps you'll need to take to gain permission over that element. While this is happening, you always have the option to click Continue. Doing so will undo your most recent edit to the element you are attempting to borrow and let you get back to working on another portion of the project.
Once the other user has granted your editing request and you click Check Now, you'll see the dialog box shown in Figure 6.26, alerting you that your permission has been granted and you can resume your workflow with your edits intact.
FIGURE 6.26 Permission granted

Workset Permission Notifications
New in 2012 is notification when editing requests are placed, granted, and denied. The notification also provides a Show button that shows you the elements so you can grant or deny the request. There is also a small visual indicator on the status bar at the bottom of your screen. It indicates whether there are any outstanding requests (both to and from you). Clicking this icon opens the Editing Request dialog box.
On the left in Figure 6.27 you can see the notification you receive when another team member requests permission to borrow an element that you have enabled. You can also see the visual indicator of a single request in the lower right. On the right in Figure 6.27 you can see the resulting notification when permission is granted.
FIGURE 6.27 Permission notification

Granting Permission
Now suppose you are on the other end of this scenario, where you have been working away and you receive a call or IM or visit from someone looking to acquire permission for an element you own in the model. How do you grant permission?
On the Worksets panel of the Collaborate tab, there is a button called Editing Requests. Clicking this button opens a dialog box allowing you to see all the outstanding requests you have for elements in the model.
To deal with the request for permission, you have a few options, as shown in Figure 6.28:
FIGURE 6.28 Editing Requests dialog box
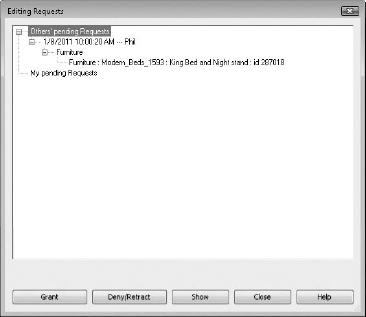
Grant Gives permission for the requested element to your team member
Deny/Retract Denies permission to your team member
Show Shows you which element or elements have been requested to help you make an informed decision
Once you are ready to grant permission for the element, one of two things will happen. If there have been no edits to the element, you can simply click Grant and the permission for the element will be transferred to your team member.
If you have made edits to this element or one that is dependent or hosted to the element in question, you will be alerted that you'll need to SWC before the permission can be switched. Your team member on the other end will also need to SWC to receive the recent changes, and then they can begin editing the most recent version of that element. Permission requests that require an SWC are flagged in this dialog box by an asterisk next to the permission request.
Relinquishing Permission
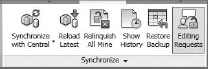
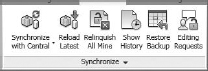
It is not always necessary to wait for a request from another team member to relinquish permission over your elements. Fortunately in Revit, there is a tool to do just that. On the Worksets panel of the Collaborate tab is a button called Relinquish All Mine (Figure 6.29). This feature returns the permissions for any elements you have not edited back to the central file so they are available to the rest of your team.
FIGURE 6.29 Relinquish All Mine
Closing Revit
Eventually, you will need to close your project and Revit and leave for lunch or go home for the day. Don't worry—the project will still be there tomorrow. But in the meantime, it's important to understand how to close the project correctly so you don't accidentally leave the office and maintain permission over any elements. This situation—where a team member has accidentally left the office and not closed Revit or relinquished permissions—leaves the other team members without a way to edit those elements or even request permission. So that you are not the unfortunate victim of their wrath upon your return, make sure you close Revit properly.
The most thorough way to close the file is to simply quit the application completely. You can do this by clicking the red X at the upper right or clicking the Application menu and selecting Close. Both will provide the same results. You'll be presented with a dialog box asking you to save your file locally. After that, you'll see a second dialog box asking you to relinquish or keep ownership of elements and worksets (Figure 6.30). As we noted, if you do not SWC, your changes will not appear on the network for other users to see and you'll maintain permission over some of your elements.
FIGURE 6.30 Saving to the central file

Disabling Worksharing
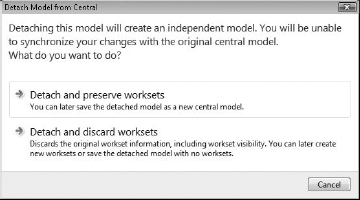
In a few cases, you might decide that you've enabled worksharing too soon, or after enabling worksharing you'd rather go back. Prior to Revit 2012, doing so was not possible. However, in Revit 2012, worksharing may be disabled as part of the Detach From Central functionality. When you elect to detach a copy of the central file, you now have the option to discard worksets (Figure 6.31).
FIGURE 6.31 Disabling worksharing
View Template Visibility
It's possible to control workset visibility in Revit 2012 when worksharing is enabled. To modify these settings, select the View Templates panel on the View tab. Select the panel and a drop down menu will appear. Select the “View Templates Settings” option, which will open a dialog box. Once the dialog box is open (Figure 6.32), select V/G Overrides Worksets on the right of each override option to modify the visibility settings in your View Template.
FIGURE 6.32 Controlling workset visibility

Selecting Your Starting View
On the Manage Project panel, you can now select the starting view for a project (Figure 6.33, left). Once you click this option, you can select any project view (Figure 6.33, right). Because 3D views take longer to open when your project opens, you can select a 2D view to speed this process; you can even create a drafting view that contains the project name and image as the starting view.
FIGURE 6.33 Selecting the starting view

Changing Worksets from the Properties Palette
Prior to Revit 2012, in order to change the workset assignment for an element you had to enable the element or the workset. This is no longer the case. Simply select the element or elements, as shown in Figure 6.34. The workset assignment is no longer hidden and you can change the value.
FIGURE 6.34 Changing the workset assignment

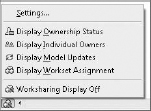
Worksharing Visualization
New in 2012, you can visualize four different values: ownership status, individual ownership, updated elements, and workset assignment. You can open the settings from the View Control Bar (Figure 6.35). To display any of the values, select the desired setting from the View Control Bar. When any value is selected, the project view indicates the status at the edges of the project window.
FIGURE 6.35 Workset visualization
The Ownership Status tab of the Worksharing Display Settings dialog box shows three values: what is owned by you, owned by others, or not owned at all (Figure 6.36).
The Individual Owners tab of the Worksharing Display Settings dialog box illustrates which elements are owned by the users in your project. If there are users listed who do not have any enabled elements or worksets, you can remove them from the list by selecting their username and clicking the Remove User button at the lower left (Figure 6.37).
FIGURE 6.36 Ownership Status tab
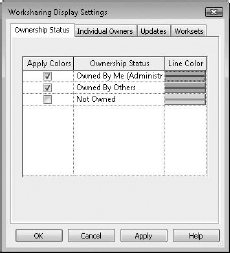
FIGURE 6.37 Individual Owners tab

The Updates tab of the Worksharing Display Settings dialog box indicates changes to the central file that may not be apparent until you have synchronized with the central file (Figure 6.38).

The Worksets tab allows you to color-code the model based on the workset assignment of all the building elements. Color-coding is also helpful for keeping track of your active workset (Figure 6.39).

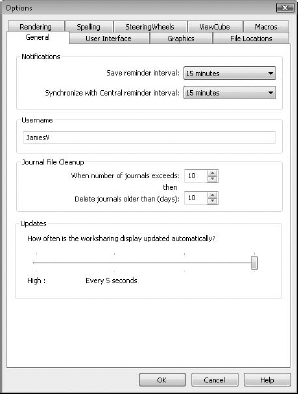
Finally, how often the display settings update in your project is up to you. To modify these settings, choose Application ![]() Options to modify the Worksharing Update Frequency option. Moving the slider to the far left, will set the Updates slider to Manual Updates Only as a description below the slider and the update will occur when you use Reload Latest or Sync With Central. Slide just a bit to the right and you'll see that the display will update every 60 seconds. Slide it all the way to the right and your display will update every 5 seconds (Figure 6.40).
Options to modify the Worksharing Update Frequency option. Moving the slider to the far left, will set the Updates slider to Manual Updates Only as a description below the slider and the update will occur when you use Reload Latest or Sync With Central. Slide just a bit to the right and you'll see that the display will update every 60 seconds. Slide it all the way to the right and your display will update every 5 seconds (Figure 6.40).
FIGURE 6.40 Using the Updates slider
GETTING PERMISSION FOR SOMEONE ELSE'S OBJECTS
Inevitably it happens on a project. Someone leaves their desk for a meeting or goes home without relinquishing permission over all their elements and worksets, leaving the rest of the team in a lurch. The best solution is to contact the person and gain their network password and just synchronize their file with central. Doing so ensures that all their changes as well as permissions are synchronized and no work is lost. If that is not possible, there is a workaround for this problem. Note that the workaround will result in the loss of the work by the missing team member but will clear up all the permissions issues.
If the immediate team needs outweigh the potential loss of the missing person's work, follow these steps:
- Open a new session of Revit.
- Click the Application menu, select Options, and choose the General tab in the resulting dialog box.
- Change the name listed in the Username field from your username to the person's whose permissions you are looking to release.
- Create a new local file of the project and open it. Now simply SWC, and all their elements will be available to the team to edit. Then close the file.
- Before closing Revit, be sure to go back to the Application menu, click Options, and select the General tab so you can change the username back to your own.
Sometimes you've opened a file to do something simple such as review a detail or print a set of documentation. You might have inadvertently taken permission of an element or group of elements but not performed any edits. On closing the file, you'll get a dialog box like the one shown in Figure 6.41, alerting you that you have permissions that need to be reconciled. Again, the proper workflow is to discard any unsaved changes you made to the project.
FIGURE 6.41 The worksharing concept
