
As shown in the previous topic, you can store dozens of pieces of information about a contact in the Address Book. The information you store about a person, company, or other entity is recorded in a contact record.
When you create or open a contact record, it opens in a contact window. The contact window has its own toolbar, displaying commands separate from those in the Entourage program window.
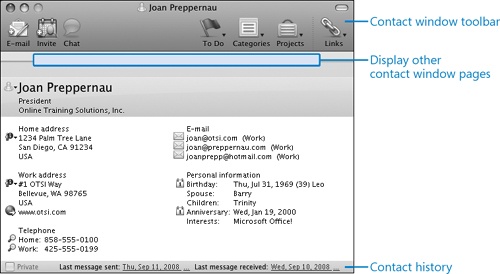
The Summary page of a contact record displays information collected from the other pages. You can’t edit information from this page.
With the buttons and lists on the contact window toolbar, you can:
Initiate e-mail or instant messaging communication with a contact.
Invite a contact to a meeting.
Flag a contact record to remind you to take action related to that person.
Assign a category or project to a contact.
Link a contact record to another contact or to a contact group, or link it to a message, calendar event, task, note, or file.
Tip
If you’re using Entourage to connect to a Microsoft Exchange Server account, that organization’s contact information is stored in the Global Address List (GAL). The GAL might include names, job titles, e-mail addresses, office locations, telephone numbers, and other contact information. It can also include organizational information (each person’s manager and direct subordinates) and group membership information (the distribution lists and aliases each person belongs to). The GAL is administered as part of Exchange. Entourage users can view the GAL but not change its contents.
For each person whose information you record in an address book, you can store the following types of general information:
Name and e-mail information, including:
First and last names
Title (such as Mrs. or Dr.), suffix (such as Jr. or Sr.), and nickname
Work, home, and up to 11 other e-mail addresses
Thirteen instant messaging (IM) addresses
Two custom-labeled fields
Home information, including:
Address details, from which you can display a map or driving directions
Web page
Two home phone numbers; mobile, pager, and fax numbers; and up to four custom-labeled numbers
Two custom-labeled fields
Work information, including:
Company name, job title, and department
Address details, from which you can display a map or driving directions
Web page
Two work phone numbers plus numbers for the main switchboard and for an assistant; mobile, pager, and fax numbers; and up to four custom-labeled numbers
Two custom-labeled fields
Personal information, including:
Birthday, age, and astrological sign
Anniversary date and spouse or partner’s name
Interests
The names of up to 10 children
An image (most likely a photo of the person)
General notes (text only)
Two custom-labeled dates
Two custom-labeled fields
You can create a contact record containing only one piece of information (for example, a name or company name—but neither is required), or as much information as you want to include. You can quickly create contact records containing similar information—for example, for several people who work for the same company—by duplicating the contact record and then changing the details in the copy. And of course, you can add to or change the information stored in a contact record at any time.
To create a contact record:
On the Address Book toolbar, click the New button (or press Command+N).
In the Create Contact window that opens, enter a basic name, e-mail addresses, phone numbers, and home or business addresses or, to store additional information in fields available from the full contact record window, click the More button (in the lower-right corner of the window).
After entering the information you want to store, click the Close button, and then in the message box prompting you to confirm that you want to save your changes, click Save.
To make changes to a contact record:
In the Address Book, double-click the contact record you want to edit.
In the contact record window, make any changes, additions, or deletions.
Click the Close button, and then click Save in the message box that appears.
Tip
When you send an e-mail message to a person whose contact information is stored in one of your address books, you can quickly address the message to that person by typing his or her name into the To, Cc, or Bcc box, or by clicking the adjacent button to open the Address Book window and then selecting the intended recipient’s name.
Linking Entourage Items
You can associate contact records, or any type of Entourage item, with other Entourage items and with files. For example, you can link the contact records of two related people, link a contact record to the résumé of that person, or link a résumé to an interview appointment.
Links can be useful when you have a lot of information stored in Entourage and want immediate access to related items. You might find that it takes less time to open an item from the Links To window than it does to return to Entourage, change modules, and search for the item you want.
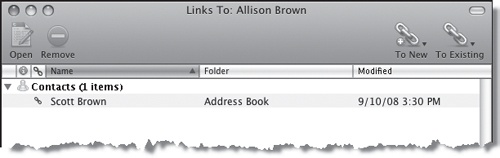
The Links list is located at the right end of the toolbar in each item window. You can create and display links from this list, and even simultaneously create and link items to the active item. You can open any linked item by double-clicking it in the Links To list.
To link a contact record to another item:
On the toolbar of the contact record window, click the Links button, and then click Open Links.
In the Links To window, click the To New button or the To Existing button and then, in the list, click the type of item you want to link to.
Select or create the item, and then close the open windows.
Linked records are indicated in the Address Book, Notes, and Tasks panes by a Link icon (a linked chain) in the Links column, and in the Mail pane by a Link icon in the message header. No indication of links is given in the Calendar pane or in any Preview pane. In the Address Book, Notes, and Tasks panes (which display information in list format), you can display and open existing links, and create additional links, by clicking the Links icon or in the Links column for the item you want to link.