In this exercise, you’ll create a SmartArt diagram in a document. Then you’ll add text and format the diagram.
We’ll work in a Word document in this exercise, but you can use the skills you practice in this exercise in Excel and PowerPoint.
Note
SET UP Open a new, blank document. Size the document to fit the window, and then hide the toolbar area.
In the Elements Gallery, click the SmartArt Graphics tab.
The Elements Gallery displays all the available diagram layouts. You can filter the display by clicking the buttons at the top of the gallery.
Click the List, Process, Cycle, Hierarchy, Relationship, Matrix, and Pyramid buttons to view the available layouts in each group. When you finish, display the Relationship gallery.
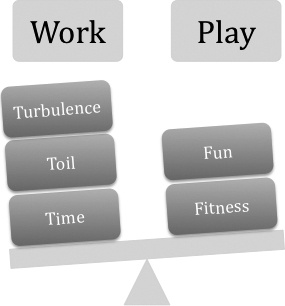
Click the Balance layout (the first thumbnail in the Relationship gallery).
Word inserts a frame, containing the selected diagram, into the document. The diagram depicts a balance with shapes stacked on each side. Text placeholders appear in the shapes.
A floating Text pane opens next to the diagram frame. The Text pane contains the same placeholders, formatted as a bulleted list.
In the Text pane, click the first [Text] placeholder, and then type Work.
When you click the placeholder, the upper-left diagram shape becomes active. As you type the letters, they appear simultaneously in the Text pane and in the active shape.
Press the Down Arrow key to move to the first second-level list item in the Text pane.
The base shape on the left side of the balance becomes active.
Type Time, press the Down Arrow key, type Toil, and then press Return.
A third shape appears on the left side of the diagram, and the balance shifts to a state of equilibrium because each side now contains the same number of shapes.
Type Turbulence.
When the word reaches a length where all the letters can’t fit in the box, the font size used in that shape and all related shapes becomes smaller, until the widest word (Turbulence) fits its shape.
Click the [Text] placeholder located in the upper-right shape of the diagram, and then type Play.
As you type, letters appear simultaneously in the shape and in the Text pane.
Click the shape at the top of the right stack, and type Fun. Click the next shape, and type Fitness.
Click the shape at the base of the right stack. In the Text pane, click the Remove button. Then click outside of the diagram frame to see the result.
Click near (but not on) the diagram to activate the frame but not a specific shape. Then in the Text pane, click the Close button.
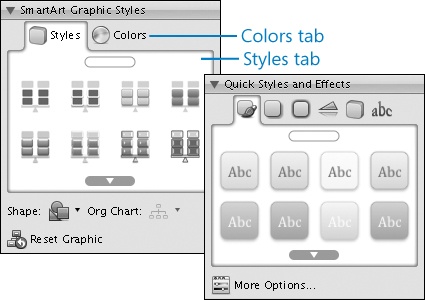
Display the Formatting Palette in the Toolbox. Expand the SmartArt Graphic Styles panel and the Quick Styles and Effects panel, and hide the others.
Note
You can apply the effects from many other Formatting Palette panels to the shapes in a SmartArt graphic. We’ll focus on these two panels in this exercise, and you can experiment with others on your own.
The Styles tab of the SmartArt Graphic Styles panel displays a simple version of the current diagram layout with different styles applied to the diagram shapes.
On the Styles tab, click the Inset thumbnail (the third thumbnail in the second row).
The balance diagram changes to reflect the selected style. The shapes now take on a three-dimensional appearance.
Click the Scroll Down button at the bottom of the Styles tab to view more graphic styles. Apply other styles that look interesting. When you finish, click the Polished thumbnail (the second thumbnail in the second row).
At the top of the SmartArt Graphic Styles panel, click Colors.
The Colors tab displays the current diagram layout with 31 multi-color and single-color options reflecting the document theme colors applied to the diagram shapes.
Scroll down to view the color options.
The first row of thumbnails depicts the multi-color options. The first Colorful option shows eight different theme-specific accent colors on the eight diagram shapes. The three Colorful Range options each show ranges of two accent colors across the eight shapes.
The six rows of single-color options each depict four patterns in one accent color.
The last row depicts three Dark options—two with only outlines, and one with filled shapes.
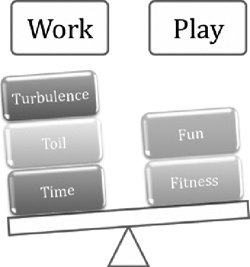
On the Colors tab, click the Colorful thumbnail. Then click away from the diagram to see the results.
The diagram changes from shades of blue to seven different colors.
In the diagram, click the triangle supporting the balance.
The triangle is selected for editing, and the options on the Quick Styles tab of the Quick Styles And Effects panel become active.
Press and hold the Shift key, and then click the rectangular shape balancing on top of the selected triangle, the Work shape, and the Play shape.
On the Quick Styles tab, click the Colored Outline – Accent 4 thumbnail (the fourth thumbnail in the third row).
The four selected objects change to have only colored outlines.
Tip
The More Options button at the bottom of the Quick Styles And Effects panel opens the Format Shape dialog box (if one or more shapes are active) or the Format Object dialog box (if the frame is active). From these dialog boxes, you can apply Fill, Line, Shadow, Glow & Soft Edges, Reflection, 3-D Format And Rotation, Picture, and Text Box formatting to the active elements. From the Format Object dialog box, you can also control the size and layout settings of the diagram.
Click away from the diagram to see the results.
Experiment on your own with additional formatting options from the Shadows, Glows, Reflections, and 3-D Effects tabs of the Quick Styles And Effects panel, and with options from the Format Shape dialog box. When you finish, right-click the diagram frame, and then click Reset Graphic.
The diagram returns to its original formatting.