In this exercise, you’ll create a couple of different TOCs for a document, based on heading styles. Then you’ll alter the document by inserting page breaks, and update the TOC to reflect your changes.
Note
SET UP Open the Contents document from the ~/Documents/Microsoft Press/ 2008OfficeMacSBS/FinishDocuments/ folder. Display the document in Print Layout view.
Position the insertion point in front of the General Administration heading.
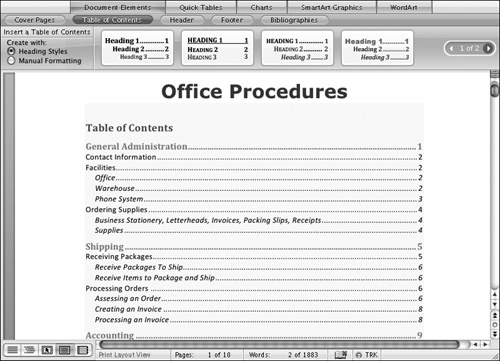
Click the Document Elements tab of the Elements Gallery, and then display the Table of Contents gallery.
In the left pane of the Table of Contents gallery, click Heading Styles (if that option isn’t already selected). Scroll the gallery if necessary, and then click the Modern thumbnail.
After a short pause, Word inserts a TOC, with predefined styles, at the insertion point.
Scroll up to view the new TOC, and then point to any part of the table.
A pale pink background appears behind the TOC, indicating that this is a field rather than plain text.
See Also
To learn how to move to sections of the document from the TOC, see "Practice Creating Indexes" later in this chapter.
Click anywhere in the TOC.
A border appears around the field contents. A tab containing a move handle and menu are in the upper-left corner of the field. The updatable field text is indicated by a gray background.
At the right end of the Table of Contents tab, click the arrow.
On the Table of Contents menu, click Remove Table of Contents.
The TOC is deleted.
With the insertion point in front of the General Administration heading, point to Break on the Insert menu, and then click Page Break; or press Shift+Enter (the Enter key is on the numeric keypad).
Word inserts a manual page break, and the General Administration heading moves to the next page.
Press the Up Arrow key twice, to position the insertion point in front of the page break, immediately below the document title. Press Return to make space between the document title and the line on which you’ll insert the new TOC.
On the Insert menu, click Index and Tables.
The Index And Tables dialog box opens.
In the Formats pane, click Classic. In the Show levels list, click 2. In the Tab leader list, click (none). Then click OK.
Word inserts a simple TOC displaying the page numbers of the first two levels of headings.
Notice that the TOC created from the Index And Tables dialog box doesn’t include a title.
Tip
You can display field codes, rather than the calculated field contents, by pressing Option+F9.
Move to page 5, click at the beginning of the Shipping heading, and then press Shift+Enter to insert a page break.
The Shipping heading is now on page 6.
Move to page 9 and insert a page break before the Accounting heading to move it to the top of page 10.
Press Command+Home to return to the beginning of the document.
The page numbers in the TOC don’t reflect the new page breaks.
Right-click anywhere in the TOC, and then click Update Field.
The Update Table Of Contents dialog box opens.
With the Update page numbers only option selected, click OK.
Word updates the TOC to reflect the new page numbers.