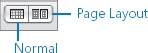
Excel provides two views of worksheet content:
Normal view. This view displays the content in each worksheet as one large cell grid. The ruler is not available in Normal view.
Page Layout view. This is the default view for a new workbook. This view displays worksheet pages as they will appear when printed. Headers and footers are visible. Pages that do not contain content appear gray.
Tip
To change the default view, display the Excel Preferences dialog box and then, under Authoring, click View. On the View page, in the Settings area, choose the view you want from the Preferred View For New Sheets list. Then click OK.
You can switch between views of a worksheet by using the following methods:
Tip
The View toolbar is located on the status bar. In Excel, you can hide the status bar—for example, to save screen real estate or simplify the window—by clicking Status Bar on the View menu. A check mark indicates when the status bar is active.
The following table lists several ways of using keyboard keys to move around in a worksheet. In addition to these methods, you can move between cells by pressing the Tab and Return keys. You can move one cell to the right by pressing the Tab key, or one cell to the left by pressing Shift+Tab. The Return key moves you to different locations depending on your recent activity, as follows:
If you’ve been entering data vertically—for example, supplying information in one column of a worksheet—pressing the Return key moves down one cell.
If you’ve been entering data horizontally—for example, creating a table of data or entering data in a table from left to right—pressing Return moves to the farthest left cell of the next row of the data entry range.
In addition to the Tab, Shift+Tab, and Return keyboard shortcuts, you can use the keyboard shortcuts described in the following table to move around in a worksheet or workbook, or between workbooks.
To move... | Press... |
|---|---|
Up, down, left, or right one cell | Up Arrow, Down Arrow, Left Arrow, or Right Arrow |
To an edge of the current data region | Control+Arrow key |
To the beginning of the row | Home |
To the beginning of the sheet | Control+Home |
To the last populated cell (the intersection of the rightmost column of data and the bottom row of data) | Control+End |
Up or down one screen | Page Up or Page Down |
To the left one screen | Option+Page Up |
To the right one screen | Option+Page Down |
To the next worksheet | Control+Page Down |
To the previous worksheet | Control+Page Up |
To the next pane in a split worksheet | F6 |
To the previous pane | Shift+F6 |
To the next workbook or window | Control+Tab |
To the previous workbook or window | Control+Shift+Tab |
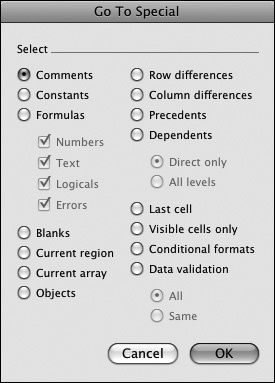
To move to a specific cell, named range, or worksheet element: