In this exercise, you’ll create a themed presentation from the Project Gallery, and add slides to it. Then you’ll populate the slides by entering text, both directly in slides and on the Outline page of the Navigation pane.
In the Category list, click Office Themes.
Scroll the list of themes to view the available options. Then click the Travelogue thumbnail.
The thumbnail depicts three white-framed photos on a gold background, with a title and subtitle below.
In the Project Gallery, click Open.
PowerPoint starts, if it wasn’t already running, and a presentation based on the selected theme opens in Normal view. The Slides page of the Navigation pane shows that the presentation consists of only the title slide.
The title slide shown doesn’t include the photographs depicted in the project template thumbnail. That title slide layout is not the default, but it is available from the Elements Gallery.
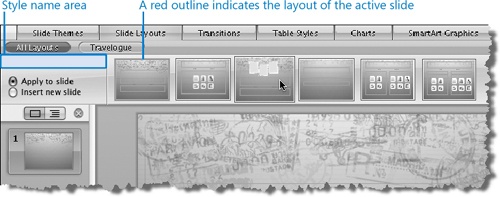
Click the Slide Layouts tab of the Elements Gallery to display thumbnail representations of the available slide layouts.
A red outline indicates the current slide layout. The name of the layout, Title Slide, is shown in the style name area at the top of the left pane of the gallery.
On the Slide Layouts tab, point to the third thumbnail, which depicts the title slide layout we saw earlier in the Project Gallery.
Title Slide with 3 Pictures appears in the style name area.
With the Apply to slide option selected below the layout title, click the Title Slide with 3 Pictures thumbnail.
PowerPoint changes the layout of the title slide displayed in the Slide pane. The red outline moves to the Title Slide with 3 Pictures thumbnail.
In the left pane of the gallery, below the style name area, click Insert new slide.
A white plus sign in a green circle appears in the upper-left corner of each slide layout thumbnail as a visual indicator that clicking the thumbnail will insert a slide.
In the gallery, click the second thumbnail, Title and Content.
A second slide, Slide 2, appears in the Navigation pane and in the Slide pane.
Scroll the gallery to display additional slide layouts. Click the Picture with Caption thumbnail, and then the 2 Pictures above Caption thumbnail, to insert two additional slides.
We’re finished adding slides for now, so click the Slide Layouts tab once to close it.
In the Navigation pane, click Slide 1.
In the Slide pane, click the Click to add title placeholder.
A selection box surrounds the placeholder, and a blinking insertion point appears in the center of the box, indicating that the text you type will be centered in the placeholder.
Type My Vacation.
See Also
For information about entering and editing text, see "Add Content to Slides" earlier in this chapter.
At the top of the Navigation pane, click the Outline button.
The text you typed also appears on the Outline page.
In the Slide pane, click the Click to add subtitle placeholder.
The subtitle placeholder becomes active.
Type Fun in the Sun!, and then press Return to move the insertion point to a new line in the same placeholder.
Type featuring Trinity Grace.
When you press the Spacebar after typing the first word, the AutoCorrect function changes it from featuring to Featuring, and a miniature version of the AutoCorrect Options button appears under the letter F. The button disappears by the time you type the rest of the text, but that’s okay—we can get it back.
Click in front of the letter F to redisplay the miniature AutoCorrect Options button. Point to it and then, when it changes into the full-size AutoCorrect Options button, click it.
In the AutoCorrect Options list, you can choose to deal with this specific instance of automatic capitalization, with all instances of automatic capitalization, or with all AutoCorrect options.
In the AutoCorrect Options list, click Undo Automatic Capitalization.
The capital letter F reverts to lowercase.
Below the vertical scroll bar, click the Next Slide button to display Slide 2.
In the slide title placeholder, type Where We Went. Then in the content placeholder, click the bulleted list item (not the bullet).
Type Olympia, and then press Return.
PowerPoint adds a new bullet at the same level.
Type Sequim, and then press Return.
On the Insert menu, click New Slide (or press Shift+Command+N).
PowerPoint inserts a new slide following Slide 2, and displays it in the Slides pane. The new Slide 3 has the same slide layout as the slide you created it from.
In the Navigation pane, click to the right of the Slide 3 icon. Then type What We Saw.
As you type in the outline, the text also appears on the slide. The insertion point is active only in the outline, not on the slide.
With the insertion point at the end of the new slide title, press Return.
PowerPoint inserts another new slide with the same layout.
Press the Tab key.
The new slide, Slide 4, changes into a bulleted list item on Slide 3. In the outline, the bullet is gray, to indicate that it is temporary, until you enter the list item text.
Tip
To convert a bulleted list item into a slide, press Shift+Tab.
You can use the Increase Indent button on the Formatting toolbar to demote items (for example, to change slide titles to bulleted list items or first-level list items to second-level items), both on the slide and on the Outline page. You can also use the Decrease Indent button to promote items in both places. However, when you are entering text on the Outline page, it’s usually faster to use key combinations—Tab and Shift+Tab—to perform these functions than it is to take your hands off the keyboard to use your mouse.
With the insertion point after the bullet in the outline, type Relatives, Friends, Dogs, and Horses, pressing Return after each word. Save the presentation in the ~/Documents/Microsoft Press/2008OfficeMacSBS/CreatePresentations/ folder, as My Vacation.pptx.
See Also
For information about saving presentations, see "Open, Save, and Close Office Files" in Chapter 2.