In this exercise, you’ll explore the Project Gallery and the Word publication templates available therein. Then you’ll create a brochure based on one of the project templates.
In the Dock, click the Microsoft Project Gallery icon.
Or
With the Word, Excel, PowerPoint, or Entourage menu bar active, click Project Gallery on the File menu (or press Shift+Command+P).
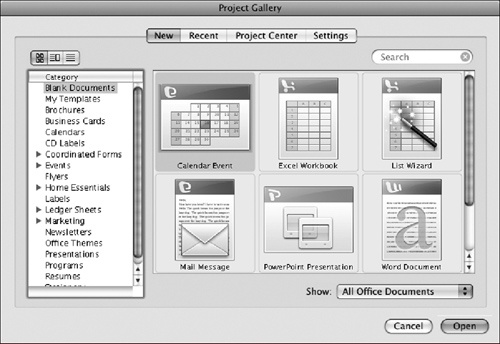
The Project Gallery opens, displaying the New page in Thumbnails view. Blank Documents is selected in the Category list, and the available templates for creating blank documents appear in the Template list.
Tip
By default, the Project Gallery displays the page—New, Recent, Project Center, or Settings—that was active when it was most recently closed. If you would prefer that the Project Gallery open to a specific page each time, display the Settings page and then, in the Open On list, click the default starting page you want.
Scroll the Template list to view the eight available blank file templates.
The color of the thumbnail header and the stylized program initial (matching the program icons in the Dock) indicate the program in which each project template opens its resulting document.
In the Show list, click Word Documents.
The Template list now displays only three blank document templates: Word Document, Word Notebook Layout, and Word Publishing Layout. These are the same three templates available from the New list on the Standard toolbar in the Word window, which we looked at earlier in this chapter.
In the Category list, click the arrow to the left of Events.
The Template list does not change, but the Events category expands to reveal four subcategories: Awards, Invitations, Postcards, and Posters.
Click the Posters subcategory.
The Template list displays thumbnails of four poster templates.
Above the Category list, click the Details View button.
The Template list changes to a list (with the first template already selected), and the Details pane appears, displaying additional information about the selected template.
At the top of the Template list, click the Name header.
The sort order of the templates changes. You can sort the list by either the name or the kind of template by clicking the corresponding header, and reverse the sort order by clicking the header again.
Click the Thumbnails View button to return to the default view.
Notice that the sort order you selected in Details view is not active in Thumbnails view. You can’t change the sort order of the thumbnails from alphabetical.
Scroll the Category list to see the available project templates, and end by clicking Brochures. In the Template list, click Float Trifold Brochure. Then click Open.
A full-color brochure opens on the default Publishing Layout view workspace, which resembles an oak desktop. The toolbar displays the specialized Publishing Layout tools.
The Pages section of the status bar indicates that the brochure is a two-page document.
Click below the scroll box on the vertical scroll bar to display the second page of the brochure.
The brochure includes graphics, greeked text, and—if you supplied them as part of your user information—your default address and Web page. The two pages represent the outside and inside of a tri-fold brochure, which you can create by printing this publication double-sided.
Tip
The publication settings do not automatically turn on the Two-Sided printing option. If your printer is capable of double-sided printing, you will need to turn on that option (on the Layout page of the Print dialog box) before printing the brochure. If you plan to print a lot of copies of the brochure, you can supply the publication file to a commercial printing company and they will handle the printing niceties.
See Also
You can provide standard information for use in documents such as this by populating the User Information window or the pages of your personal address card. You access these resources from the Word Preferences dialog box. For more information, see "Personalize Program Functionality" in Chapter 1.
In the lower-right corner of the document window, click the Master Pages tab.
If necessary, click the More Buttons button at the right end of the toolbar to display the Zoom list. In the Zoom list, click Whole Page. Then scroll the window to view each of the two master pages.
Each master page defines a different page background.
In the lower-right corner of the document window, click the All Contents tab to return to the populated publication.
You can work more with the text and graphics in this Word publication and with the special tools available in Publishing Layout view. In this exercise, though, we’re concentrating on the simple process of creating a document from a project template, so we’ll wrap things up.
On the toolbar, click the Save button. In the Save As dialog box, name the publication Doctor Brochure and save it, with the other practice files from this chapter, in the ~/Documents/Microsoft Press/2008OfficeMacSBS/CreateDocuments/ folder.