In Entourage, entries you record in the Calendar are collectively referred to as calendar events, regardless of their length or whether other people are invited. A calendar event might be a day-long block of time, such as a holiday, or an appointment with specific start and finish times. You can make it a meeting by inviting other people to the appointment. (You can also invite people to day-long events.)
By default, Entourage displays a desktop reminder 15 minutes prior to the start of the event.
See Also
For more information about reminders, see "Flag Items for Follow Up" earlier in this chapter.
You can create an event when viewing your calendar in Day view, Week view, or Month view. To create a calendar event:
In the Calendar window, click the New button on the toolbar (or press Command+N).
A New Event window opens.
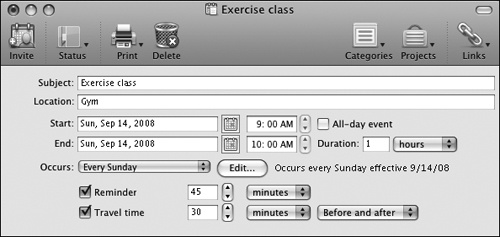
Enter the name of the calendar event in the Subject box, and its location in the
Location box.
In the Start box, select the date of the event or, if it’s a multi-day event, the first day.
If the event is not tied to a specific time span, select the All-day event check box.
If it starts and finishes at specific times, enter that information in the Start and End boxes.
If the event will recur on a regular schedule, such as a monthly meeting or a weekly exercise class, click the Occurs list, and then click the frequency of the recurrence.
If you want to change the reminder time, select the units and number of units in the lists to the right of the Reminder check box. Or, if you prefer that Entourage not display a desktop reminder, clear the Reminder check box.
If you want to block out time on your schedule before and after the event for traveling to and from the event location, select the Travel time check box. Then from the lists that appear, select the amount of travel time required and whether the time is required before, after, or before and after the event.
After you complete the information in the event header, click the Status button and then, in the list, click Busy, Free, Tentative, or Out Of Office to indicate whether you’re available for other appointments or meetings during the event.
Add any notes or other information you want to save with the event in the text area at the bottom of the event window. Then click the Close button, and click Save in the message box that prompts you to confirm that you want to save the changes.
Display the event date in the Calendar and confirm its details.