The Calendar appears in the same program window that displays the Address Book, but the toolbar and layout of the program window change to best display calendar event information.

In the Calendar module, the program window reflects information and commands related to calendar events.
To help you stay on top of your schedule, you can view your calendar in a variety of ways:
Day view. This view displays only one day at a time.
Work Week view. This view displays only the days that are part of your work week, which by default is defined as Monday through Friday from 9:00 A.M. to 5:00 P.M. You can define your work week to include whatever days and hours you want, from the Calendar page of the Preferences dialog box.
Week view. This view displays one week (Sunday through Saturday) at a time, divided into days.
Month view. This view displays five weeks at a time.
List view. This view displays a simple list of your current and future calendar items.
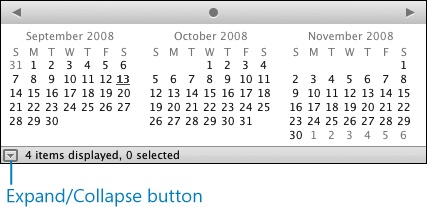
The currently displayed time period is shown at the top of the calendar content pane, below the Quick Filter. You can move to the previous or next time period by clicking the left and right arrows that appear to the left of the time period. You can display a specific date or range of dates by clicking or dragging to select them in the Mini Calendar in the lower-left corner of the Calendar window.
You can change the Calendar view by clicking the toolbar buttons or by clicking, on the Calendar menu, the name of the view you want to display. You can also change the time period displayed in the large calendar by selecting time periods in the Mini Calendar. Here’s how:
To display the month that appears in the Mini Calendar, click the name of the month.
To display a week that appears in the Mini Calendar, click the margin to the left of that week.
Tip
Week numbers are used in some countries to reference events, vacations, and other specific dates. Week 1 is the calendar week (Sunday through Saturday) in which January 1st falls, Week 2 is the following week, and so on through to the end of the year. Because of the way the weeks are numbered, a year can be made up of Weeks 1 through 53. In Entourage 2008 for Mac, the week number is displayed, to the right of the specific dates, in Week view.
To display a day, click that day.
In module views that include the Mini Calendar, increasing the width of the Folder list also increases the number of months shown in the Mini Calendar. You can allocate up to 50 percent of the program window to the Folder list.
Entourage keeps a To Do list for you of all the items you’ve flagged for follow up. You can display your To Do list in the Calendar window, by clicking the To Do List button on the toolbar.
Here are some of the ways you can work in the To Do list:
You can add a task to the To Do list (and simultaneously to the Tasks list) by entering it in the Create a task box at the bottom of the To Do List pane. To assign a due date to the task as you create it, enter the task description in the box, click the Options button, and then click the due date you want to assign.
You can open any To Do list item in its original item window by double-clicking it.
You can assign color-coded categories to list items. The color is visible in the To Do list and in the item’s original module. To assign a category to an item, right-click the item, point to Category, and then click the appropriate category.


