Although you may never have thought of things like wetlands areas, easements, and stormwater-management facilities as parcels in the past, you can take advantage of the parcel tools to assist in labeling, stylizing, and analyzing these features for your plans.
This exercise will teach you how to create a parcel representing wetlands using the transparent commands and Draw Tangent-Tangent With No Curves tool from the Parcel Layout Tools toolbox:
1. Open the WetlandsParcel.dwg file, which you can download from this book’s web page. Note that this drawing has several alignments, parcels, and a series of points that represent a wetlands delineation.
2. Choose Parcel Parcel Creation Tools on the Create Design panel. The Parcel Layout Tools toolbar appears.
3. Click the Draw Tangent-Tangent With No Curves tool on the Parcel Layout Tools toolbar. The Create Parcels – Layout dialog appears.
4. In the dialog, select Subdivision Lots, Property, and Name Square Foot & Acres from the drop-down menus in the Site, Parcel Style, and Area Label Style selection boxes, respectively. Keep the default settings for all other options. Click OK.
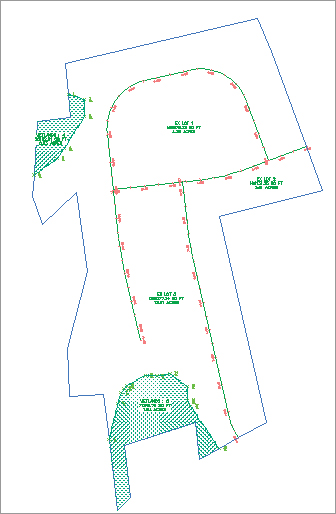
5. Make sure that the Node running osnap is set. At the Specify start point: prompt, pick point 1. Continue picking the wetlands points in numerical order. Repeat for the other wetlands. Your drawing should look similar to Figure 5-11.
Figure 5-11: The wetlands defined on the site
6. It’s usually easier to change the appearance of the parcel and its area label after the parcel has been created. Change the style of the parcel by picking the parcel area label and choosing Parcel Properties from the Modify panel. The Parcel Properties dialog appears.
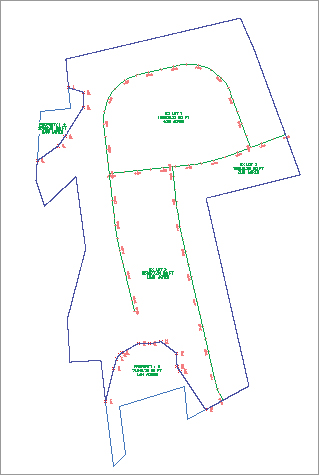
7. Select Wetlands from the drop-down menu in the Object Style selection box on the Information tab, and then click OK to dismiss the dialog. The parcel segments turn green, and a swamp hatch pattern appears inside the parcel to match the Wetlands style.
8. To change the style of the parcel area label, first select the Wetlands parcel area label, and then right-click and select Edit Area Selection Label Style. The Parcel Area Label Style dialog appears.
9. Select the Wetlands Area Label style from the drop-down menu in the Parcel Area Label Style selection box. Click OK to dismiss the dialog. A label appears, labeling the wetlands as shown in Figure 5-12. Later sections in this chapter will discuss parcel style and parcel area label style in more detail.
Figure 5-12: The Wetlands parcel with the appropriate label styles applied