
When you want to quickly create an effective, visually attractive document, one of the most efficient methods is to leverage design work already done for you by other people. (Although this might be considered plagiarism in another context, Microsoft is quite willing to let you take credit for all the hard work when you produce a document using their designs.)
The Project Gallery, installed with Microsoft Office 2008 for Mac, gives you access to approximately 160 ready-made, professionally designed project templates, as well as Office files that you’ve recently accessed. (Not all the templates are for Word projects—some are for Microsoft Excel 2008, Microsoft PowerPoint 2008, and Microsoft Entourage 2008.) Some of these projects can be used as is; others are designed as templates to which you must add your own information. You can personalize any aspect of any project by changing the text, formatting, size, shape, and other design elements.
See Also
This topic discusses the pre-populated project templates available from the Project Gallery. We’ll specifically discuss document templates—the base files that define styles within a document—in "Manage Document Templates" in Chapter 7.
To open the Project Gallery, click the Microsoft Project Gallery icon in the Dock, or open it from the /Applications/Microsoft Office 2008/Office/ folder.

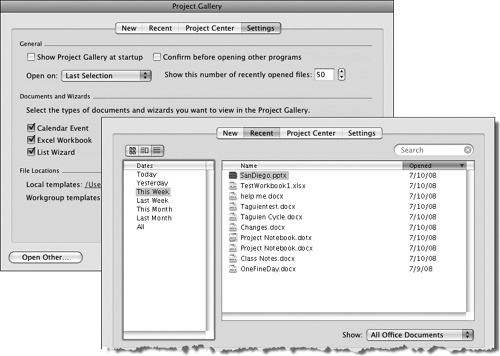
The Project Gallery includes four pages:
The New page displays project templates for creating new Office documents.
The Recent page displays a list of Office files you have worked with in the past two months. You can filter the list by day or week.
From the Project Center page, you can open Office files that are part of a project you have set up in the Project Center.
From the Settings page, you can refine the default Project Gallery settings and specify the types of templates and wizards you want to have available.
Three views of the Project Gallery are available:
Thumbnails view. displays (you guessed it) thumbnail views and names of the project templates that fit the current filter or search criteria. In this view, a maximum of six thumbnails are visible in the Template list at a time. This is the default view.
Details view. displays the names and file types of the category’s project templates, and the thumbnail, name, file type, file size, and creation/modification dates of the selected template. In this view, up to 14 templates are visible in the Template list at a time.
List view. displays only the names and file types of the category’s project templates. Up to 14 templates are visible in the Template list.
The Category list is displayed on the left side of the Project Gallery in all three views.
Clicking a category or subcategory in the Category list displays project templates of that type in the Template list. By default, project templates of all types are visible. You can filter the Template list to display templates for only a certain program by selecting that program from the Show list. If no templates of the selected category and file type are available, the Template list displays a generic graphic in Thumbnails view or a blank list in Details view or List view.

In Thumbnails view, this screen indicates that no project templates are available in the selected category or subcategory. This screen also appears—somewhat misleadingly—when you select a category that has subcategories.
Choosing a project template from the Project Gallery creates a temporary Office file based on the selected template, and opens that file in the appropriate program and view. Depending on the project template you select, the file content might be basically final other than changes you want to make, or it might contain placeholders or greeked text for you to replace with your own information. You replace these with your own text by clicking either type of placeholder and then typing the replacement. If you aren’t going to use a placeholder, you simply delete it. After you make the changes you want, you name the file and save it to your Documents folder or other storage location, or save it as a custom template.
Note
The changes you make in a file created from a project template affect only that file, not the template it is based on.
See Also
For information about saving changed documents as templates, see "Create a Personalized Project Template" later in this chapter.