
When Word, Excel, or PowerPoint first starts, a splash screen appears, identifying the program and providing distraction while program resources load in the background. Then the program menu bar appears at the top of the screen, followed by a document window. Depending on the state of the program when it was last closed, the Toolbox might also open. Your screen will look something like this:
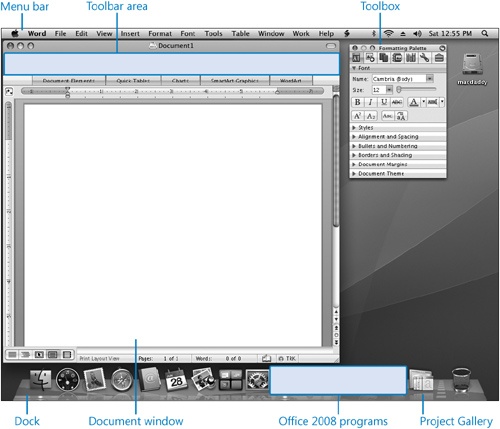
A typical window configuration. You can control the active document from the menu bar or Toolbox, and access Office programs from the Dock.
Note
What you see on your screen might not match the graphics in this book exactly. The screens in this book were captured on a monitor set to a resolution of 1024 × 768 pixels with the Dock open at the bottom of the desktop.
You can give instructions in an Office 2008 program in many ways. You can choose commands from a menu, click buttons on a toolbar or in a toolbox, choose features from a gallery of options, or use keyboard shortcuts. In this section, we’ll examine menus, toolbars, and toolboxes in the primary Office programs. Later in this chapter, we’ll discuss interface elements that are specific to each program.
Tip
Many Office for Mac keyboard shortcuts use the Command key in conjunction with another key. On a modern Macintosh keyboard, the Command key might be labeled with the word Command or with the infinite loop symbol, which looks like this: ![]() . (On older Mac keyboards the Command key was labeled with an apple. For that reason, many long-time Mac users refer to this key as the "open apple" key.) On a Windows keyboard, the Command key is labeled with the Windows logo (a waving flag), and is commonly referred to as the Windows key or the Windows Logo key. On a Macintosh running Mac OS X, both of these keys perform the same function, so if you connect a Windows keyboard to your Mac, you can use the same keyboard shortcuts as you would on a Mac keyboard.
. (On older Mac keyboards the Command key was labeled with an apple. For that reason, many long-time Mac users refer to this key as the "open apple" key.) On a Windows keyboard, the Command key is labeled with the Windows logo (a waving flag), and is commonly referred to as the Windows key or the Windows Logo key. On a Macintosh running Mac OS X, both of these keys perform the same function, so if you connect a Windows keyboard to your Mac, you can use the same keyboard shortcuts as you would on a Mac keyboard.
Resources
Throughout this book we include information about keyboard shortcuts you can use to give commands without using the mouse. You can access a full list of keyboard shortcuts for Office and for the individual programs by searching for "keyboard shortcuts" in the program’s Help file.
Each Office program, when active, displays a full-width menu bar across the top of the screen. The menu bar includes a program menu with links to program information, preferences, and commands; eight common menus; and from one to four menus that are specific to the current program.

Note
Word, Excel, and PowerPoint don’t have integrated program windows displaying one set of program controls and multiple files. Instead, each program has the independent menu bar and file-specific windows.
The menus common to Word, Excel, PowerPoint, and Entourage are:
The program menu. You manage the program, rather than files or content, by using commands on this menu.
File. You manage files by using commands on this menu. You can open, save, close, and create files; preview and print documents; or send document content to other people or programs. You can also view and manage file properties.
Edit. You manage content by using commands on this menu. You can select, copy, cut, and paste text and graphics; find and replace specific text or formatting; and move around in the document.
View. You control the display of the document and of various program tools by using commands on this menu.
Insert. You insert or link to document parts, specialized content, visual elements, multimedia elements, and other elements by using commands on this menu.
Format. You apply character and paragraph formatting to selected content, and set up layout options, by using commands on this menu.
Tools. This menu provides access to very useful research tools, including a thesaurus and dictionary, tools for managing documents, wizards to assist you with creating documents, and other goodies.
Window. You manage the display of file windows by using the commands on this menu.
Help. You access the computer Help system and the Office program Help system from this menu, as well as online resources for program information and updates.
Tip
You can go directly to a program’s Help file by clicking the Help button on the Standard toolbar in the program instead of going through the Help menu on the program’s menu bar.
See Also
For information about menus specific to Word, Excel, and PowerPoint, see the program-specific topics in "Use and Configure Program-Specific Features and Functions" later in this chapter.
Tip
Clicking the Apple icon at the left end of any menu bar displays a menu of commands for controlling your Mac. You can access software updates and software compatible with your Mac operating system, set system preferences and control the appearance of the Dock, and open applications, documents, and servers you have recently accessed. You also have options for shutting down applications and for shutting down or logging off from your Mac.
The menus are followed by a series of icons linking to features specific to your computer. These might include things like AppleScripts and Automator workflows, Time Machine, Bluetooth, AirPort, and SuperDrive. At the right end of the menu bar are the volume control, date and time, and the Spotlight search control.
Note
Automator is a Mac program that helps you automate tasks that you perform frequently. Office 2008 for Mac (the full version, not the Home & Student Edition) and Office 2008 for Mac Special Media Edition come with sample Automator workflows, and you can create your own.
The menu bar is a separate entity from the file window. The menu bar remains open as long as the program is running; even if you don’t have a document open.
Each of the primary Office programs includes certain general-use toolbars that, when open, appear in the toolbar area at the top of the file window, and might also include context-specific floating toolbars. A toolbar is a container for buttons that you click to perform a task and lists from which you select options.
Word, Excel, and PowerPoint all include the Standard toolbar and the Formatting toolbar.
The Standard toolbar in each program includes basic commands such as New, Open, Save, Print, Undo, and Redo; buttons to toggle the display of the Elements Gallery and the Toolbox; the Zoom commands; and a link to the Help file. In addition, the Standard toolbar in each program includes a few program-specific commands.
See Also
For information about the toolbars in the Word, Excel, and PowerPoint file windows, see the program-specific "Word Tools and Preferences" sections later in this chapter.
The Formatting toolbar is also available in each of the primary Office programs. As the name implies, this toolbar hosts commands you use to format text and paragraphs. (Formatting commands specific to tables, charts, graphics, and other visual elements appear on specialized toolbars, in the Elements Gallery, or in item-specific dialog boxes.)
By default, the Standard toolbar appears at the top of each Word, Excel, or PowerPoint file window. Other toolbars are hidden until you choose to display them or they are necessary to the task you’re performing at the time.
You can display and hide toolbars in these ways:
On both Toolbars submenus, a check mark in front of a toolbar name indicates that the toolbar is open. If you have other file windows (for the same program) open when you change the toolbar configuration, the additional toolbars appear in each window the next time you activate the window.

Tip
If you find the toolbar area is taking up too much space in the window, you can make it smaller by displaying only the icons (and not the labels), or you can hide it altogether by clicking the Hide Toolbars button located in the upper-right corner of the window. (This doesn’t affect other open file windows for the same program.)
On the Toolbars submenus (available from the View menu or from the toolbar area shortcut menu) the toolbars listed above the horizontal line are those that will appear in the toolbar area at the top of the file window; we refer to these as docking toolbars. The toolbars listed below the line are floating toolbars. Floating toolbars can be horizontal or vertical, or they might present a gallery of choices in a rectangle.

You can open a floating toolbar at any time by pointing to Toolbars on the View menu and then clicking the toolbar you want, or by right-clicking the toolbar area, pointing to Toolbars, and then clicking the toolbar you want. You can close a floating toolbar by clicking its Close button or by clicking its name (to remove the preceding check mark) on the View menu or the Toolbar menu.
You can’t remove a docking toolbar from the toolbar area, but you can move a floating toolbar anywhere on the screen (including outside of the file window) by dragging its title bar.
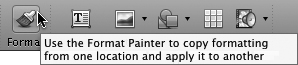
Commands on toolbars are represented as buttons or, less frequently, as lists or galleries. By default, the button name appears below each button icon, and pointing to a button displays a ScreenTip that describes what the button does.
Tip
When more toolbar content is available than can be shown on a docked toolbar, the More Buttons button appears at the right end of the toolbar. Click this button to display a list of additional buttons and commands.
Some buttons have arrows, but not all arrows are alike. If you point to a button and both the button icon and the arrow are in the same box, clicking the button displays options for refining the action of the button. If you point to a button and the arrow is in its own box separate from the button icon, clicking the button carries out that action with the button’s current settings. If you want to change those settings, you need to click the arrow to see the available options.

The Elements Gallery is a new feature in Office 2008; available only in the primary Office programs—Word, Excel, and PowerPoint. (Entourage and MSN Messenger do not have Elements Galleries.) A similar feature, the Microsoft Office Fluent user interface Ribbon, was introduced in Office 2007 for Windows. The Elements Gallery and Ribbon represent a radical change in the way commands are made available within the program. A significant difference between the Elements Gallery and the Ribbon is that in the primary Office 2007 for Windows programs, the Ribbon has entirely replaced all menus and toolbars. (Microsoft implemented this concept in a pre-release version of Office 2008 for Mac, and it wasn’t well received.) Office 2008 still includes the traditional menus and toolbars, as well as an improved Toolbox and the new Elements Gallery.
The Elements Gallery is located at the top of the content pane, below the toolbar area. By default, only the gallery tabs are visible. You can display the gallery by clicking any tab, and hide it by clicking the active tab or double-clicking any inactive tab.
See Also
You can change the program settings so that the Elements Gallery opens automatically when you start a program. For information about changing Elements Gallery settings, including the color and transparency of the Elements Gallery, see "Personalize Program Functionality" later in this chapter.
From the Elements Gallery, you can insert a variety of document elements into an Office file:
In Word, you can insert cover pages, headers, and footers into a document and tables of contents, bibliographies, Quick Tables, charts, SmartArt graphics, and WordArt from the Elements Gallery onto a page.
In Excel, you can insert worksheets into a workbook, and charts, SmartArt graphics, and WordArt from the Elements Gallery into a worksheet.
In PowerPoint, you can apply themes to a presentation, apply layouts and transitions to slides, and insert professional-looking tables, charts, SmartArt graphics, and WordArt from the Elements Gallery onto slides.
The Elements Gallery is divided into sections, called tabs. One type of document element is available from each tab. For example:
From the Excel Elements Gallery, you can insert Sheets, Charts, SmartArt Graphics, and WordArt.
From the PowerPoint Elements Gallery, you can insert Slide Themes, Slide Layouts, Transitions, Table Styles, Charts, SmartArt Graphics, and WordArt.
The elements on each tab are organized into groups, usually related to the style of the element represented on the tab. Each group contains thumbnails representing the document element you can insert or apply by clicking the icon.

See Also
To learn about creating really cool graphics like the ones shown here, see "Create Professional Diagrams" in Chapter 12.
Depending on your screen resolution, the size of the program window, and the number of thumbnails in a group, all the thumbnails in a group might not fit in the Elements Gallery at one time. When that happens, navigation buttons at the right end of the gallery indicate the number of additional gallery pages.
When you point to thumbnails in the Elements Gallery, the active thumbnail gets bigger than the others. If you don’t like this effect, you can turn it off by following the instructions in "Change the Gallery Color Scheme" later in this chapter. As you point to each thumbnail, its name appears in the upper-left corner of the gallery page.
The Toolbox displays the commands and settings you are likely to need when working with an Office file. The first time you start Word, Excel, or PowerPoint, the program’s Toolbox opens, to the right of the file window, displaying the Formatting Palette.

All the common font, paragraph, document, and page formatting options are available from the Formatting Palette.
Each program’s Toolbox includes multiple palettes, and each palette can include multiple panels of commands. The result is that you can perform nearly any function within an Office file by using the commands available from the Toolbox. The Toolboxes for all three programs include these common palettes (the icon representing each palette is shown to the left of its description):
Formatting Palette. This palette is a convenient central location for the tools you use to format text, paragraphs, tables, charts, pictures, and other document elements.
Object Palette. From this palette, which is new in Office 2008, you can insert shapes, symbols, clip art, or pictures into an Office file.
Scrapbook palette. This is a convenient central storage location for content snippets and files that you want to reuse elsewhere. The Scrapbook is shared by Word, Excel, and PowerPoint, so you can retrieve stored content from a program other than the one you saved it in.
You can organize content in the Scrapbook palette by assigning keywords to a clipping or file (let’s call these scraps, collectively) and by assigning scraps to categories or to projects that you’re tracking in the Project Center (a feature of Entourage).
Reference Tools palette. Tools on this palette give you direct access to a thesaurus, the Encarta encyclopedia, single-language dictionaries that provide definitions of English, French, German, Japanese, and Spanish words; a bilingual dictionary that provides definitions and translations of simplified or traditional Chinese, English, French, German, Italian, Japanese, Korean, and Spanish words; and a cool translation tool that you can use to translate phrases in simplified or traditional Chinese, Dutch, English, French, German, Greek, Italian, Japanese, Korean, Portuguese (Brazilian), Russian, and Spanish.
Compatibility Report palette. From this palette, you can check the compatibility of your Office file with other versions of Office, for Mac or for Windows.
Project Palette. From this palette, you have access to all the information about projects that you’re tracking in the Project Center, and a link to the Project Center.
See Also
For information about tracking Office files, time, people, and information about a project in the Project Center, see Chapter 16.
Each program includes one additional palette:
The Word Toolbox includes the Citations palette. From this palette, you can insert appropriately formatted bibliographic citations into a document.
See Also
For information about using the Citations palette, see the sidebar "Create a Bibliography" in Chapter 14.
The Excel Toolbox includes the Formula Builder palette. From this palette, you can locate mathematical functions that are appropriate to the operation you want to perform. You can then fill in the information required by the function, and the Formula Builder inserts the complete formula into your worksheet.
See Also
For information about using the Formula Builder palette, see "Create Simple Formulas" in Chapter 9.
The PowerPoint Toolbox includes the Custom Animation palette. From this palette, you can add entrance, emphasis, and exit animation effects, or multimedia actions, to selected slides. You can preview and modify the effects directly in the Custom Animation palette.
Bonus Web Content
For information about using the Custom Animation palette, see "Animate Slide Content in PowerPoint 2008 for Mac" on the book’s companion Web site at www.microsoft.com/mspress/companion/9780735626171.
You can manage the appearance and content of the Toolbox in several ways:
You can display and hide the Toolbox by clicking the Toolbox button on the Standard toolbar.
You can switch palettes by clicking the palette buttons at the top of the Toolbox, or by choosing the palette you want from the View menu.
You can minimize the Toolbox by double-clicking its title bar. The minimized toolbox displays only the title bar and the palette buttons. You can display a palette by clicking its button, or redisplay the Toolbox in its previous state by double-clicking its title bar.
You can move the Toolbox around on the screen. It is designed to dock tidily at the right or left side of the file window, but it can also float. When you drop the Toolbox very close to the left or right edge of the screen, it docks itself.
Clicking the Settings button swivels the Toolbox to display the Toolbox Settings pane. Using the commands at the top of the pane, you can control how and when the Toolbox closes. Using the commands at the bottom of the pane, you can control what appears on each palette.
