In this exercise, you’ll mark a few simple index entries and a cross-reference entry. Then you’ll create and format an index, delete an index entry from the document, and update the index.
Note
SET UP Open the Index document from the ~/Documents/Microsoft Press/ 2008OfficeMacSBS/FinishDocuments/ folder.
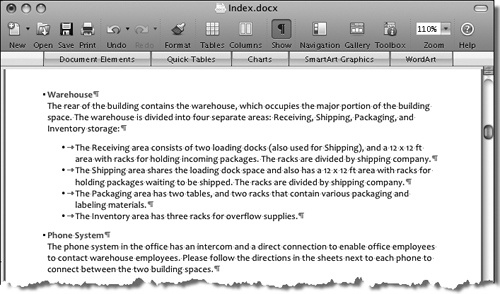
In the TOC at the top of the document, point to the page number (2) following Warehouse.
When the pointer changes to a pointing hand, click once to jump directly to the Warehouse heading at the top of page 3. Then on the Standard toolbar, click the Show button, to display hidden characters.
In the paragraph below the heading, select the word Receiving.
On the Insert menu, click Index and Tables. If the Index page isn’t already displayed, click it.
The From Template format shown by default reflects the character formatting of the document.
In the Index and Tables dialog box, click the Mark Entry button.
The Mark Index Entry dialog box opens. The selected text is already displayed in the Main Entry box.
In the Main entry box, change Receiving to receiving (with a lowercase r). Then click Mark All.
Note
Index entries appear in the index exactly as they appear in the Mark Index Entry dialog box. For consistency, make all entries lowercase except those for proper nouns.
Word inserts hidden index entry fields adjacent to every occurrence of the word Receiving in the document.
Troubleshooting
The additional index entries might take some time to appear, or might appear only after you click around in the document. During the development of this exercise, additional entries consistently took a long time to appear; sometimes more than one minute. This seems to be a bug in the program.
Without closing the Mark Index Entry dialog box, select the word Shipping in the same paragraph.
Click anywhere in the Mark Index Entry dialog box to activate it.
Word automatically enters the selected text in the Main Entry box.
In the Main entry box, change the first letter of the word from uppercase to lowercase, and then click Mark All.
Repeat steps 7–9 for the words Packaging and Inventory in the same paragraph.
In the paragraph under the next heading, Phone System, select the word phone.
Change the entry in the Mark Index Entry dialog box to phones, and then click Mark All.
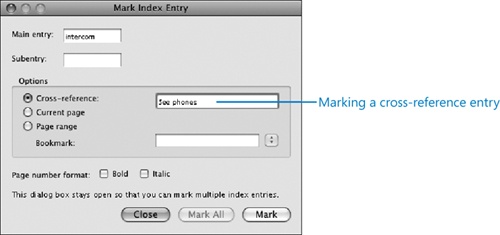
In the same paragraph, select the word intercom. In the Mark Index Entry dialog box, under Options, click Cross-reference.
The insertion point moves to the space after the word See in the adjacent box.
Without moving the insertion point, type phones.
In the Mark Index Entry dialog box, click Mark.
A cross-reference to the phones index entry appears adjacent to the word intercom.
In the next heading, Ordering Supplies, select the word Supplies. In the Mark Index Entry dialog box, type ordering in the Subentry box, and then click Mark.
Troubleshooting
The index subentry functionality appears to have a bug. If you make a change to the word in the Main Entry box—for example, change the word or its case—and then move to the Subentry box, the main entry reverts to its original case. Steps 16–19 demonstrate a workaround to this, and will not be necessary if the bug is fixed in a service pack or other update released in the future.
Word creates an index entry/subentry pairing after the heading.
In the Supplies:ordering index entry you just created, replace the uppercase S with a lowercase s.
The capitalization of the main entry is now consistent with the shipping entry you created earlier.
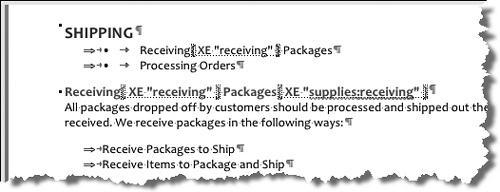
Select the {XE "supplies:ordering" } entry, and then copy it to the Clipboard (by clicking Copy on the Edit menu or by pressing Command+C).
Move to the Receiving Packages heading near the top of page 6, (noting along the way the many index entries that you’ve created in the document). Position the insertion point after the word Packages, and then paste the copied index entry from the Clipboard.
In the second index entry, replace ordering with receiving.
Close the Mark Index Entry dialog box.
Press Command+End to move to the end of the document, and then press Shift+Enter to insert a page break.
Tip
Use the Enter key on the numeric keypad, not the Return key. If your keyboard doesn’t have an Enter key, point to Break on the Insert menu, and then click Page Break.
The insertion point moves to the top of the new page.
Type Index, and then press Return twice.
From the Styles panel of the Toolbox, apply the Heading 1 style to the new heading.
Then move to the second paragraph under the heading.
See Also
For information about applying heading styles, see "Work with Styles" in Chapter 7.
On the Standard toolbar, click the Show button, to hide non-printing characters.
On the Insert menu, click Index and Tables.
The Index And Tables dialog box opens with the Index page active, because that was the most recent page displayed.
Make the following changes:
In the Index and Tables dialog box, click OK.
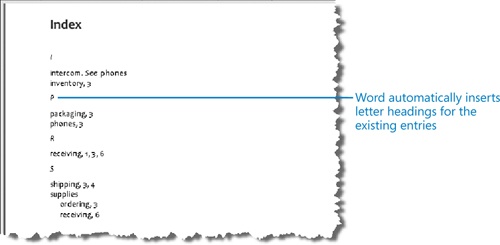
Word compiles a short index based on the few index entries you just marked. The index is formatted in one column with the page numbers adjacent to their index entries.
Display non-printing characters, and then move to the Phone System heading on page 3.
Delete the entire {XE "intercom" "See phones" } cross-reference entry following intercom.
Tip
If you find it hard to select only the index entry, try pointing to the right of the closing brace ( } ) and dragging slightly to the left.
The cross-reference entry is deleted from the document.
Press Command+End to move to the end of the document.
Hide the non-printing characters. Then right-click the index, and click Update Field.
Word updates the index and removes the cross-reference.