In this exercise, you’ll format the text in a document by changing its font, font style, size, color, and character spacing. We’ll be working in a Word document, but you can use these same techniques when working with text on a worksheet or on a slide.
Note
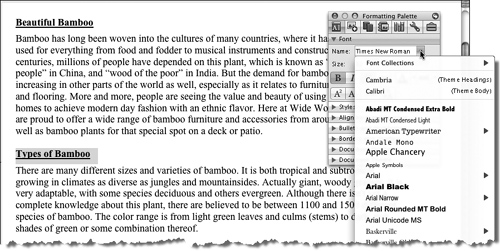
SET UP Open the Bamboo document from the ~/Documents/Microsoft Press/ 2008OfficeMacSBS/FormatContent/ folder. Display the Standard toolbar and close any other toolbars. Display the Formatting Palette in the Toolbox.
In the Formatting Palette, expand the Font panel, and close the other panels. Arrange the document and Toolbox so you can work with them.
The Font panel displays information about the font at the current location of the insertion point. The font used in this document is 12-point Times New Roman.
In the Beautiful Bamboo heading, click anywhere in the word Beautiful.
In the Font panel of the Formatting Palette, click the Underline button.
The word containing the insertion point is now underlined. Notice that you did not have to select the entire word to format it.
With the insertion point still in the word Beautiful, click the Bold button in the Font panel.
The word Beautiful is now bold and underlined.
On the toolbar, click the Format button to activate the Format Painter. Then move the pointer to the selection area to the left of the Beautiful Bamboo heading.
As you move the pointer across the text of the document, it changes to an I-beam with a plus sign to its left.
When the pointer is in the selection area, it changes to a right-pointing arrow.
Click in the selection area to the left of the Beautiful Bamboo heading.
Word "paints" the formatting of the word Beautiful onto the entire heading.
Click the Format button again, and then click in the selection area adjacent to the Types of Bamboo heading.
Word "paints" the formatting of Beautiful Bamboo onto Types of Bamboo. The font is bold and underlined, and the space after the paragraph increases to match that of the source paragraph. The active buttons on the toolbar and in the Toolbox indicate the attributes that you applied to the selection.
With Types of Bamboo selected, click the Name arrow in the Font panel.
The full Font list is available from the Toolbox.
Point to the arrow at the bottom of the list to scroll down. Locate and click the Stencil font.
The selected heading now appears in the new font.
Select the Beautiful Bamboo heading, and then click Repeat Font Formatting on the Edit menu (or press Command+Y)
Word applies the Stencil font to the selected heading.
In the Font panel, click the Size arrow and, in the list, click 26.
The size of the heading text increases to 26 points.
Tip
In Word, you can increase or decrease the font size in set increments by sliding the Size control in the Font panel of the Word Formatting Palette.
On the Format menu, click Font (or press Command+D).
The Font dialog box opens. An example of the current font settings is shown in the Preview window at the bottom of the dialog box.
In the Underline style list, click (none).
In the Effects area, select the Outline check box.
The Font sample in the Preview box changes as you make your selections.
At the top of the dialog box, click the Character Spacing button.
The Font dialog box changes to a page of character scale, spacing, and positioning options.
In the Spacing list, click Expanded. In the By box to the right of the list, enter 2 pt (or click the Up arrow to increase the number in increments of 0.1 point). Then click OK.
The selected text changes to reflect the font formatting you applied.
With Beautiful Bamboo selected, experiment with the other buttons in the Font panel. Then on the Edit menu, point to Clear, and click Clear Formatting.
The heading text returns to the default document font.
In the last sentence of the paragraph following the Types of Bamboo heading, select the words light green.
In the Font Color gallery, under Standard Colors, click the Light Green square (the fifth square from the left).
Tip
Pointing to a color in the Standard Colors palette displays the name of the color. Pointing to a color in the Theme Colors palette displays information about the purpose and intensity of that color.
The selected words are now light green. (To see the color, release the selection by clicking away from it.)
In the same sentence, select dark, rich shades of green. Click the Font Color arrow and then, at the bottom of the gallery, click More Colors.
The Colors dialog box opens. In this dialog box, you can choose colors from a color wheel, by moving color sliders, from a color palette, from an image palette, or from a box of crayons.
Click the buttons at the top of the dialog box to display the different color-selection interfaces. End by clicking the Crayons button.
In the crayon box, click various crayons to display a sample of the color and its name. Finish by clicking the Clover crayon (the third crayon from the left end of the top row). Then click OK.
The color of the selected text changes to clover green.
In the same paragraph, select the phrase there are believed to be between 1100 and 1500 different species of bamboo. Then in the Font panel, click the Highlight arrow.
In the Highlight gallery, click the Bright Green square.
The highlighted phrase now stands out from the rest of the text.
Tip
If you click the Highlight button without first making a selection, the mouse pointer becomes a highlighter that you can drag across text to apply the currently selected highlight color, as indicated on the Highlight button. Click the Highlight button again, or press the Escape key, to turn off the highlighter.