In this exercise, you’ll format slide backgrounds with solid colors, custom gradients, textures, and pictures.
Note
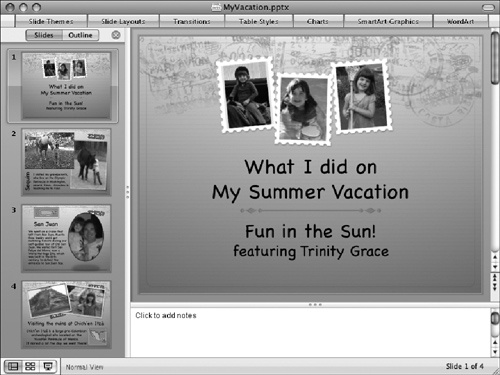
SET UP Open the MyVacation presentation from the ~/Documents/Microsoft Press/ 2008OfficeMacSBS/WorkSlides/ folder, and display it in Normal view.
Display the Slides page of the Navigation pane, if it’s not already open. Then adjust the width of the Navigation pane so that you can see several slides at once.
The background of each slide is a color gradient moving from a light color at the top of the slide to a darker color at the bottom of the slide. A graphic depicting several postmarks appears at the top of each slide. One or two graphics representing Par Avion (by airmail) stickers also appear on each slide other than the title slide. The postmark graphics on slides 1 and 4 are larger than the graphics on the others.
Display the Formatting Palette in the Toolbox, and expand the Slide Background panel.
The Slide Background panel of the Formatting Palette displays 12 slide backgrounds based on the Text/Background theme colors of this presentation (the PowerPoint equivalent of the theme-specific color scheme).
See Also
For information about color schemes, see "Work with Office Themes" in Chapter 7.
The top four backgrounds in the Slide Background panel (Style 1–Style 4) are solid versions of the Light 1, Light 2, Dark 1, and Dark 2 Text/Background colors. The middle four backgrounds (Style 5–Style 8) are three-color radial gradients, and the bottom four backgrounds (Style 9–Style 12) are two-color, centered, radial gradients.
With the presentation’s title slide displayed, select the Hide Background Graphics check box in the Slide Background panel.
The postmark graphic disappears from the top of the title slide. In the Navigation pane, the postmark graphic is still visible on slides 2, 3, and 4.
In the Slide Background panel, click the Style 3 thumbnail.
The backgrounds of this slide and the other slides in the presentation change to brown (the Text/Background - Dark 2 color), and the text changes to yellow (the Text/Background - Light 1 color).
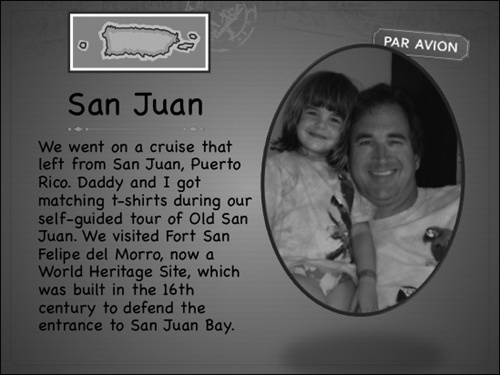
Display Slide 3 of the presentation.
The sticker graphic still appears on this slide. If you look closely at the top of the slide, you can see that the postmark graphic is still here, too. Its colors haven’t changed, and they’re difficult to see against this background.
In the Slide Background panel, click the Style 10 thumbnail.
The slide backgrounds change to a lighter brown color (the Text/Background – Light 2 color), with a sort of glow effect at the center. This effect is caused by the radial gradient that is part of this preset background.
The postmark graphic is more visible with this color scheme, as is the shadow effect that’s been applied to the photo.
In the Slide Background panel, click the Format Background button.
The Format Background dialog box opens, displaying the Solid page. This dialog box always opens to the Solid page, regardless of the type of background applied to the active slide. The Color box at the top depicts an accurate representation of the current background formatting.
At the top of the dialog box, click the Gradient button.
The Gradient page displays the details of the current slide background. As mentioned earlier in this exercise, this is a two-color, centered, radial gradient.
The gradient sliders just below the Gradient bar represent the colors used on the slide background and the way they blend into each other. (There are two sliders, so this is a two-color gradient.) The left slider is blue, indicating that it’s active. The right slider is gray, indicating that it isn’t active. The Color box displays the color of the active slider.
Click the right gradient slider to activate it.
The color shown in the Color box changes to the color represented by the right slider.
Click the Color box.
The Color palette expands. The 10 theme colors shown at the top are the same colors that appear in the Create Theme Colors dialog box discussed in the sidebar "Work with Presentation Color Schemes" earlier in this chapter.
At the top of the Theme Colors palette, click the dark pink square (Accent 2).
The Gradient bar changes to display a smooth gradient from a tan color to the dark pink color.
Drag the right gradient slider to the center of the Gradient bar, until the gradient box says 50%.
In the Color and transparency section of the Gradient page, click the Add Color button.
A third slider appears, between the second slider and the right end of the Gradient bar. The color associated with the new slider is the same as the currently active slider—dark pink.
Click the Color box and then, in the larger Theme Colors palette, click the middle green square (Accent 5, Lighter 40%).
The active slide background and gradient box change to reflect your selection.
If necessary, drag the Format Background dialog box out of the way so that you can see the active slide or its thumbnail.
With this color combination, it’s easier to see the effect of the centered radial gradient. It’s basically a series of circles. The center of the slide is the tan color, surrounded by a larger red circle, surrounded by a larger green circle—but the green circle runs off the page, so we have to take that for granted.
In the Styles and direction section of the Gradient page, experiment with the other Style choices—Linear, Rectangular, Path, and From Title—looking at the effect of each. Experiment with different combinations of styles and directions, to see the varying results you can achieve.
Tip
Choosing None in the Style list resets the background to the most recent Slide Background panel selection.
The Direction list is active for only the Radial and Rectangular styles. The Angle setting is active for only the Linear style.
When you finish trying out the gradient slide backgrounds, find one that you like, and click the Apply button. Then in the presentation window, display Slide 2.
In the Slide Background panel of the Formatting Palette, click Format Background. Then in the Format Background dialog box, click the Texture button.
You can choose from 24 different "textures," or patterns, that generally represent patterns found in nature—marble, wood grain, and water—with a few fabric weaves and random patterns that look a bit like...linoleum patterns, perhaps. (It’s hard to imagine what the criteria were for choosing these.)
Pointing to a texture thumbnail does not display its name, but clicking a thumbnail displays the texture name, just below the thumbnail pane.
Scroll the texture thumbnail pane, and click any textures that interest you to see them previewed on the active slide. End by clicking the first thumbnail in the last row (Cork).
The selected texture appears on the active slide.
By moving the slider, typing in the box, or clicking the arrow buttons, set the Transparency to 15%.
The cork lightens up a bit, providing a better contrast with the slide content.
In the Format Background dialog box, click Apply.
In the presentation window, display Slide 4.
In the Slide Background panel, click Format Background. In the Format Background dialog box, click Fill in the left pane, and then click the Picture button.
From the Picture page of the Format Background dialog box, you can add an image from the Clip Art Gallery storage location, or any image file, to the slide background. The image can stand alone on the slide or you can tile it to cover the entire slide.
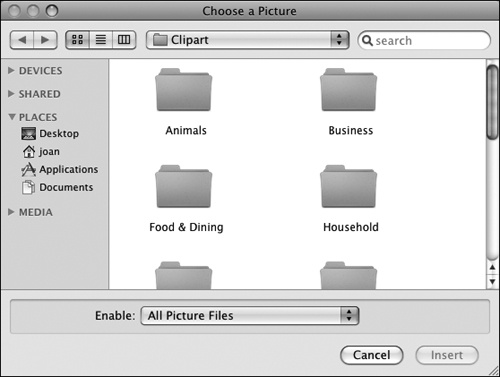
On the Picture page, click the Choose a Picture button.
The Choose A Picture window opens, displaying the contents of the Clipart folder.
Scroll the window if necessary, and double-click the Lines folder to display its contents. Scroll the folder contents if necessary, click the Stained Glass Line icon, and then click Insert.
The Stained Glass Line image (a multicolored stripe) appears in the preview area of the Picture page, and also on the active slide—but on the slide, it appears as a series of colorful vertical stripes.
Many of the stripe colors are dark enough to make it difficult to read the writing on the slide. (And, let’s face it, it looks a bit garish.)
On the Picture page of the Format Background dialog box, set the Transparency to 70% to tone down the colors so the text is more visible.
The slide immediately reflects your change.
In the lower-left corner of the dialog box, select the Hide background objects check box to remove the somewhat distracting postmark and sticker images.
Finally, at the bottom of the Picture tab, select the Tile check box.
The stripes on the slide background change to a zigzag pattern.
In the Format Background dialog box, click Apply, and then survey the results of your efforts!
You’ve formatted the four slides in the presentation with four entirely different backgrounds.


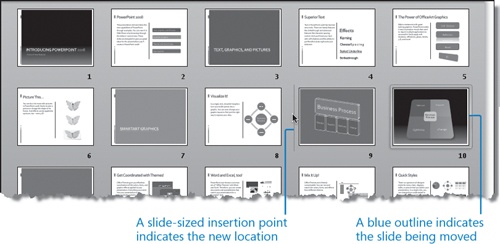
Move Slides in a Presentation
After you have created several slides, whether by adding them and entering text or by importing them from another presentation, you might want to rearrange the order of the slides so that they effectively communicate your message. You can rearrange a presentation in two ways: