
Content in a workbook is stored on sheets. In addition to the basic blank sheet (which we’ll refer to as a worksheet to differentiate it from the others), you can create chart sheets and list sheets. Each has a different appearance and purpose.
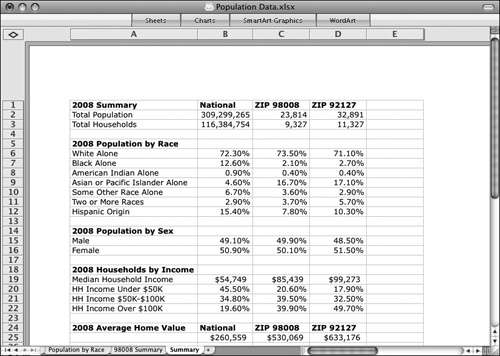
You can store and manage data in a worksheet, which has clearly defined cells and no built-in structure.
Acknowledgment
The population statistics shown in the workbooks in this section are from the ESRI Community Data dataset. ESRI (originally named Environmental Systems Research Institute) is the original creator of geographic information systems (GIS) technology. GIS technology supports complex, geographically based data collection, management, and analysis. For more information, visit www.esri.com.
You can store and manage one set of data in a tidy list by using a list sheet, which has a built-in structure for entering columns of data. You can specify the name of each column and restrict the type of data that can be entered in the column. The column headings include built-in sort and filter functions. As you enter data into a list sheet, the cell structure of the specific data set becomes visible. You can create new columns (fields) and enter data in rows (records), but you can’t enter data outside of the defined list structure.

A list sheet provides a specific structure for entering data, as well as built-in sort and filter functions.
A new workbook has only one sheet. This is sufficient for tracking simple data. If you want to track multiple data sets, divide a data set into logical groups, or display a different view of a data set (such as a chart), it’s tidiest, and least confusing, to do this on multiple sheets within one workbook.
You can add a blank worksheet to an existing workbook by clicking the Insert Sheet button at the right end of the existing sheet tabs. You can add a blank chart sheet or list sheet by pointing to Sheet on the Insert menu and then clicking Chart Sheet or List Sheet. Other specialized sheets are available from the Project Gallery and from the Elements Gallery.
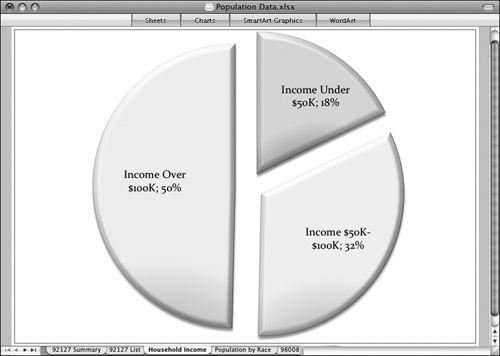
You can present a chart, independent of its data set, in a chart sheet. You can also embed a chart in its source worksheet (or another sheet). However, if you intend to present the chart to anyone, it will be more legible on a chart sheet.
Hide Sheets
If you want to keep a sheet in a workbook but not display it, you can hide it. For example, you might want to display or distribute a workbook that contains data stored on worksheets, and charts generated from the worksheet data, on separate chart sheets. If you don’t want to distract the audience with the raw data, you can hide the worksheets, leaving only the chart sheets visible.
To hide a worksheet, list sheet, or chart sheet:
Display the sheet you want to hide.
On the Format menu, point to Sheet, and then click Hide.
The sheet disappears from view.
To redisplay a hidden sheet:

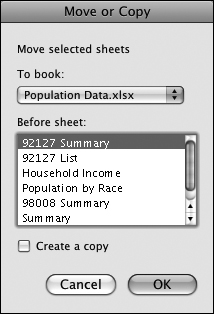
Another way of adding a sheet to a workbook is by moving or copying a sheet from one workbook to another. For example, you might want to compile related sheets from multiple workbooks into one, or use an existing dataset structure from one workbook in another. You can move a sheet between workbooks by displaying both workbooks and then dragging the sheet from one to the other. If you want to copy the sheet, hold down the secondary mouse button and drag the sheet. (We’ll refer to this action as right-click and drag.) If it’s not convenient to display both workbooks at the same time, open both workbooks, right-click the sheet you want to move, and then click Move Or Copy. In the Move Or Copy dialog box, you can specify the target location of the sheet.
You won’t necessarily create sheets in a workbook in the order you want to present or access them. For example, Excel creates new sheets at the end of the existing sheets, but if the new sheet is the one you want to display most frequently, you might want to put it at the beginning.
You can change the order of sheets within a workbook by dragging their sheet tabs from one position to another. This method works well if the sheet you’re moving is relatively close to its intended position. If it’s difficult to find the target location this way, you can move a sheet by right-clicking its sheet tab and then clicking Move Or Copy.
At the bottom of each sheet, a sheet tab displays its name. New sheets have a name based on the type of sheet and the number of sheets of that type in the workbook. For example, the third chart sheet in the document is named Chart3.
The sheet name is not only a tab label. It might also be displayed and printed in the sheet header or footer, and is used in formulas referencing information on other sheets. For this reason, even if your workbook has only one sheet, it’s a good idea to give each sheet a meaningful name. To select the sheet name for editing, double-click the sheet tab, or right-click the sheet tab and then click Rename. You can type a completely new name to replace the selected text, or click in the selected name to edit it. When you finish, press Return or click away from the sheet tab to save the new name.
A sheet name can be up to 31 characters, including spaces. The width of the sheet tab changes to match the sheet name. If you’re managing multiple sheets within a workbook, you might want to keep the sheet names short so that you don’t have to scroll the sheets to find the one you want.