
Overview of Exporting
Of equal importance to importing external data is the ability to export Revit data for use by others. This section will examine various processes for exporting data from your Revit project to other formats. To achieve your desired results when exporting, remember that exporting from Revit is essentially a WYSIWYG (what you see is what you get) process. For example, exporting a 3D view will result in a 3D model, exporting a floor plan will result in a 2D CAD file, and exporting a schedule will result in a delimited file that can be used in a program such as Microsoft Excel.
We will first review the process for preparing a set of files to be exported. This method is similar for almost all exports and will be referred to in subsequent sections.
There have been a number of significant improvements in Revit Architecture 2012. For instance, exporting of lines has been improved so that in the DWG Export settings, you can map a Revit line pattern to use a different linetype in the resulting DWG file. To access this new functionality, from the Application menu choose Export ![]() CAD Formats
CAD Formats ![]() DWG Files. Click Export Setup and select the Lines tab. The available linetypes are loaded from the *.lin file selected in the Load DWG Linetypes column. Any custom settings can be saved as well.
DWG Files. Click Export Setup and select the Lines tab. The available linetypes are loaded from the *.lin file selected in the Load DWG Linetypes column. Any custom settings can be saved as well.
As with lines, exporting of hatch patterns has been modified. You can map a different hatch pattern to the one that was used in Revit. To access this new functionality, from the Application menu select Export ![]() CAD Formats
CAD Formats ![]() DWG Files. Select Export Setup and choose the Patterns tab. The available patterns are loaded from the acdb.pat file located in the Procram/ACADInterop folder.
DWG Files. Select Export Setup and choose the Patterns tab. The available patterns are loaded from the acdb.pat file located in the Procram/ACADInterop folder.
Text and fonts can now be mapped and exported to a different font than was used in Revit. To access this new functionality, from the Application menu select Export ![]() CAD Formats
CAD Formats ![]() DWG Files. Select Export Setup and choose the Text & Fonts tab. The fonts available from the drop-down are loaded from your operating system's Fonts folder. Keep in mind that only fonts supported by Revit will be shown in the list.
DWG Files. Select Export Setup and choose the Text & Fonts tab. The fonts available from the drop-down are loaded from your operating system's Fonts folder. Keep in mind that only fonts supported by Revit will be shown in the list.
Dimensions in Revit can now be mapped to a dimensional style-based DWG dimension. In other words, the dimension text is controlled by the text style. But the tick mark is controlled by the arrow properties in the DWG file.
Preparing for Exports
The first step to any export is to establish the set of files to be exported. The following steps will walk you through the process:
- You can find all exporting commands by clicking the Application menu and clicking the Export flyout. As shown in Figure 8.16, check the bottom of the flyout menu for additional commands available for use.
FIGURE 8.16 Export commands accessed by clicking the Application menu

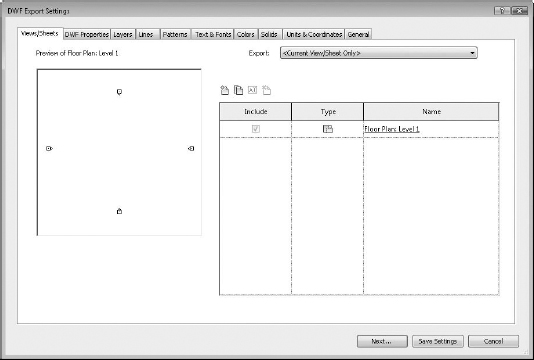
- Beginning an exporting command such as DWF/DWFx, you will first see the typical Export Settings dialog box, as shown in Figure 8.17. Notice in the View/Sheet Set tab the Export value is usually set to <Current View/Sheet Only>.
FIGURE 8.17 First view of Export Settings dialog box
- Begin to create your own list of views and/or sheets to export by picking <In Session View/Sheet Set> from the Export drop-down list, as shown in Figure 8.18. Note the listings “Export Set 1” and “Export Set 2” are predefined lists I created for the purposes of this tutorial.
FIGURE 8.18 Viewing available export sets in the model

- From this point, you can either use a temporary in-session set or create your own named set. We will continue these steps by creating a new set. Click the New icon above the view list, as shown in Figure 8.19, and name the set Export Set 3. Click OK to close the dialog box.
USING IN-SESSION LISTS WITH WORKSHARING
Be careful when using an in-session list for printing or exporting on a worksharing-enabled project. If two or more team members working on the same Revit project attempt to use the In-Session set, you may receive errors about the workset not being editable. Instead, always try to use predefined lists for exporting and printing on worksharing projects.
- To begin adding views and/or sheets to your new export set, make sure the Show In List drop-down is set to Views In The Model, Sheets In The Model, or All Views And Sheets In The Model (see Figure 8.20).
FIGURE 8.20 Showing all views and sheets in the model

- Select the views and/or sheets you need to export by checking the boxes next to the listed views in the Include column. Remember, you can sort the list by clicking any of the list headers (Figure 8.21).
- If you are done creating your list of views to export and don't want to continue exporting, click the Save Settings button; otherwise, click Next.
FIGURE 8.21 Adding views/sheets to the export list


The subsequent steps in the exporting process are slightly different based on each export format. You will usually see a Save To Target dialog box that allows you to specify automatic or manual naming conventions for multiple exported files. Exporting FBX files or images simply requires a file location and name.
Export Layer Settings
In addition to creating and maintaining lists of views for various exporting tasks, we recommend that you create at least one standardized layer mapping file for CAD format exports. Revit stores these settings in a text file (with the filename extension *.txt) that can be loaded from any location on your computer or network. To access the layer mapping select the Application menu and click the Export flyout on the DWG Properties tab. Then click the ellipsis button next to the Layers And Properties option (Figure 8.22).
FIGURE 8.22 Accessing export layer settings on the DWG Properties tab

Several exporting templates based on the industry standard layering guidelines are included (Figure 8.23) with Revit Architecture and can be applied by clicking the Standard button in the Export Layers dialog box. Similarly to import settings, you may want to create customized layer export templates and save them with your project data for future reference. Note that export templates will inherit all layer names of linked CAD files in your active project. Because of this, we recommend saving a copy of your export templates in a zip archive in case you need to return to the original template.
FIGURE 8.23 Industry standard layering conventions can be applied to export settings.

Layer names and colors can be customized by directly editing the values in the Export Layers dialog box (Figure 8.24). Each category and subcategory is capable of independent color and layer names.
FIGURE 8.24 Exported layer names and colors can be customized for any standard.

Special layer suffixes can be assigned to Revit model objects that are subject to graphic overrides from phasing. The standard phasing overrides (Existing, Demolished, and Temporary) are listed as object styles in the Export Layers dialog box and can be customized as required. These settings are applied to the end of the specified layer for a given Revit object. For example, if a new wall was set to export to A-WALL, a wall displayed as demolished in a Revit view would be exported to the A-WALL-DEMO layer.