
Standard point properties include items such as number, easting, northing, elevation, name, description, and the other entries you see when examining points in Prospector or Panorama. But what if you’d like a point to know more about itself?
It’s common to receive points from a soil scientist that list additional information such as groundwater elevation or infiltration rate. Surveyed manhole points often include invert elevations or flow data. Tree points may also contain information about species or caliber measurements. All this additional information can be added as user-defined properties to your point objects. You can then use user-defined properties in point labeling, analysis, point tables, and more.
How Can Civil 3D Work with Soil Boring Data?
In the following example you will add user-defined properties to some soil boring points and leverage point groups to work with the data. The skills you learn in this example can be applied to multiple soil boring values for the purposes of creating subsurface data.
1. Open the file Soil Borings.dwg. This file contains an existing ground surface along with several point groups, including one containing soil boring points. Take a moment to examine the soil boring points and the current elevation listing.
2. From the Settings tab, in the Point collection, right-click on User-Defined Property Classifications and select New. Name the new classification Soil Borings and click OK.
3. Expand the User-Defined Property Classifications area (if it is not already) and right-click on Soil Borings. Select New.

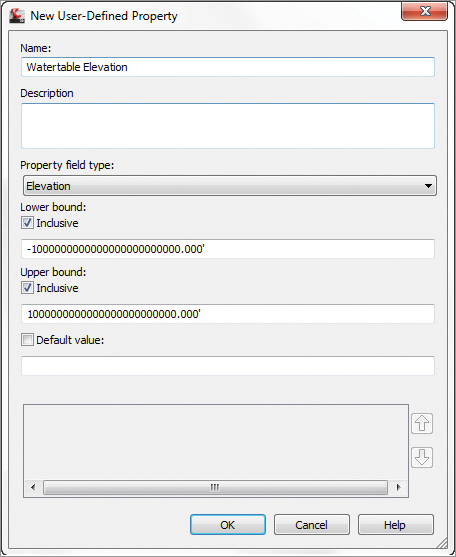
4. Name the new property Watertable Elevation. Set Property Field Type to Elevation. Deselect Default Value and click OK.
5. Jump back to the Prospector tab. Highlight the main Point Groups listing. At the very bottom of Toolspace you will see a listing of all the point groups, as seen here. Set the classification as shown.

6. Right-click the Soil Borings point group and select Edit Points. Scroll over in Panorama until you locate the new classification column. This is the information you added in the previous step.
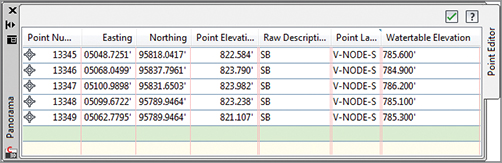
7. Add the Watertable Elevation entries in Panorama, as shown here. Dismiss Panorama when you’re done.
8. Right-click on the Soil Borings group and select Properties. Switch to the Overrides tab.

9. Place a check mark next to Point Elevation on the Overrides tab. Click the tiny pencil icon twice, or until it turns into the user-defined property icon.
10. Click the field next to the icon to set the value to Watertable Elevation.
11. Click OK to dismiss the Point Group Properties dialog. Notice that the elevation labels for the five points are listed as the watertable elevations.