
Strategies for Managing Templates
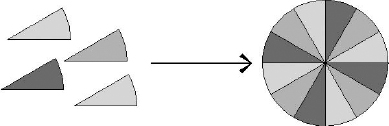
During the implementation of Revit, you can take one of two approaches when managing project templates: additive or subtractive. An additive approach, as shown in Figure 4.44, assumes that more than one project template will be developed to manage standards and content for a single project. Typically, a “base” template is used to start a project with a minimum amount of settings, whereas content and settings from “supplemental” templates are appended based on region, project type, or project style. In this scenario, each template file is lighter, but managing the templates becomes more difficult because changes in common settings or families must be applied to all templates.
FIGURE 4.44 Additive template approach
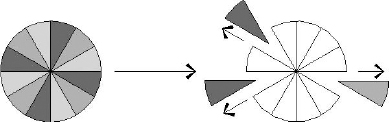
In contrast, the subtractive approach, shown in Figure 4.45, uses a single master template that contains all standard settings and content and relies on the project teams to remove and purge unused content. Although these templates tend to be heavier, graphic settings are easier to manage within a single file.
FIGURE 4.45 Subtractive template approach
![]() Real World Scenario: USING PROJECT TEMPLATES TO REDUCE REDUNDANT WORK
Real World Scenario: USING PROJECT TEMPLATES TO REDUCE REDUNDANT WORK
Based on a survey conducted by Robert Manna for an Autodesk University class, the majority of responders indicated they develop two to five project templates primarily to differentiate between project types and/or market sectors. For example, if you work for an architectural firm that is usually contracted to perform work on large transportation sector projects, you might need to create a Revit file just to manage the site data for every project.
In that case, you would use a specific template as a “site” project template. Within such a template, you could use the following settings to reduce the amount of redundant work every time different teams attempt to establish a site model to which other building models are linked:
- Name levels Sea Level and First Floor Reference
- Set default view scales to larger sizes
- Change default project units to reflect civil engineering
- Add a Cut/Fill schedule
- Create dimension types useful for large drawings
- Pad types including “gravel”
More information on template management, including results of the survey, can be found on Robert Manna's website at http://revit.krarchdesign.net. His Autodesk University content can be found at au.autodesk.com.
Aggregating Template Data
Whether you are managing the settings between templates or developing a project with multiple templates in an additive approach, Revit has some useful tools to help share data between projects, such as Transfer Project Standards, Insert Views From File, and Insert 2D Elements From File.
TRANSFERRING PROJECT STANDARDS
You can easily share Revit families between project files by loading their RFA files; however, most other types of content can be transferred with the Transfer Project Standards command. Some types of elements commonly transferred with this command include, but are not limited to, the following:
- Materials
- System family types (Walls, Floors, Roofs, and so on)
- Text and dimension styles
- Grid and level types
- Line styles and patterns
- Object style settings
- Viewport types
![]() To use this command, you must first have both the source and target Revit files open (or the source file linked into your target file); then make the target file the active project. Switch to the Manage tab, and select Transfer Project Standards on the Settings panel. In the Select Items To Copy dialog box (Figure 4.46), choose as many item categories as you'd like to transfer, and then click OK.
To use this command, you must first have both the source and target Revit files open (or the source file linked into your target file); then make the target file the active project. Switch to the Manage tab, and select Transfer Project Standards on the Settings panel. In the Select Items To Copy dialog box (Figure 4.46), choose as many item categories as you'd like to transfer, and then click OK.
FIGURE 4.46 Select categories to be transferred between projects.

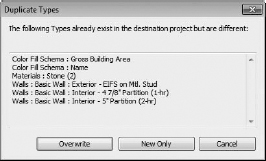
If you choose an element category containing some of the same types that already exist in your current project, you will be prompted with the option to overwrite the existing types or import the new types only (New Only), as shown in Figure 4.47.
FIGURE 4.47 Transferring project standards with duplicate types
INSERTING VIEWS FROM A FILE
The Insert Views From File command is useful for sharing drafting views of standard or typical details with other Revit project files. It can also insert entire sheets with all attached drafting views and associated properties. You can use the Insert Views From File command with the following view types:
- Drafting views
- Sheets
- Schedules
Switch to the Insert tab, and choose Insert From File ![]() Insert Views From File in the Import panel.
Insert Views From File in the Import panel.

Browse to a Revit project (with the file extension .rvt) file, and you will see the Insert Views dialog box (Figure 4.48). In the left pane, all eligible drafting views, sheets, and schedules will be listed. If necessary, use the drop-down list above to filter the choices.
FIGURE 4.48 Insert Views can be used to transfer an entire sheet of drafting views into your project.

If one or more sheets are selected in the Insert Views dialog box, all eligible drafting views placed on those sheets will be inserted into the current project as well. Note that repeating this process will not update the drafting views in the project, but instead will create new renamed drafting views and sheets. Also note that any custom view parameters are maintained during the transfer and can fit right into your customized Project Browser organizations, as we discussed earlier in this chapter.
INSERTING 2D ELEMENTS FROM A FILE
Similar to Insert Views From File, the Insert 2D Elements From File command imports the 2D elements of the selected view as a detail group into the active view in the current project instead of the entire view. For best results, make sure you have a drafting view active before using this command. On the Insert tab, find the Import panel, choose Insert From File ![]() Insert 2D Elements From File, and then navigate to a project file.
Insert 2D Elements From File, and then navigate to a project file.

Choose one of the available drafting views in the Insert 2D Elements dialog box (Figure 4.49).
FIGURE 4.49 Insert 2D Elements dialog box

For consistency, be sure to select the Transfer View Scale option to convert the scale of the active drafting view to that of the view you are inserting. You can move the elements into position using the Move command and, after placing the 2D elements, be sure to click Finish in the Edit Pasted panel or double-click anywhere outside the elements to complete the command.
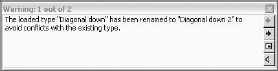
DUPLICATE TYPES WHEN INSERTING
When using Insert Views From File or Insert 2D Elements From File, be sure to watch for warnings about duplicate types being renamed, as shown here. You may be able to use the Purge Unused tool to remove any renamed styles; however, some types may need to be manually modified.
If duplicated types cannot be removed with Purge Unused, you will need to swap the duplicated types with the originals. Find the duplicated family types in the Project Browser, right-click on it, and choose Select All Instances. Doing so selects all instances of that type throughout the entire project. Open the Properties palette and select a different type. You will then be able to remove the duplicated type with Purge Unused or by right-clicking on it in the Project Browser and choosing Delete. Note that the Select All Instances method does not work on line styles.