
Adding Revisions to Your Project
Revisions allow designers and builders to track changes made to a set of construction documents during the construction phase of a project. Since the construction documents usually consist of numerous sheets, this methodology allows everyone on the team to track and identify which changes were made and when they were made during construction. The purpose is not only to ensure correct construction but also to create as-built documentation recording how the building was actually created to be delivered to building owners upon occupancy.
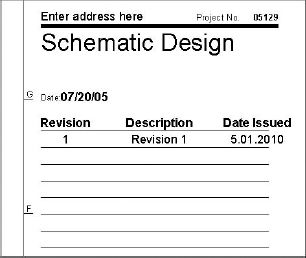
In a typical drawing set, revisions will look like Figure 22.1 when they are created in Revit and issued as part of the drawing set. Revision clouds themselves are created within views that are placed on the sheets. The Revision tag is also placed within the view, but once the view is then placed on a sheet, the revision will appear in the sheet properties and on any Revision schedule on the sheet itself.
To create a revision cloud in your project, select the Annotate tab and choose Revision Cloud from the Detail panel. This places you in a revisions cloud drawing mode, similar to a Sketch mode, and allows you to bubble the revised detail or drawing. When you're finished, click the green check to complete the sketch and your annotation is done.
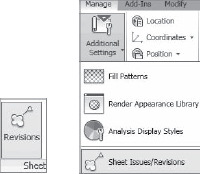
Typically in a project process, you'll have several rounds of revisions to a document set. Revit provides controls for this and gives you the ability to name and date the various revisions in your project to better track them. The Sheet Issues/Revisions tool is located in two places in Revit. You can find it either on the View tab as the Revisions button or on the Manage tab under Additional Settings (Figure 22.2).
FIGURE 22.1 A typical revision
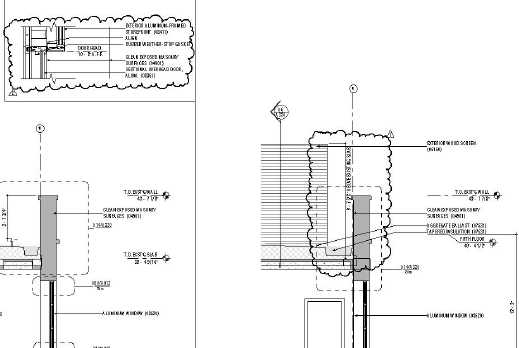
FIGURE 22.2 Opening the Sheet Issues/Revisions dialog box
Either of these tools will open the Sheet Issues/Revisions dialog box (Figure 22.3). Here you can add, merge, issue, and define the visibility of revisions.
FIGURE 22.3 The Sheet Issues/Revisions dialog box
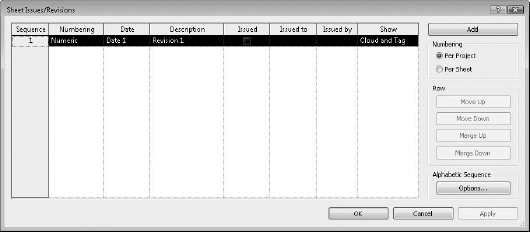
Let's review the major components of this dialog box beginning with the Revisions table:
Revision Table The Sheet Issues/Revisions dialog box starts with one default revision already in place, even though you may not have made a revision yet. This is only to give you a place to start—no revision will appear in your title blocks until you add revision clouds to your views. Each revision has a fixed number of parameters that you can enter. As you can see in Figure 22.3, the parameters include Numbering, Date, Description, and an Issued check box, in addition to Issued To and Issued By columns and options for showing clouds and tags.
Numbering (Table Column) The Numbering option allows you to number each revision numerically, alphabetically, or not at all. If you choose alphabetic sequence, the sequence is defined in the Alphabetic Sequence options. Click the Options button in the lower right of the dialog box to set your sequence and remove letters you don't want to use. For instance, some firms don't use the letters I or O because they are often confused with the numbers 1 and 0. Figure 22.4 shows a sample of the dialog box. By default, an entire alphabet appears here. The None option allows you to add project milestones—non-numbered entries that appear in revision tables—to sheets without having to add revision clouds.
FIGURE 22.4 Sequence options allow you to use any order of letters or numbers.

Issued To issue a revision, click the check box in the Issued column. Doing so locks
the revision clouds placed on sheets or in views associated with that revision, preventing them from being moved, deleted, or otherwise edited. The parameter values in the dialog box become inactive. This is to guarantee that the clouds and data do not change downstream once you issue a set of drawings.
REVISIONS IN A LIVE MODEL
During the construction process, the Revit model is still changing. When you issue a revision, keep this in mind: while the clouds can become fixed in the project, the model will not be. As you continue to make revisions to the model it will always be up-to-date. So, if you need to maintain an archive of all project phases or each revision, be sure to export the sheets either as DWF or PDF files as a snapshot of the sheets at time of issuance.
Show This table column controls the visibility of revision clouds and revision tags that have been issued. As issues occur, you may want to hide just the clouds or just the tags from previous revisions. For example, if you've issued one revision and then add revisions to a later issue and want to clean up your drawing, you can choose to show the issued revision as the tag only—typically a small triangle with the revision number inside it—or not show anything at all by using the None option.
The Add Button This function is used to create a new revision. The new revision will automatically be placed in sequential order and only the sequence number will be automatically updated. You'll need to add your own description and date.
Numbering You can choose to number revisions By Sheet or By Project in Revit. This is a global setting for the whole project, but one can be swapped for the other at any point. Which method you choose mainly depends on how your firm chooses to track revisions. The By Sheet setting allows you to have as many revisions as you want within the drawing set, but on each sheet, the list of revisions will remain sequential. For example, an issue named “Issued for Design Development” may be revision number 4 on one sheet and number 7 on another. Using the By Project setting will order your revision clouds based on the sequence established in the Sheet Issues/Revisions dialog box. In other words, all revisions with the same issue date would have the same revision number regardless of how many revisions appear on any given sheet. This approach might give you a greater degree of consistency throughout your document set but may limit you to the number of overall revisions you can use in the project. Either numbering method can be configured in advance and added to your project template.
Placing Revision Clouds
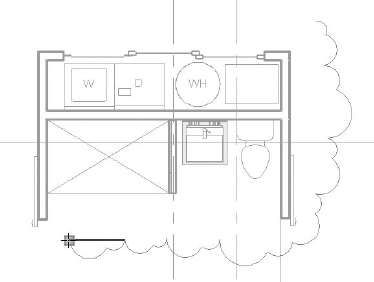
To place a revision, open a view in which changes to the model have occurred and use the Revision Cloud tool found in the Detail panel on the Annotate tab. Start drawing bubbles around the area you are calling out as a revision in a clockwise direction. Revit automatically creates a line that makes a cloud (or series of arcs), as shown in Figure 22.5. When you're finished creating the cloud, click the Finish Sketch button at the right side of the ribbon.
FIGURE 22.5 Adding a revision cloud to a view
Like other objects in Revit, the graphics for revision clouds are controlled from the Object Styles dialog box, accessed on the Annotation Objects tab. The default Revit setting for the line thickness is 1. We recommend that you change this to something like 7 in your project template to give it the pop you will typically see in revisions.
By default, each new revision cloud will be assigned to the last revision in the Sheet Issues/Revisions dialog box. If you need to change the revision to which a cloud is assigned, select the cloud and use the Properties palette to change it (Figure 22.6).
FIGURE 22.6 The revision cloud's issue assignment can be changed in the Properties palette.

As soon as you have placed a revision cloud on a sheet, any revision schedules placed in your title block will update to include the revision number, description, and the date you assigned in the Sheet Issues/Revisions dialog box earlier (Figure 22.7).
FIGURE 22.7 The updated title block with the revision information
Tagging a Revision Cloud
Revision clouds can be tagged like many other elements in Revit. Like other tags, these are intelligent and designed to report the revision number or letter that has been assigned to the revision cloud. To place a revision tag, use the Tag By Category tool in the Tag panel on the Annotate tab.
If a tag for revisions is not in your template, you will be warned that no such tag exists in your project. To continue, simply load a revision tag. The default Revit tag loaded by default in Revit is named Revision Tag.rfa and is located in the default Annotations folder within a standard installation.
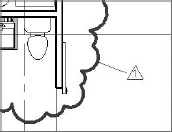
Once you have a tag loaded, you are ready to tag revision clouds. Hover the cursor over a revision cloud and click to place the tag. You will see a preview of the tag prior to placing it (Figure 22.8). Once the tag is placed, you can drag it around the cloud to reposition it, and turn on and off the leader, and it will stay associated with the cloud.
FIGURE 22.8 Tagging a revision cloud
DISABLING THE LEADER
You can choose to use a leader line between the tag and the cloud, depending on your preference or your office standards. In many cases, the tag just needs to be near the cloud, and a leader is not necessary. Disable the leader by selecting the tag and clearing the Leader option in the Options Bar.
BIM and Supplemental Drawings
The process of making supplemental drawings (SDs) entails making a change to an existing drawing and then issuing that change as a separate package during the construction process. Sometimes this can be a single 8 ½″ × 11″ or 11″ × 17″ sheet where the new detail is then pasted over the old one in the document set. From a workflow perspective, this can be a little disruptive in Revit for a couple of reasons:
- When in Revit, placing the new detail into a smaller sheet to issue the individual drawing can lead to other problems. Since there is only one instance of the view, it requires you to take views off your Construction Document sheet and place the detail in a new sheet. The problem is the new sheet/detail is meant to replace a portion of your original document set, so your set is now out of sequence. You will need to either remove the view from the sheet it was issued on temporarily (and remember to put it back) or duplicate the view and hope that you do not need to make last-minute additional changes.
- A Supplemental Drawing, once issued, is like a snapshot in time. It becomes a numbered change made to the drawing set at a given date. Because the model and all the views in the model always reflect the most current state of the project, making separate SD sheets and views within Revit will show any additional changes made to that view.
As a best practice, some architects leave all the revisions directly on the sheets where they were originally issued. The sheets can be printed to PDFs, and the PDFs (with the revision clouds) are imported into Adobe Illustrator or a similar application (where they can be properly scaled and cropped to the view or detail being revised and then placed on a template to be issued for the revision). This process not only creates a historic record of the revision, but also allows you to avoid issuing the full sheet while keeping your model up-to-date.