
Using Details from Other Files
It is not uncommon to have details in your Revit model that were originally created in a CAD program. Sometimes these are details taken from a manufacturer's website, and sometimes they can be details drawn in other projects or from an office library and you simply want to reuse them in your project rather than re-create them. Regardless of where they have originated, Revit has the ability to work with 2D detail elements and import or link them into the model for use in your project.
Revit allows you to both link and insert CAD files into your model to be used in your documentation. You can find both of these functions on the Insert tab. There are several file types you can both insert and link into Revit: DWG, DXF, DGN, SAT, and SKP. There are benefits and drawbacks to using either a linking workflow or an importing one. In the following sections, we'll step through the differences between the two and discuss when and why you should use either of these methods.
Linking vs. Importing
You will want to get CAD data into your Revit model at a variety of stages in the project process. Sometimes it could be the building site you've received from your civil consultant; sometimes it's manufacturer details you need for documentation. In each case, the CAD files can be temporarily imported or linked, or permanently become part of the documentation. In addition, the size of these CAD files can vary greatly. Knowing when to import and when to link can help save you from dealing with a lot of frustration later in your project by keeping the file sizes low and the model easy to manage.
LINKING
The Link CAD tool is on the Insert tab on the Link panel. This panel also controls all the other types of linking you might want to do for external files such as DWF markups or decals (images).
![]() We recommend you use linking when you have files that will be updated throughout the design process. This can be a 3D site drawing that you'll be receiving regularly from your civil engineer or 2D CAD details you'll receive from another drafter on your project who isn't familiar with a Revit workflow. By linking the files, you'll ensure that as those external files get updated, the information in Revit will reflect those changes. Linking creates a live connection between the model and the external files—much like an Xref in AutoCAD.
We recommend you use linking when you have files that will be updated throughout the design process. This can be a 3D site drawing that you'll be receiving regularly from your civil engineer or 2D CAD details you'll receive from another drafter on your project who isn't familiar with a Revit workflow. By linking the files, you'll ensure that as those external files get updated, the information in Revit will reflect those changes. Linking creates a live connection between the model and the external files—much like an Xref in AutoCAD.
Linked files are also easy to remove from your project, leaving no trace of imported line styles, layers, or hatch patterns. This makes linking an efficient option for temporary study files as well. Linked CAD files behave in a unique way in Revit because they will always appear in your project, even if the source file can't be found or it no longer exists. If a linked file cannot be found, you'll receive an error message like the one shown in Figure 18.26. The linked data will still display in your Revit project, but it will only display its last know version.
FIGURE 18.26 Unresolved References dialog box

IMPORTING
The Import CAD tool is on the Import panel of the Insert tab. The Import panel contains additional tools to import files from other sources. From here, you can import views from other Revit files as well as images and manage those imports through another dialog box.
![]() Use the Import CAD function when you want to embed files within your model. This might be valuable when you want to insert 2D or 3D geometry to trace over and you don't want to link the file. Or if you have completed details done in CAD and you want to make them a permanent part of your model, you can do so through an import.
Use the Import CAD function when you want to embed files within your model. This might be valuable when you want to insert 2D or 3D geometry to trace over and you don't want to link the file. Or if you have completed details done in CAD and you want to make them a permanent part of your model, you can do so through an import.
When importing CAD data, it will insert itself as a single object—like a family—in the model. You can manage layers by turning them on and off in the Visibility/Graphic Overrides dialog box, but you'll be unable to edit any of the geometry without exploding the CAD file. If you want to explode the file, you can highlight it and choose Full Explode or Partial Explode from the menu; however, we don't recommend this. Think of Revit like a database full of objects. An inserted CAD file is a single object in the database. An exploded CAD file can be thousands. Each time you explode a CAD file, you're adding overhead to your model that you might not be able to remove later. Good file management will help you keep your files small and able to react quickly.
![]() Real World Scenario: TIPS ON IMPORTING CAD DETAILS
Real World Scenario: TIPS ON IMPORTING CAD DETAILS
At times in the project, your workflow will necessitate using 2D information from a past project, manufacturer's library, or other resource in your current Revit project. To optimize the performance of your imported CAD files within your model, we recommend you take some steps to prepare the CAD file before import. Here are some general tips to help your import process:
- If the file you'd like to import contains hatches or annotations, delete them before importing and use filled regions and the Revit Text or Keynote tool for annotations. This will help keep your graphics consistent (in the case of hatch) and allow you to edit the verbiage and location of any notes.
- Import only one detail at a time so you can take better advantage of Revit's ability to manage sheet referencing. If you have a series of details organized in a single CAD file that you want to use in documenting your project, isolate each detail, save it as a separate file, and then import.
- Make sure you import the CAD details using the proper line weights, colors, and styles. Check your CAD file before importing into Revit to make sure it is consistent with your office's standards.
- If the imported geometry is something you really want or need to edit, it's better for your model and overall file size to import the CAD file into a detail component (if it's 2D) and explode it and edit it in the Family Editor. This way, when you import it into your project file, it is still a single object rather than thousands.
- Revit doesn't allow line segments shorter than ~1/32″. Although this is seemingly a very small line, many manufacturer details have small segment lines in them. When CAD details are exploded in Revit, those short lines will be deleted and can leave your linework looking incomplete.
For more complete coverage on the process of importing or linking CAD data, please refer to Chapter 8, “Interoperability: Working Multiplatform.”
Reusing Details from Other Revit Projects
We've discussed that you sometimes want to reuse details or geometry from other projects done in CAD. But what happens when you want to reuse details from projects completed in Revit? Thankfully, there are a couple of simple ways to take your Revit details and drawings with you from one project to the next.
SAVING A SINGLE DETAIL
Everyone is familiar with the problem of having a detail very similar to the one you need to create in a previous Revit project. Now the question is, how do you get it into your project? In the case of a single, 2D detail, it can be quick work to get the file from one project to the next.
 First, open the file with the detail you'd like to collect and activate the view this detail is in. Select all the geometry and annotation within the drafting view and create a group using the Create Group button on the Modify | Multi-Select contextual tab.
- The group will by default be created as a detail group (since all your geometry is only 2D). Give the group a name, making sure the name is unique enough not to overlap with any view names in your current project or the project you're going to import into.
- With the detail grouped and named, in the Project Browser expand the Groups node. Now, expand the Detail Group node and find the detail you just created. Right-click the detail and choose Save Group from the context menu.
- As part of the Save As process, you'll get the Save Group dialog box (Figure 18.27). This will allow you to create a separate RVT file for your group—basically a stand-alone project file. Save the group in a location where you'll be able to find it again and close your project file. There's no need to name the group as the new file will name itself the same as the group name.
FIGURE 18.27 The Save Group dialog box
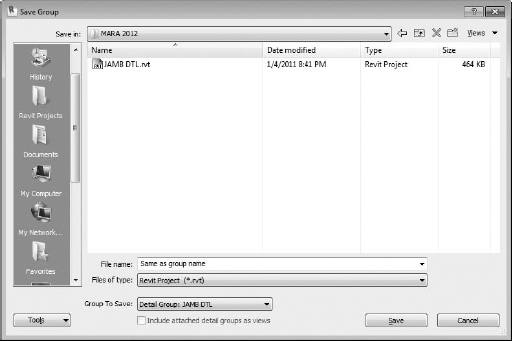
We have created a sample file using this method for use in the remainder of this exercise. Make sure you download the file JAMB DTL.rvt from the book's companion web page.
- Open the c18-Sample-Building.rvt project file saved from the previous exercises in this chapter.
- From the View tab, click on Drafting View to create a new view and name it JAMB DETAIL. The scale does not matter because it will inherit the scale of the imported detail.
- From the Insert tab of the ribbon, choose Insert From File and then Insert 2D Elements From File.
- In the Open dialog box, navigate to and select the JAMB DTL.rvt file. You will then see the Insert 2D Elements dialog box as shown in Figure 18.28. Highlight Drafting View: JAMB DTL from the list box and select the Transfer View Scale check box. Click OK to close the dialog box and begin the import.
FIGURE 18.28 Choose the detail group from the Insert 2D Elements dialog box.

- Click anywhere in the drafting view to place the imported elements and then click the Finish button in the ribbon to complete the command.
SAVING MULTIPLE DETAILS
As you create more and more details in Revit, you will inevitably want to save some of them to an office library or some sort of localized resource so you can quickly locate the good ones again. Revit allows you to selectively save multiple views from a single project into a separate, stand-alone file. This workflow will work for both 2D and 3D content.
A quick way to get any view isolated to an external file is to right-click the view in the Project Browser and choose Save To New File from the context menu. It might take Revit a few moments to compile the view content, but you will be presented with a dialog box asking you to locate the new file. Once the view is exported, it functions like any other RVT file. You can open these new views directly and edit or manipulate any of the content or elements within the file. You'll also see a streamlined version of the Project Browser having only the nodes that relate to the content you've exported.
Another way to export multiple views is to click the Application menu and choose Save As ![]() Library. This command allows you to save multiple views into a single RVT file that acts as a library for those views.
Library. This command allows you to save multiple views into a single RVT file that acts as a library for those views.
- Start by opening the file with the views you want to save. Click the Application menu and select Save As
 Library View.
 - This will give you the Save Views dialog box (Figure 18.29). It will show a list of view names on the left and a preview window on the right side. Click the check box for each of the views you want to save into a separate file. Once you have all your view names established, click OK.
FIGURE 18.29 Exporting multiple views to a separate file

Revit might take a few moments to export the views depending on how many you've chosen and how large the overall file size is. Once the process is completed, you'll have a separate file to import those views back into Revit. This import process is just as simple as exporting. To import the views:
- Open the project into which you'd like to import the views. From the Insert tab on the ribbon choose Insert From File and then Insert Views From File.
- The new dialog box will look very similar to the Save Views dialog box. You will have a list of the views you can import from the column on the left and a preview of those views on the right. Check the box for the views you want to import and click OK (Figure 18.30).

You can also import entire sheets of details as well using this method. If sheets exist in the file you have selected with the Insert Views From File command, they are listed as options to insert. When sheets are inserted, the details placed on each sheet are automatically imported into the project as well.