
Key Components of Stairs and Railings
Details of what each of the instance and type parameters do and how they affect your railing and stair design have been covered in other books and the Revit user forums. This section is about the parts of the functionality that are important to being able to create interesting stairs and railings.
Components of Railings
![]() The critical parts of a railing are the profiles, different kinds of balusters, and how they are placed within the definition of a railing.
The critical parts of a railing are the profiles, different kinds of balusters, and how they are placed within the definition of a railing.
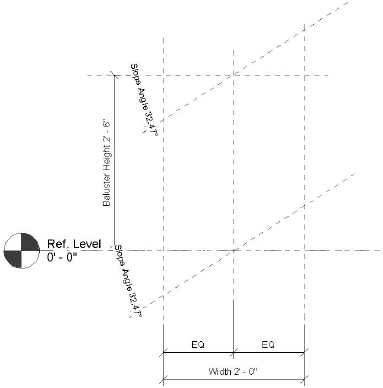
Profiles You can have as many profiles per railing as you like, but you can't have more than one profile per family (RFA) file. In each of these families, all the profiles need to be a closed loop—no gaps or overlapping lines allowed. Furthermore, all the profiles will be swept parallel to their host objects. In Figure 16.4, the baluster and all the horizontal rails are simple circular profiles swept along the line of the stair.
FIGURE 16.4 Multiple profiles per railing

Balusters There are three kinds of balusters:
- Baluster posts have built-in parameters to control the height of the baluster so that it can grow vertically (Figure 16.5).
FIGURE 16.5 Baluster post template

- Balusters have parameters that control the vertical length of both the top and bottom of the baluster. This includes reference planes that will control the angle of the top and bottom of the baluster. This is helpful for maintaining angular relationships to a stringer or handrail (Figure 16.6).
- Baluster panels have controls much like the baluster. But there are additional reference planes to control the overall width of a desired panel (Figure 16.7).

FIGURE 16.7 Baluster panel template
The railing profiles and all the different balusters come together to be controlled from a railing's type properties (Figure 16.8). In the Type Properties dialog box are separate dialog boxes for the railing. For this example, we'll use the in-the-box Guardrail – Pipe family that's part of your standard Revit template.
FIGURE 16.8 Type properties of a railing

Selecting the Rail Structure option will show you all the profiles that are associated with this railing type (Figure 16.9). As mentioned earlier, you can have multiple profiles associated with a railing, but each profile needs to be a separate family file.
FIGURE 16.9 Edit Rails dialog box

Selecting the Baluster Placement option will show you all the balusters that are associated with this railing type (Figure 16.10). As you can see, there are options for the main pattern, the posts, and an option for how the balusters will be used on stairs.
FIGURE 16.10 Edit Baluster Placement dialog box for the Guardrail – Pipe family

The Main Pattern section of the dialog box is where you would assemble all your baluster types and then space and host them accordingly. You can also decide how you want the pattern to repeat (or not repeat) itself at ends of sketched line segments.
The Posts section is used to specify which baluster is used at start, corner, and end conditions (and the frequency of corner posts).
That's a high-level overview of the properties of railings and what they're used for. We've covered the primary features necessary to create great railings using both in- and out-of-the-box techniques. Now let's discuss the important and fundamental parts of stairs.
Components of Stairs
The critical parts of stairs are the nosing structure, stringer, tread, and balusters/railings.
Nosing Structure This profile type is a closed loop that can be associated with the front and both sides of the tread.
Stringers The default stringers can only be rectilinear in shape (no “I” sections) and may only be placed on the left, right, and middle of the stair. There can be multiple middle stringers.
Treads Basically you can control the depth and the thickness. The actual shape of the tread in the plan is controlled in Sketch mode. Keep in mind that when you change the thickness of the tread, the top of the tread is maintained.
Balusters/Railings There is an important override option that allows you to specify the number of balusters per tread when the railing is used with stairs (as well as specify the baluster).
Now that we've covered the key components of stairs, let's start to investigate railings using techniques that are more common to Revit. Once you understand these rules, you'll better understand how and why to “stretch” them to create more complex configurations.