
Creating and Using Groups
It's easy to think of groups kind of like blocks (if you have an AutoCAD background) or cells (if you have a MicroStation background), but groups can be much more. Yes, they're great at maintaining repetition within your Revit project. But there are some major differences:
- Creating groups is quite easy. And whether it's a 2D or 3D group, the insertion point for the group is easily defined and modified. The same can't be said of simple 2D blocks in other applications.
- Updating groups is a breeze. It's easy and intuitive to modify a group after it's been created. Practically anyone on your team can do it, which means that design workflow will not bottleneck in your project team.
- Copying groups throughout your project is also a breeze. Groups can be copied across different levels, rotated, and even mirrored (although mirroring isn't such a good idea, but more on that later).
There are a few good practices that you'll want to keep in mind when using groups. But they're so straightforward that you'll wonder how you've ever worked without them.
Creating Groups
You can create two kinds of groups in Revit. One is just for geometry, and they're called model groups. The other is just for view-specific content like text, tags, dimensions, and so on, and they're called detail groups. You can create one kind of group or the other explicitly. But if you try to create a group with both model and detail elements, Revit is smart enough to create a detail group that's associated with the model group.
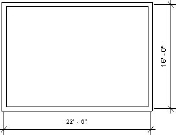
To demonstrate this, open a new project using the default template and start by drawing four walls, as shown in Figure 11.36. Don't forget to dimension the length and width conditions.
FIGURE 11.36 Four walls and dimensions
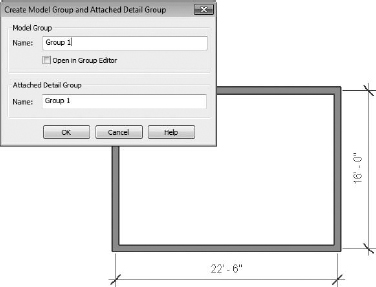
Now select all the walls you just created and choose the Create Group function under the Modify | Multi-select tab on the Create panel. Keep the default name Group 1 for both Model Group and Attached Detail Group (Figure 11.37).

FIGURE 11.37 Creating the model and attached detail group
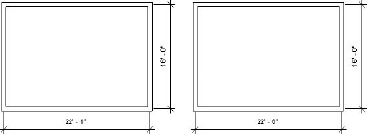
Now select the group and copy it to the side of your original group. You'll notice that only the geometry-based group is copied, which is fine for now (Figure 11.38).

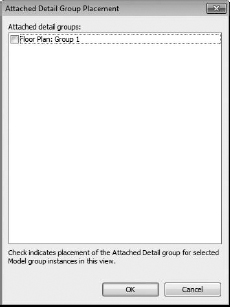
![]() Associating the detail group is simple. Select the group and then select the Attached Detail Groups option, and you'll see the dialog box shown in Figure 11.39.
Associating the detail group is simple. Select the group and then select the Attached Detail Groups option, and you'll see the dialog box shown in Figure 11.39.
FIGURE 11.39 Attached Detail Group Placement dialog box
The results are fairly straightforward (Figure 11.40). Both groups are now identical with geometry and dimensions.
Modifying Groups
Now that you've created two identical groups, let's add a door to one of the walls that belong to the group, as shown in Figure 11.41. But don't add the door to the group—just place it in one of the walls as you would any nongrouped wall.
FIGURE 11.41 Adding a door outside of Group mode

Now you can select the group to the left and select Edit Group from the Group panel on the Modify menu. You'll enter a special editing environment, as shown in Figure 11.42, and the background will appear a light yellow. This color is to alert you that you are in the Edit Group mode. Here you'll be able to add, remove, and attach other elements to your group.

![]() Now add the door to the group by selecting the Add function from the Edit Group panel. You'll notice that you can't add the door numbers because this is a model group and tags are 2D components. Now finish the group by selecting the green check and you'll notice that both groups have a door in the same location (Figure 11.43).
Now add the door to the group by selecting the Add function from the Edit Group panel. You'll notice that you can't add the door numbers because this is a model group and tags are 2D components. Now finish the group by selecting the green check and you'll notice that both groups have a door in the same location (Figure 11.43).

The process is essentially the same for modifying groups: Enter Group mode, make the changes and/or additions, and then finish the group.
Creating New Groups
Sometimes the easiest way to make a new group is copying and modifying an old one. To do this, first duplicate the group. A quick way to do this is to right-click the group name that you want to duplicate in the Project Browser, as shown in Figure 11.44.
FIGURE 11.44 Duplicating a group

Back in the View window, select your group. Notice in the Type Selector that you can swap between groups in the same way you can swap between types within a family. Using this method, highlight the group you created at the beginning of this exercise and swap the new group you created by duplicating. Exchange Group 1 for Group 2.
Select the group and enter Group Edit mode for this second group, and edit it as shown in Figure 11.45; then finish the group.
FIGURE 11.45 Modifying the second group

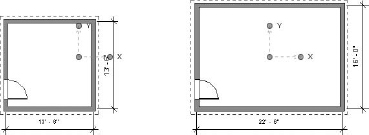
This brings up an important point of discussion. Groups have insertion points that need to be considered before you exchange one group for another. When you create a group in Revit, the insertion point is initially at the geometric center of all the stuff in the group. The group's origin is also identified by X and Y coordinates.
![]()
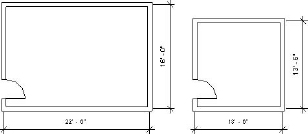
But keep in mind that as you edit the group, the insertion point doesn't move until you deliberately relocate it. This can be seen in Figure 11.46, as editing the geometry for Group 2 retains the same insertion point that was active when the group was initially created. Even though we've modified the group, the insertion point remains where it was originally when the group was created.
FIGURE 11.46 Insertion points in different groups
Moving the insertion point is an easy matter of dragging (and if necessary, rotating) the Insertion Point icon to a common location before swapping one group for another (Figure 11.47).
FIGURE 11.47 Relocating insertion points

Once you've done this, swapping groups occurs at the same relative location. Figure 11.48 illustrates Group 1 being swapped for Group 2, and vice versa. But common insertion points are being maintained.
Excluding Elements Within Groups
Of course there will be occasions where everything in a group works great and it works throughout the project—except for that one particular condition where things go awry. This issue is really frustrating. In the past, you had to create new groups for each slight exception, which might have been conceptually consistent but often led to an exponentially growing list of group variants. You were left with little ability to cohesively modify them as the project size (and number of groups) continued to grow.
This workflow is now deftly handled by excluding elements from groups. The rest of the groups are intact, and scheduling is aware of excluded elements. Figure 11.49 shows an example. We've copied a group above another one of the same type. But in this condition, there's a column right in the middle of the door.

We don't want to destroy the integrity of the group and give up being able to quickly modify similar elements, but we also cannot advance the design with the column located where it is shown. To resolve this, first select the door (by using the Tab key), right-click, and select Create Similar from the context menu to place a new door where you want it to go. This door will not be part of the group (you can't place elements as exceptions). In this case, the new door has been placed above the grouped door, and its swing direction has been flipped (Figure 11.50).
FIGURE 11.50 Adding a new door

Now you can exclude the door that conflicts with the column as an exception to the rest of all the other groups. This process can be a bit confusing at first, because you don't enter Group Edit mode to exclude members from groups. Simply hover over the group and tab through until the door is highlighted. Then select the door, as shown in Figure 11.51.
FIGURE 11.51 Selecting elements in groups

Once this is done, you'll notice an icon in the upper left of the door (Figure 11.51). Clicking this icon will allow you to exclude the door as an exception to the group, and the wall will heal itself as if the door was never there. When you click the icon, it will appear with a red hash through it notifying you the element is now excluded from the group. Click in the whitespace of the view to deselect, and the door will be excluded.
Selecting the group will reveal any hidden elements in the group that are excluded (Figure 11.52). Just tab through to select the hidden door to include the component back into the group.
FIGURE 11.52 Excluded elements not shown

Saving and Loading Groups
Even though we consider Revit to be the only whole building BIM (WBB) application in the world (by integrating the building, content, documentation, and multiuser workflow into one database), there are times when you'll want to share the data across many files.
Just as you wouldn't want your family components locked up inside a project file, there are good reasons to keep commonly used groups outside your project. You might even want to keep them in a folder just as you do your custom content so you can use them again later on similar projects. You can do so by saving groups outside your projects.
Saving groups is a matter of right-clicking the group name in your Project Browser and selecting Save Group (Figure 11.53).

You'll then be prompted to save the group as an RVT file (not an RVG file as in the past). You can open this file like any other RVT file if you'd like to modify it later and then reload the group into the project in order to update all the instances. To load an external group into a project, choose Load As Group from the Insert tab.
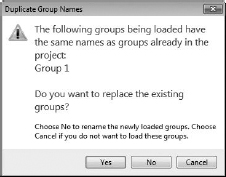
Be aware that when you load the group in a project, if the group name already exists, you'll be given a warning. You can overwrite the existing group (by selecting Yes) or load with the option to rename the group that's being loaded (by selecting No). Or you can cancel the operation altogether (Figure 11.54).
FIGURE 11.54 Loading modified groups
What's really great is that when you reload the group Revit even remembers to exclude previously excluded elements from the group that's been modified in another session of Revit. Figure 11.55 shows that a desk and chair have been added to the group. The group has been reloaded, overwriting the original group, but the exclusion remains intact.
FIGURE 11.55 Retaining excluded group elements

Creating Groups from Links
Because groups are also RVT files, they can be linked into the project environment as well. Although you can't edit a link in place (as with a group), there are some excellent reasons you might want to start a group as a link and then bind the link at a later time, which will convert it to a group. Groups and links can also exist within design options (more on design options later in this chapter). To follow this workflow:
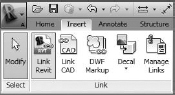
- Select Link Revit from the Insert tab (Figure 11.56).
- Browse to your group and click Open.
FIGURE 11.56 Adding groups as links
After the link has been placed, you can copy it throughout your project as you would any other element in Revit. Keep in mind that all the functionality between groups and nongrouped elements will not behave the same as links and the rest of your project. For example, in Figure 11.57 the upper-right collection of walls and furniture is a link, not a group. As a result, walls are not cleaning up between links and groups in the same way as they are between groups or other walls.
FIGURE 11.57 Wall joins between links vs. groups

This graphic restriction may not be a concern during programming and predesign, when links allow for a lot of rapid flexibility. After you've resolved your design using links, you can bind them into the project environment (Figure 11.58).

Rather than “explode” the link into separate and unrelated elements, Revit converts the link to a group. Once this happens, the previous graphic issue is resolved as walls easily join across groups, as shown in Figure 11.59.
FIGURE 11.59 Resolved wall graphics

Best Practices for Groups
Groups are great for creating and maintaining design iteration within a single project. And they're also great for maintaining consistency across multiple projects, since groups can be saved and loaded across multiple files. They can even be linked as separate RVT files and then converted to groups at a later time.
As with everything in Revit, there are some important exceptions that you will want to note. Nearly every time a problem crops up with groups it's the result of ignoring one of the following five best practices:
Don't put datum in your group. Avoid putting datum (levels and grids) inside your group. First, you can't manage the extents of the datum unless you're in Group Edit mode, which can create conflicts elsewhere in your project. Of course you will have the option to not include the datum when you bind your link. Again, doing so doesn't necessarily create a technical hurdle, but it can create a lot of confusion. We've seen situations where duplicate levels are deleted, only to find out that those levels were hosting content in the project.
Don't nest groups. Take care to avoid nesting groups. Although nesting can save time in some situations when the design is preliminary and your team is trying to distribute content and design ideas quickly, you'll likely find a point of diminishing returns as the design evolves. You can't get to all the features and functionality of Revit when you're in Group Edit mode. And if you're nested deep into groups and trying to modify project properties, you'll quickly get frustrated digging in, out, and across nested groups to go back and forth between your group and the project.
Group hosted elements and their hosts together. You want to keep your hosted elements and hosts together. For example, try not to group doors and windows without their host walls. Technically, nothing keeps you from creating a group from windows without their host. If any of your windows become unhosted and then deleted, this will delete other windows that are properly hosted. Another example is that elements such as plumbing fixtures that don't need to cut their host shouldn't be hosted. Instead, they should be face-based (or assigned the option Moves With Nearby).
Don't use attached relationships in groups. Avoid attached relationships within groups. In other words, give walls explicit heights rather than Attaching Top/Bottom to levels or other hosts (like floors and roofs). If you manipulate the datum or attached host and the relationship creates inconsistent conditions, you'll see a warning asking you to fix the groups (Figure 11.60).
FIGURE 11.60 Avoid attaching with groups.

Fixing the group really doesn't fix the group. It actually explodes it or creates a new group that is no longer referenced to the first group (Figure 11.61).
FIGURE 11.61 Resolving attachments warning

If you'd like to download the file that has been created during the examples, you can find it in the Chapter 11 folder on the book's companion web page (www.sybex.com/go/masteringrevit2012); the file is called c11_Groups.rvt.
Don't mirror groups. Finally, and maybe most importantly, don't mirror groups. Instead, it's better to create left and right versions. Does mirroring work in concept? Yes. Does it work in the real world? Not really.
Think about it. You'd love to be able to mirror that precious prototype coffee shop, right? Well, Revit doesn't disallow mirroring of content as a parameter. Mirror the coffee shop and now the baristas are foaming milk on the right rather than the left. This might look great in a rendering, but it doesn't make sense for the company that manufactures espresso machines.
And now the display cases have power supplies on the wrong side. The cash register has keys on the wrong side. The desk in the manager's office now has drawers on the left and filing cabinets on the right. And to make matters worse, the sink in the bathroom now has hot water coming from the wrong faucet. Again, it makes all the conceptual sense in the world to be able to mirror a building...and a group. But trying to make it work can cost a lot of time and money. And that's just a coffee shop. If you think it's a good idea to mirror a hospital room or a surgical theater or some other mission-critical building or civil construct, well...it could end badly. Or you will have to work very, very late.