Selecting, Modifying, and Replacing Elements
Knowing how to efficiently select, modify, and replace elements is fundamental to working productively in Revit. These interface operations are the foundation on which you will build skills in creating and editing your project models. In this section, we will review methods for selection, filtering, and modifying properties.
Selecting Elements
Revit was one of the first programs that had the ability to highlight elements as you hovered the mouse pointer over them before you actually selected them. Not only does this give you a clear idea of what you are about to select, it displays information about that object in the status bar and in a banner near the mouse pointer. When you hover over an element, it highlights in blue; click the highlighted element and it turns blue, indicating that it is selected.
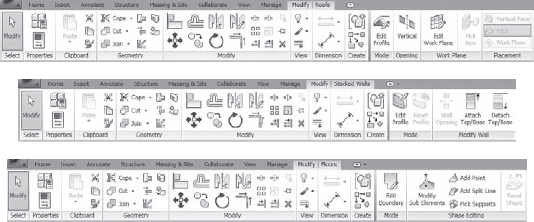
Once an element is selected, the ribbon changes to Modify mode where consistent editing tools are located in the left side and context-sensitive tools appear to the right. Notice the subtle differences in the ribbon, as shown in Figure 3.1, when a roof, stacked wall, and floor are selected.
CHANGING SELECTION COLORS
Note that you can change Revit's default colors for selection, highlighting, and alerts to your liking. Click the Application menu and select Options. In the Options dialog box that opens, switch to the Graphics tab to edit the settings for colors.
FIGURE 3.1 The right end of the Modify tab changes based on the element that is selected.

You can select elements in many different ways:
Add or Subtract You can build a selection of individual elements by using the Ctrl and Shift keys on your keyboard. Hold down the Ctrl key while picking to add elements, and hold down the Shift key while picking to remove elements. Notice the mouse pointer will indicate a plus (+) when you hold the Ctrl key and a minus (-) when you hold the Shift key.
Window To select large amounts of elements in a view window, you can click and drag the mouse to form two different types of selection windows. Click and drag from left to right, and only the elements completely within the window will be selected—this implied window is displayed as a solid line. Click and drag from right to left, and any element within or crossing the window will be selected—this implied window is displayed as a dashed line.
Chain Although there are no polylines in Revit as there are in AutoCAD, chain-select is an intelligent method for selecting connected elements. To activate this mode, hover your mouse over (but don't click yet) one wall that is connected to several other walls. While the element is pre-highlighted, press the Tab key once, and the connected elements should be selected. When selecting objects, note that the Tab key is used to cycle through all available objects near your mouse pointer. If a floor edge happens to be near the edge of a wall you are trying to chain-select, you can skip the chain of walls and select the floor. Be sure to look at the status bar; it will indicate “Chain of walls or lines” when you have selected correctly.
![]() Selection Count Whenever you select any number of objects, the count of selected objects is displayed at the right end of the status bar. Clicking the Filter icon next to the selection count opens the Filter dialog box, allowing you to further refine the elements you want to modify.
Selection Count Whenever you select any number of objects, the count of selected objects is displayed at the right end of the status bar. Clicking the Filter icon next to the selection count opens the Filter dialog box, allowing you to further refine the elements you want to modify.
Select Previous A little-known feature allows you to select elements you had previously selected. Either right-click and choose Select Previous from the context menu or press Ctrl and the left arrow key on your keyboard.
Filtering Your Selection
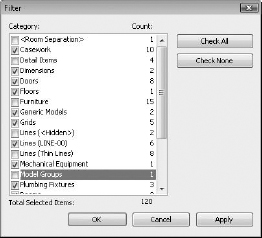
Once you have elements selected, you can filter the selection by object categories using the Filter tool. This tool allows you to select large numbers of elements and then focus your selection by removing categories you don't need, as shown in Figure 3.2. For example, if you box-select an entire floor plan, you will have a selection set of many different categories. Using the Filter tool, you can limit the selection to just the Doors category—or perhaps Doors and Door Tags.
Note that the Filter tool in the ribbon appears only if you have elements from multiple categories selected. If you have elements of only one category selected, you can still open the Filter tool by clicking the Filter icon in the status bar. You can use the Properties palette as a filter as well; see the section “Using the Properties palette” later in this chapter for more information.
FIGURE 3.2 Use the Filter dialog box to fine-tune your selections.

Selecting All Instances
Another fast and powerful method for selecting objects is the Select All Instances function. When you right-click a single object in the drawing area or right-click a family in the Project Browser, the Select All Instances tool gives you two options: Visible In View or In Entire Project. Selecting the Visible In View option will select only those items you can see in the current view. This will not select elements that have been either temporarily or permanently hidden in the view.
Use the In Entire Project option carefully because you can modify elements in many places that you did not intend to change. Always remember to look at the selection count in the status bar when you use Select All Instances. Here are some common situations where you might use this tool:
- View titles—when updating graphics
- Walls—when switching from generic to specific types
- Title blocks—moving from design to detail documents
- Viewports—useful when trying to purge unused viewports
Note that Select All Instances does not work on model lines or symbolic lines. This limitation exists because lines are not only drawn in project views; they are integral parts of other objects such as filled regions and shaft openings.
Using the Properties palette
![]() The Properties palette is similar to the Instance Properties dialog box in previous versions of Revit. In the latest version, it is a floating palette that can remain open while you work within the model. The palette can be docked on either side of your screen, or it can be moved to a second monitor. Open the Properties palette by:
The Properties palette is similar to the Instance Properties dialog box in previous versions of Revit. In the latest version, it is a floating palette that can remain open while you work within the model. The palette can be docked on either side of your screen, or it can be moved to a second monitor. Open the Properties palette by:
- Clicking the Properties icon in the Properties panel of the Modify tab in the ribbon
- Selecting Properties from the right-click context menu
- Pressing Ctrl+1 on your keyboard (like in AutoCAD)
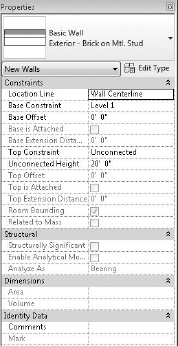
As shown in Figure 3.3, the Properties palette contains the Type Selector at the top of the palette. When placing elements or swapping types of elements you've already placed in the model, the palette must be open to access the Type Selector.
FIGURE 3.3 The new Properties palette contains the Type Selector and is used to set view properties.

When no elements are selected, the Properties palette displays the properties of the active view. This supersedes the View Properties command in older versions of Revit. If you need to change settings for the current view, make the changes in the Properties palette, and the view will be updated. For views, you may not even need to use the Apply button to submit the changes.
Finally, you can also use the Properties palette as a filtering method for selected elements. When you select elements from different categories, the drop-down list below the Type Selector displays the total number of selected elements. Open the list and you will see the elements listed per category, as shown in Figure 3.4. Select one of the categories to modify the parameters for the respective elements. This process is different from the Filter tool in that the entire selection set is maintained, allowing you to perform multiple modifying actions without reselecting elements.
FIGURE 3.4 Use the Properties palette to filter selection sets.
Matching Properties
![]() Located on the Modify tab of the ribbon under the Clipboard panel, the Match Type Properties tool allows you to select one element and apply its type and instance properties to other elements of the same category. Once you select one element, the brush icon near the mouse pointer appears filled. Each subsequent pick on elements of the same category will replace the selected element with the properties of the first element picked. Clicking in an open space will clear the brush icon and allow you to pick a new source object without restarting the command.
Located on the Modify tab of the ribbon under the Clipboard panel, the Match Type Properties tool allows you to select one element and apply its type and instance properties to other elements of the same category. Once you select one element, the brush icon near the mouse pointer appears filled. Each subsequent pick on elements of the same category will replace the selected element with the properties of the first element picked. Clicking in an open space will clear the brush icon and allow you to pick a new source object without restarting the command.
Be careful when using this tool with walls, because not only does it change the wall type, but it also changes the top and bottom constraints of the walls being matched. Thus, the best practice for changing wall types without affecting height constraints is to use the Type Selector.
Using the Context Menu
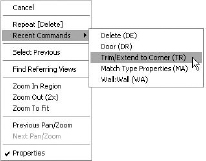
The context menu that appears when you right-click in the drawing area contains several options in Revit. You can activate the last command or select from a list of recent commands, as shown in Figure 3.5.
FIGURE 3.5 Run recent commands from the context menu.

In addition to the other right-click commands listed throughout this chapter (such as Create Similar), zoom commands including Previous View are on the context menu. There are also useful commands when you right-click views in the Project Browser. For example, activate a plan view and then try right-clicking a 3D view in the browser. Select Show Section Box, and you can edit the extent of the 3D view's section box while in a floor plan.

