
Interface Organization
The interface has continued to evolve since 2010 and displays real finish and elegance. Persistence of command location is the key. So even though functions remain contextually exposed or hidden depending on what you're working on, the majority of those contextual commands are in the same place.
Figure 2.64 shows the Revit 2012 UI. To illustrate some different project views, we've tiled four view types: plan, elevation, 3D, and sheet.
![]() FIGURE 2.64 Revit 2012 user interface
FIGURE 2.64 Revit 2012 user interface

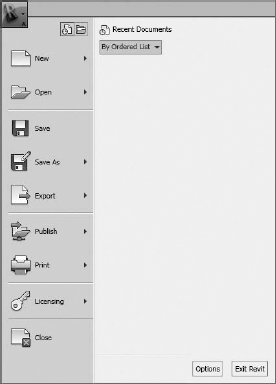
Application Menu
The Application menu (Figure 2.65) allows you to access commonly used commands: New, Open, Save, Print, and so on. You can also export your project to a number of 2D and 3D formats from this menu. This menu is also where you manage licensing information. The Publish option lets you publish RFA files to Autodesk Seek.
Quick Access Toolbar
The Quick Access toolbar (QAT) allows you to create a group of frequently used tools in one selection area (Figure 2.66).
FIGURE 2.66 Quick Access toolbar
![]()
Right-clicking a command in one of the tabs allows you to add elements to the QAT (Figure 2.67).
FIGURE 2.67 Adding commands to the QAT
![]()
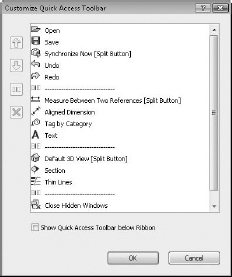
By clicking the small, down-facing arrow to the far right of the QAT, you'll find that commands may be further customized, grouped, and removed from the toolbar (Figure 2.68). You also have the option to show the QAT below the ribbon.
FIGURE 2.68 Customizing the QAT
InfoCenter
To the far right of the QAT is the InfoCenter (Figure 2.69).
![]()
From left to right, you have the ability to search, access the Subscription Center, access the Communication Center, save Favorites, and get help.
Properties
The Properties palette contains the instance parameters of whatever you're currently working on. From this palette you can access the Type Selector, filter properties, and edit type parameters (Figure 2.70).
FIGURE 2.70 Properties palette

Project Browser
The Project Browser (Figure 2.71) is a project tree of all the views, legends, schedules, sheets, families, groups, and links in your Revit project. You can collapse and expand the project tree by selecting the + or – icon.

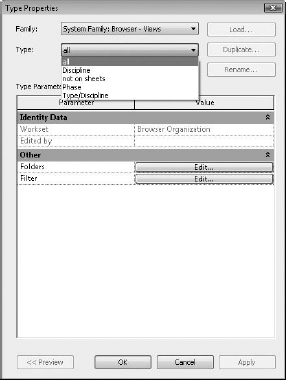
The Project Browser can also be filtered and grouped into folders based on a number of user-defined parameters. To access the type properties of the Project Browser, simply right-click the Views portion at the top of the palette (see Figure 2.72).
FIGURE 2.72 Project Browser's type properties
Status Bar
The status bar provides useful project information on files that are opening or already open (Figure 2.73). Project information such as worksets, design options, and filters is immediately accessible from the status bar.
![]()
Drawing Area
The drawing area is the window into your design space. In this example, we've tiled four view types: plan, elevation, 3D, and sheet (Figure 2.74). Rather than jump between expanded drawing areas that obscure each other, it's sometimes helpful to tile many views in the same area.

When you do this, you'll only be able to zoom into the extents that are defined by the drawing area. If you want to get around this limitation, here's a helpful tip.
Create a new sheet, but then delete the sheet (keeping the view). This is your “working” space for any view of the project. Now you can create duplicate views of any of your project views and assemble them in this working space (Figure 2.75). Zooming in and out is much more fluid, and you're not limited to the extents of one drawing area. You can create a keyboard shortcut to activate and deactivate views, which is helpful as well.
FIGURE 2.75 Working sheet view

View Control Bar
The View Control Bar is at the bottom of every view and is contextual, based on the type of view that you're working in (Figure 2.76). Some views (like sheet views) won't have them. Perspective views won't show a scale.
![]()
From left to right you have Scale, Detail Level, Visual Style, Sun Path (On/Off), Shadows (On/Off), Rendering Show/Hide (only in 3D views), Crop (On/Off), Show Crop (Show/Hide), Temporary Hide/Isolate, Reveal Hidden Elements, and in 3D views Lock 3D (On/Off).
One of the nice features in Revit is the ability to see realistic colors from the visual style (Figure 2.77).
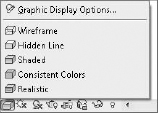
The difference is subtle, but when combined with other graphic features, it will likely lead to users not rendering project views that are part of the document set. Rather, they'll opt for having real-time views.
Graphic Display Options
Selecting the Graphic Display Options from the View Properties bar opens a dialog box that lets you further embellish your project view on a per view basis (Figure 2.78), such as adding silhouette edges and real-time shadows.
FIGURE 2.78 Graphic Display Options dialog box

New in Revit 2012 is the ability to add global transparency to all solid elements in a view by selecting the Ghost Surfaces option (Figure 2.79).
FIGURE 2.79 Ghost Surfaces option

The results of selecting this option are seen in Figure 2.80.
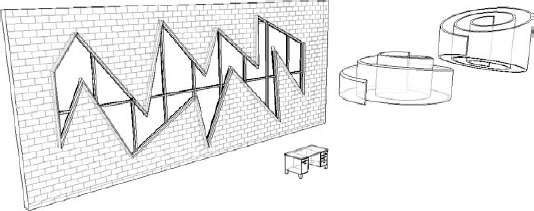
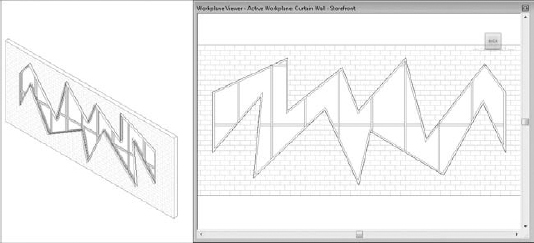
Work Plane Viewer
New in Revit 2012 is the Viewer option located on the Work Plane panel of the Home tab (Figure 2.81). This viewer is available from all model views when you're in the project environment.
FIGURE 2.81 Viewer option on the Work Plane panel

By default, the work plane is based on the active work plane of the last active view. But when you enter Sketch mode, the active work plane is that of the sketch (Figure 2.82). So even if the project window shows a 3D view, the viewer shows the plane of the sketch.
FIGURE 2.82 Sketch mode with active work plane
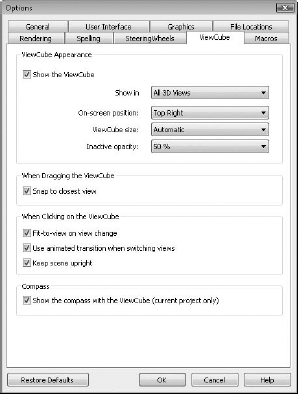
ViewCube
You'll find the ViewCube in 3D views (Figure 2.83).

Hovering over the ViewCube reveals the Home option (the little “house” above the ViewCube), which you click to return to your home view. Right-clicking the ViewCube opens a menu that allows you to set, recall, and orient your view (see Figure 2.84).

Selecting Options from the context menu takes you directly to the ViewCube options in the Options dialog box (see Figure 2.85).
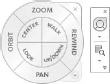
Navigation Bar
The navigation bar contains the Navigation Wheel, View Zoom, and Pan controls (Figure 2.86).
Ribbon
The ribbon contains all of the Revit functionality for designing and documenting your Revit project (Figure 2.87). There are specific portions of the ribbon you should be familiar with.

TABS
Tabs are used to select from among the various groups of functionality in Revit. There are nine tabs in the Revit ribbon (Figure 2.88).
FIGURE 2.88 There are nine tabs in the ribbon.
![]()
We'll take a moment to briefly describe these tabs.
Home The Home tab is used to create or place content (both system and component families) as well as datum (Figure 2.89).
![]()
Insert The Insert tab is used to link external files (2D, 3D, image, and Revit file types) as well as search for external content via Autodesk Seek (Figure 2.90).

Annotate The Annotate tab contains many of the tools necessary to annotate, tag, dimension, or otherwise graphically document your project (Figure 2.91).
![]()
Structure The Structure tab contains the tools necessary to add elements, which can be structurally analyzed in Revit Structure (Figure 2.92). You can also add datum from this tab.

Massing & Site The Massing & Site tab contains the tools necessary to add massing- and site-related elements (Figure 2.93).
FIGURE 2.93 Massing & Site tab

Collaborate The Collaborate tab contains the tools that you'll use to coordinate and manage the project within your own team as well as across other teams and their linked files (Figure 2.94).

View The View tab contains the tools that you'll use to create all your project views, 2D and 3D, as well as schedules, legends, and sheets. You can also modify your user interface from this tab, including your keyboard shortcuts (Figure 2.95).
![]()
Manage The Manage tab contains all your project standards and other settings (Figure 2.96). This tab also contains your design option and phase tools.
![]()
![]() One of the most important settings that you'll use during your project is Object Styles on the Manage tab. Selecting this option will allow you to manage the global visibility settings for just about everything in your project: how it projects, how it cuts, and its associated color and pen weight.
One of the most important settings that you'll use during your project is Object Styles on the Manage tab. Selecting this option will allow you to manage the global visibility settings for just about everything in your project: how it projects, how it cuts, and its associated color and pen weight.
Modify The Modify tab contains the tools you'll use to manipulate all the content that you're creating in your Revit project (Figure 2.97).

Contextual Modify Contextual Modify tabs are revealed as part of an addition to the Modify tab when specific elements are selected (Figure 2.98). Contextual tabs are located to the far right of all the other panels in your ribbon.

PANELS
Panels identify areas of grouped functionality in the ribbon. They can also be pulled out of tabs and arranged so that functionality is persistently exposed. To relocate a panel, click and drag the panel portion out of the ribbon (Figure 2.99).
FIGURE 2.99 Panels identify areas of grouped functionality.

The panels will snap together if you hover over a previously placed panel. To return a panel to the ribbon, click the down arrow in the upper portion of the right gray bar in the panel set.
OPTIONS BAR
The Options Bar is a contextually sensitive area that gives you feedback as you create and modify content (Figure 2.100).
