Physical to Virtual
In some cases, you don't want to spend the time to create a VM that is a duplicate of a physical machine, particularly if it means trying to re-create a physical machine that contains an operating system, numerous applications, and dozens of user-created files that has grown and evolved over time. Trying to e×actly re-create such a physical computer would be nearly impossible, especially if the physical computer you're trying to duplicate is a work-issued desktop or laptop that contains applications and settings that you can't install or duplicate.
Fortunately, both Parallels and VMware have applications that allow you to turn your physical computer into a virtual computer, in effect migrating the entire computer into a VM. This is commonly referred to as physical-to-virtual (P2V) technology. The applications to complete the P2V migration are provided on a complimentary basis by the software vendors. Obviously it's in their interest to get you to give virtualization a try! Not only that, but both Parallels and VMware offer 30-day trials of their virtual solutions so you can create or convert a trial virtual computer.
To download Parallels Transporter, go here:
www.parallels.com/products/pvc45/technology/transporter/
To download VMware Converter, go here:
www.vmware.com/products/converter/
Once you've downloaded either (or both) P2V conversion solution, simply install the application, start it, and follow the onscreen directions. It's pretty straightforward, but it may take some time (up to a few hours), and while the conversion is taking place, it's best to not attempt to work on the host computer.
When the conversion is complete, you'll have a single file that is very close to the size of the used capacity of your physical computer. For example, if your physical computer's operating system, applications, files, settings, and so on take up 60 GB of space on your hard drive, you'll have a 60 GB file when the P2V conversion is complete. Therefore, it's important to have more free space on your hard drive than you're presently using before you start the conversion process. Or better yet, you can write the conversion (the creation of the virtual computer) to another hard drive, even an external hard drive.
Prepare yourself when you open this VM for the first time. Expect everything to look and feel the same as your physical computer. But the first time you launch your virtual machine, expect to be at least a little “giddy” when everything is just there and looks the same. All the settings, software, files—even the desktop—will look just like your physical computer, except now your physical computer may reside on an e×ternal hard drive that is no longer dependent on a specific location. Any computer that contains the virtual software is capable of running your virtual computer. So if your workstation or laptop is unavailable or in need of repair, you can still be up and running!
![]() Real World Scenario: RUNNING REVIT IN VIRTUALIZATION
Real World Scenario: RUNNING REVIT IN VIRTUALIZATION
It's always interesting to us the reaction that virtualization gets from many suspecting individuals. If it's really that good, why haven't you heard about it before, right? Well, it's likely that your company is already using virtualization on the server side of your IT department. There are some advantages to running mission-critical applications on virtual machines (like your email server) so if one application fails, the rest of the server is not affected.
But virtualization is somewhat new on the end-user side. And although you might feel comfortable testing virtualization yourself or on a case-by-case basis, what about end-user virtualization in an enterprise environment?
At Autodesk University 2007, Peter Streibig and Phil Read presented “Running Revit in Virtualization.” As you can imagine, a lot has changed since then. Both hardware and software have evolved—more memory allocation, multiple processors, and so on. So we've asked Peter to contribute to this book and update us on what's been going on in virtualization over the past two years. But first, some background information on the amazing design firm where Peter works.
BOHLIN CYWINSKI JACKSON
Bohlin Cywinski Jackson (BCJ) is the design firm behind such notable projects as the Pacific Rim Estate near Seattle; the Pixar Animation Studios in Emeryville, California; and a series of high-profile stores for Apple Inc. that are located around the world. New York City's Fifth Avenue store is shown here.

The firm has received more than 350 regional, national, and international awards for design, including the Architecture Firm Award of the American Institute of Architects—the highest honor bestowed on an architectural practice by the institute.

BCJ was founded in 1965 and has offices in Wilkes-Barre, Pittsburgh, Philadelphia, Seattle, and San Francisco. The firm is known for exceptional design rigor as well as their commitment to the particularity of place and user. This extraordinary aesthetic is based on a quiet rigor that is both intellectual and intuitive.
The firm's principals and nearly 200 staff practice architecture and offer a broad range of related services. Their breadth and depth of skills and experience enable the practice to address a wide range of challenges—difficult sites, demanding budgets and time constraints, unusual technological requirements, and the integration of new construction with existing buildings and contexts. The firm responds to the particular circumstances of each situation, alive to the subtleties of place—man-made or natural, to the varied natures of client and user, to the character of institutions, and to the means of construction.
BCJ is also noted for exceptional and humane design, ranging from modest houses and recreational facilities to larger academic, research, civic, and corporate buildings. Their problem-solving approach emphasizes thorough research and analysis of each project's unique human, technical, and economic circumstances. They believe the best design comes from an alert and balanced response to the particular circumstances inherent in each situation.
In an essay about their firm's work, Gold Medal–winning architect Joseph Esherick comments, “What is remarkable is the degree to which BCJ achieve the highest possible technical standards of construction, of energy management, of sophisticated program requirements, and still preserve such freshness and openness.”
TECHNOLOGY HISTORY
It's particularly interesting to note that BCJ has always been a Macintosh shop (a noted irony considering its design history). They consisted of longtime MicroStation users, first on the Macintosh, but they later transitioned their workstations to the Windows platform for CAD starting with version 7 of MicroStation.
Apple's switch to the Intel platform provided the opportunity to return to the Macintosh, with options of running Windows virtualized (with Parallels or VMware) or by booting directly into Windows via Apple's Boot Camp technology. For low-end consumer computers, Apple can cost a premium. But for high-end workstations and laptops BCJ believes the current advantage of overall price, flexibility, build quality, and subsequent ease of maintenance make Apple products an easy choice.
When looking to make the move from CAD to BIM, BCJ investigated many of the BIM products available. Revit proved the most developed and complete solution available. The depth of resources available in the Revit community, and the number of colleagues, consultants, and collaborators using Revit, made the decision to move to Revit even easier.
Initially, BCJ used both Parallels and VMware for their virtual computing environments. Both VMWare and Parallels provide simple, easy-to-maintain virtual solutions. But since that time they've begun to transition solely to Parallels.
For workstations, BCJ uses Mac Pro towers running at 2.6 GHz and 2×Quad Core Xeons with10 GB of RAM and VMware for virtualization. But for laptops, they selected the MacBook Pro running at 2.5 GHz and containing Core Two Duo processors with 8 GB of RAM and Parallels for virtualization.
BEST PRACTICES
Overall, the employees have a brief accommodation period while learning how the two systems (host and guest computers) interact and how to best use the systems together. The company will periodically host employee seminars and refresher sessions on getting the most from virtual machines.
In their experience, the isolation of running Windows and Revit from other primary tasks on the host computer running the Mac OS X environment has proven its worth when Windows crashes or has problems booting. They keep exact copies of VMs on hand for just such a case. If a virtual machine becomes suspect or corrupted, the end users shut down their VM and rename both images (the original for the backup, and vice versa), thereby swapping the backup for the original. Then they restart the VM and are up and running.
This flexibility has proved invaluable during tight deadlines, especially when someone is working late or on weekends when support from other associates or IT staff might be limited.
Another protective layer that BCJ utilized is adding a secondary hard drive to users' machines for hosting their virtual images. The additional backup copies are kept on the system drive in anticipation of hard drive failure. If the system drive fails, the user can shut down, take their virtual images on the second Apple drive sled, and move it to another Mac Pro and slide it in place. Then they can open their image by double-clicking on it or choosing it through Parallels or VMware. In such cases, the total downtime is about 15 minutes.
As for best practices, Peter highly recommends regularly discussing and sharing user experiences with other user users. It's important to gain as much as possible from their perspective. User experience often suggests potential tweaks to configuration, workflows, and preferences. Overall, sharing this knowledge is the best way to get a smooth, consistent environment for everyone involved.
Obviously there are a number of options an administrator can set right at the start. Creating a master image to roll out for the users significantly reduces setup time. It also provides a great platform for testing updates, upgraded or new software, and settings before impacting everyone's work.
Some particularly important issues from an administrative standpoint are that both Parallels and VMware Tools need to be reinstalled on all updates and occasionally at random maintenance intervals (possibly due to Windows updates). Additionally, Parallels and VMware Tools (like many other Windows-based applications) require Windows administrator-level permissions to install properly. Usually this can be accomplished by a “first-run” setup logged in as administrator, and then switching to the user's account.
It's important to note that Parallels and VMware updates require an administrative password on the Macintosh side of things. The process that Peter typically uses is the following:
- Schedule an hour with the user to shut down Parallels or VMware.
- Make a backup copy and then install the new version and upgrade the image.
- Reinstall Parallels Tools. It's a good idea to test the VM for a bit, tweaking any new settings as necessary.
- Shut down and make another (new) backup copy. Then restart and get back to work (don't forget to delete the old VM).
Keep in mind that updating takes a significant amount of work. There are updates for two operating systems involved (OS X and Windows), not to mention all the related applications on both the host and guest computers. Peter manages this by testing all the updates himself and then after a couple of weeks (and a fair number of waiting upgrades have amassed), he schedules time with users to upgrade and update. It's best to do the updates early in the morning or late in the evening.
Using Apple Remote Desktop, Peter can “push” new images to clients even while they continue to work, reducing transition time later, when the 40 GB OS images are ready on the local machine for his administrative access. Mac OS system upgrades are sped up with the use of an in-house Apple Software Update Server that downloads the updates once and then distributes the updates to the client machines over the local network. This provides much faster installs for the workstations, while reducing overall Internet bandwidth impact.
HARDWARE SETTINGS
BCJ began using investigating virtualization back in 2007. At that time they began implementing both VM Ware and Parallels. VMware was found more suitable for workstations and Parallels was better for laptops.
But over the past three years, Parallels has won out over VMware for a couple of reasons. Overall, BCJ has been more pleased with the performance from Parallels (verified by higher Windows Experience Scores), including higher video RAM throughput and more core support in multicore machines. The following graphics show the specific settings in Parallels for both laptops and workstations. Keep in mind that current Apple laptops are limited to two cores, whereas BCJ uses workstations with four cores (a few of them have eight).
The hardware settings in Parallels reside on three tabs in the configuration panel. These settings control the general options, the options for applications, and the options for hardware. The General options are shown here. The important thing about this setting is that out of 8 GB of RAM, the user is allocating 4 GB of RAM to the virtual machine.

The Options tab contains a setting that allows you to control the startup and shutdown of the virtual machine. BCJ has opted not to automatically start up the VM when the user logs into the host computer.

Optimization is important when using virtualization for 3D-intensive applications like Revit. Notice that BCJ is optimizing performance toward the virtual machine (rather than the host machine), as shown here, and they're leaning toward better performance (rather than extending battery life). Note that auto-compression has been disabled.

Services allow you to share the time and date settings of the host computer. This option has been selected, as shown here.

If you want to isolate your virtual environment from your host computer, this can be done through the Security settings. But by doing so, you won't be able to launch project files from the host machine. This option has not been selected, as shown here.

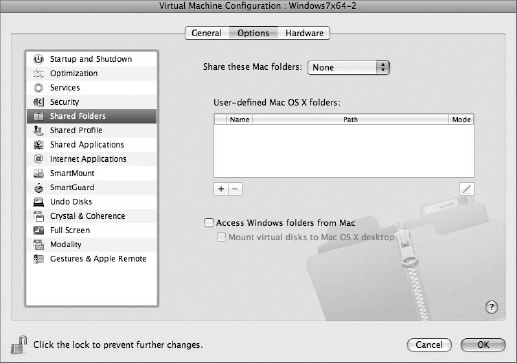
Creating a shared folder allows you to designate a specific location to share files between the host and virtual computers. But this option is not needed in an already networked environment.
Shared Profiles has not been selected either, as shown here. This is more useful if you're working the majority of time from the guest OS rather than the host OS. This is not typically the case, because most users of virtualization utilize the guest OS for access to a few, very important applications.

By sharing applications, you're able to launch files that reside on the host OS by the guest OS, as shown here. This is not being utilized.

Internet applications create consistent experiences between the guest and host OS. The default settings are being used, as shown here.

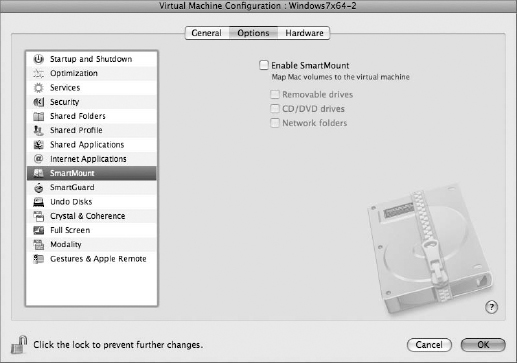
SmartMount allows other hardware, drives, and folders to map to the guest OS from the host OS. These options are not selected, as shown here.
SmartGuard allows you to automatically create snapshots of your entire virtual machine, so in the event of corruption you can in effect roll back your VM to a previous state. BCJ did not enable SmartGuard, as shown here, because they have other backup methods.

The ability to create an undo disk means that all the operations from the moment of starting the virtual session are not permanently stored. This is great for testing purposes but not needed in this case, as shown here.

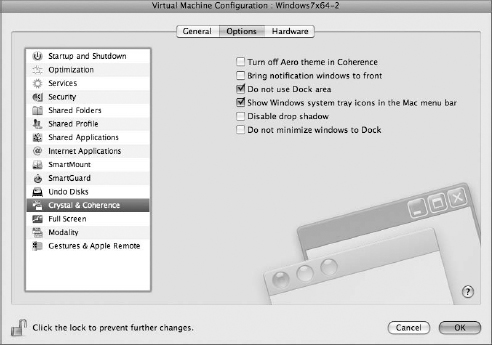
BCJ has opted to show the Windows system tray in the Mac menu bar rather than show applications in the dock, as shown here.
Full-screen mode is entered by moving your cursor to a predefined screen corner. This is a convenient way to share the same window. But keep in mind that users have another option in Mac spaces that allow you to create panels out of your desktop.
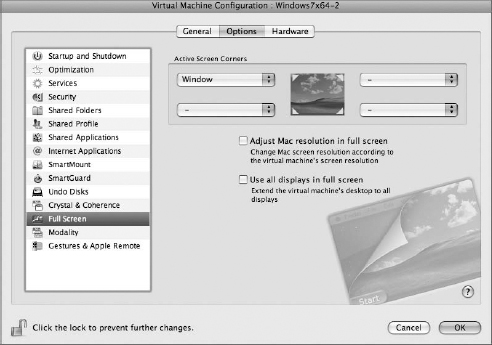
Note that BCJ has deselected the option that forces one window to stay on top of another window, as shown here. This allows you to see through the guest machine to the host machine.

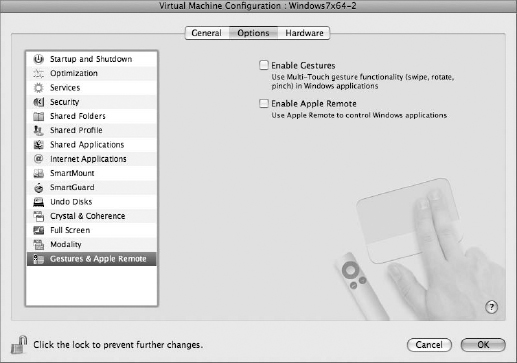
Neither gestures nor remotes have been selected, as shown here. This means that the track pad will respond more conventionally in the guest OS.
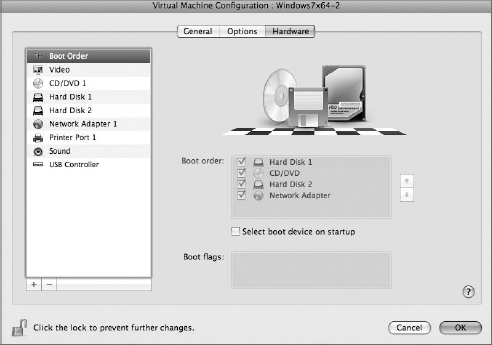
Now we can begin to discuss some of the important hardware virtualization settings. The default boot order is shown here.
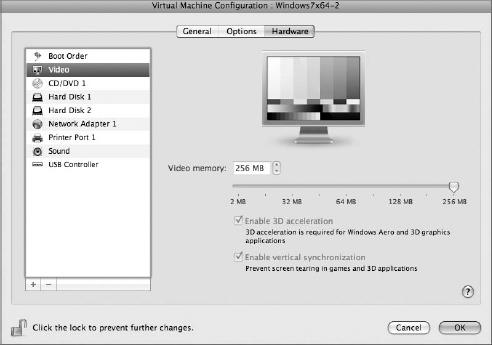
Using Revit in virtualization will require as many video resources as you can manage. In fact, most operations in virtualization are nearly concurrent in speed, as if running on a host OS. But there is a bottleneck with regard to video card simulation. As mentioned earlier, HP has created some interesting alternatives by dedicating video hardware to virtual machines. But these alternatives are not available in laptops or with Apple hardware.
BCJ has deselected the default option to share the CD/DVD player with the guest OS, as shown here. Again, these virtual machines are just for running Revit and little else. So, they're very lean from a resource and hardware standpoint.

Two hard disks are shown. You may only have one on your system. BCJ recommends having a separate drive that is used only for storing the virtual machine. Hard Disk 1, as shown here, is used for the host OS applications and files.

Hard Disk 2 is used to store the virtual machine image and nothing else, as shown here. According to Peter, performance increases when the host and guest OS don't need to share the same disk drive.

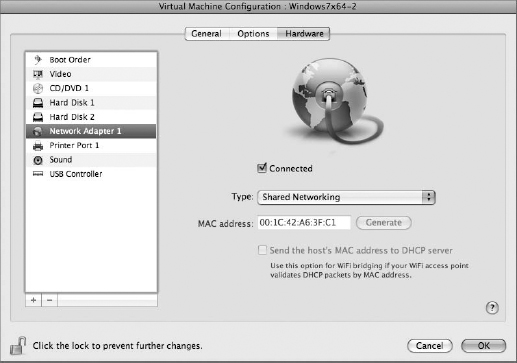
Selecting Connected, as shown here, allows the host machine to share the Internet connection of the host machine. If your intention is to keep the guest VM from accessing the Internet, then you'd want to deselect this option.
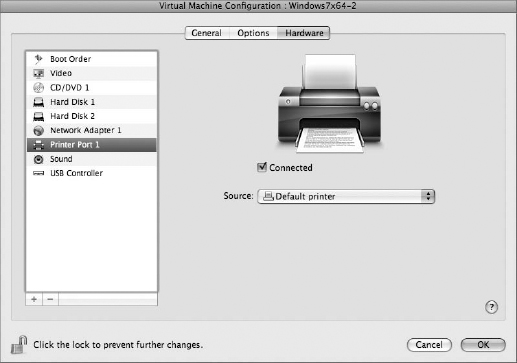
The hardware printer port is being shared, as shown here.
Again, the virtual machine is meant to be as light as possible from a resources standpoint. Not even sound is being shared between the host and guest, as shown here.

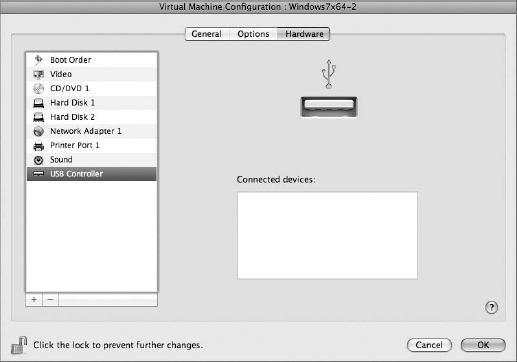
No USB devices are being shared, as shown here. When a USB device is plugged into the host computer, it will only show up on the desktop of the host machine.