Figure 13-3: The Your Book form.
Filling In Your E-Book’s Information Correctly
To add your first e-book to the Amazon site, follow these steps:
1. Click the yellow Add New Title button on the KDP Bookshelf (refer to Figure 13-1).
You can add a new title before entering your account information (as described in the preceding section), but you can’t publish your e-book and have it available on Amazon until your account information is complete.
 When you start to add a new book, a prominent section above the Your Book form asks whether you want to enroll your e-book in the KDP Select program, which debuted in December 2011. The later sidebar “The advantages and disadvantages of using KDP Select” can help you decide whether KDP Select is for you.
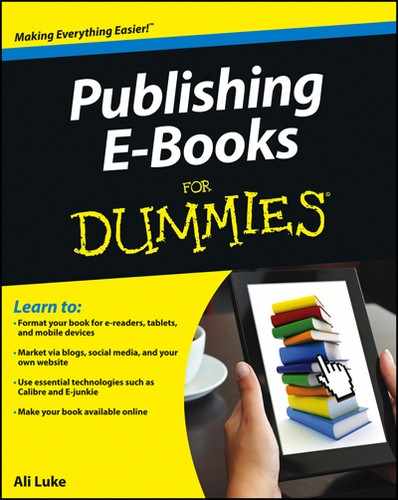
The first part of the form for adding your book to Amazon — Your Book — is shown in Figure 13-3.
2. Fill in these options in the Enter Your Book Details section:
• Book Name: Enter the title of your book, including a colon and the subtitle, if appropriate.
• This Book Is Part of a Series: Select this check box, and add the series title and volume number if you’re publishing a series of books. You can update this information later, if you create a sequel.
• Edition Number: The first time you publish an e-book, you’re publishing its first edition. You can leave this check box alone.
• Description: The book description appears whenever readers view your e-book’s page on Amazon, which is where they find information about your e-book (and purchase it, you hope). The description acts as the blurb, to promote your e-book to potential customers.
When readers browse e-book titles on their Kindle devices, they see only the first few words of the description unless they click the Read More link. Try to make these first words compelling.
 You can’t add formatting to the e-book description while entering it in the Description box. To use HTML code in the description — for bold or italic text, for example — register at Author Central and edit the description there. (For information about Author Central, see the section “Using Amazon’s Author Central to Increase Sales,” later in this chapter.)
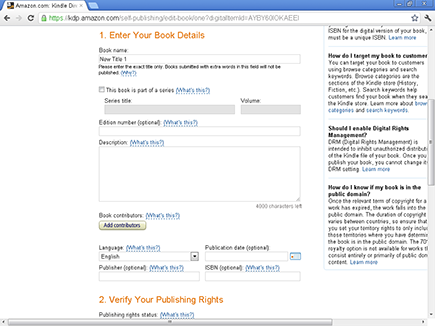
• Book Contributors: When you click the Add Contributors button, the Add or Change Contributors dialog box opens, as shown in Figure 13-4. Enter your first name and surname (or your pen name), and select Author from the Title drop-down list.
If you’re publishing an e-book that several people have contributed to, you can list them all in this dialog box. For example, if you’re working with a co-author, you can list two authors. If your anthology includes work from several authors and has been edited by a separate individual, you can list all the authors and the editor.
• Language: The default setting is English. If your book is written in a different language, select it from the drop-down list.
• Publication Date: You can choose only the current date or a day in the past; you can’t upload your book to be published on a future date. If you don’t select a date, Amazon specifies the date of publication.
• Publisher: Though a publisher name isn’t required, consider using your own name or the name of your company, if it has one.
• ISBN: An International Standard Book Number, or ISBN, isn’t required in order to publish an e-book, but if you want to use an ISBN, enter it in this text box. Don’t use the ISBN from the print edition of your e-book — every edition must have a separate ISBN.
3. In the Verify Your Publishing Rights section, indicate whether this e-book is in the public domain.
Unless you’re publishing your work in the public domain (usually, books that are out of copyright), select the This Is Not a Public Domain Work radio button.
4. In the Target Your Book to Customers section, fill in the following information:
• Categories: Click the Add Categories button and then choose a category or two for your e-book from the dialog box that opens, as shown in Figure 13-5. Then click Save.
Note that you can click a plus-sign (+) icon to expand a category. Try to find the best possible fit — categorizing an e-book inappropriately only causes confusion and frustration for readers.
Figure 13-4: Adding your e-book’s contributors.
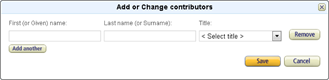
Figure 13-5: Selecting a category.
• Search Keywords: Choose words and phrases that are relevant to your e-book’s content, and separate them with commas. Think about the terms that readers might search for when browsing titles on Amazon. For example, if you’ve written a romance novel set in Italy, your keywords might be words and phrases such as Italy, romance, and vacation romance.
These words and phrases become tags (descriptive labels) for your e-book, and readers can add more tags. Examine similar books in your niche or genre to see what tags are being used.
5. In the Upload Your Book Cover section, click the Browse for Image button, and select from your computer the image file that will become the cover of your e-book on Amazon.
(See Chapter 5 for more on creating an e-book cover.)
The cover file must be in either JPEG/JPG or TIFF/TIF format. Amazon recommends that a cover image measure 2,500 pixels on its longest side, for maximum quality, with an ideal height:width ratio of 1:6. Amazon doesn’t accept any cover image that isn’t at least 1,000 pixels on its longest side.
6. In the Upload Your Book File section, fill in the following information:
• Select a Digital Rights Management (DRM) Option: You can enable digital rights management, or DRM, which is a form of file protection intended to stop the unauthorized sharing of e-books. You decide whether to enable DRM. Some authors feel that DRM is an important protection, and others feel that it unnecessarily annoys readers.
• Book Content File: Click the Browse for Book button. In the Open dialog box, navigate to your e-book’s content file, and click Open. Finally, click the Upload Book button.
 Though you can upload a Word document or an EPUB file, a PDF file, or even a TXT file, for the best result, your e-book should be formatted in the HTM/HTML or MOBI file format. I prefer MOBI because you can easily preview the file on your own Kindle before uploading it.
If you’re in a hurry and your e-book was created in Microsoft Word, you can save the file using the Web Page, Filtered format and then upload it to Amazon. If aspects of the text didn’t convert correctly, follow the instructions in Chapter 8 to create a MOBI file with Calibre.
After you click Upload Book, the Preview Your Book section appears.
7. In the Preview Your Book section, you can preview your book two ways:
• Simpler Previewer: Click the Preview Book button to see a preview of the e-book. The Amazon onscreen preview isn’t perfect, so preview your e-book after uploading its content file. (The preview doesn’t show margins, for example. Your text doesn’t appear as close to the edges of the screen on an e-reader device.)
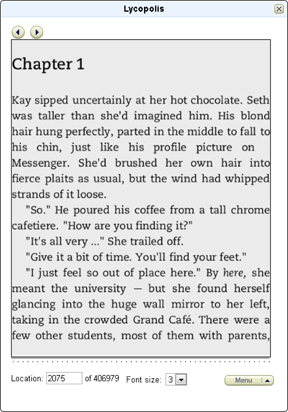
In the example shown in Figure 13-6, notice that the Chapter 1 text is in a header font and starts a new page. Check at least the first few pages of your e-book, and its last few pages, to ensure that all the text is formatted correctly. Look out for problems such as missing special characters (quotation marks and dashes, for example) and bold or italic text that doesn’t end correctly.
Figure 13-6: Previewing your e-book onscreen.
• Enhanced Previewer: Download your e-book file (using the Enhanced Previewer option), even if you have used none of the Kindle Format 8 features. The file is downloaded in MOBI format. You can also download the Previewer software, though you may prefer to view the file on your Kindle device or Kindle app.
8. When you’re happy with the way your e-book looks, click Save and Continue at the bottom of the page.
The rights and pricing information page appears; see the next section for details on filling out this information.
..................Content has been hidden....................
You can't read the all page of ebook, please click here login for view all page.