Figure 12-2: HTML code for the Buy Now button.
Adding the Buy Button to Your Sales Page
To buy your e-book, customers click the Buy Now button to open the E-junkie payment page for your e-book. The code may look daunting, so this section walks you through the steps.
Getting and using the Buy Now button code from E-junkie
When you create a new product on E-junkie, the last page you see after creating a new product presents the code for displaying the Buy Now button on your website. You can easily access the page again later by following these steps:
1. Log in to E-junkie.
2. In the Manage Products section, click the View/Edit/Delete Products link.
3. Select your e-book from the drop-down list.
If you have only one e-book, it’s automatically selected.
4. Click the Get Button Code button.
5. Click the Buy Now Buttons tab.
You should see the screen shown in Figure 12-2, with the HTML code for the Buy Now button shown in the wide yellow box.

You can copy and paste this Buy Now button code directly into the HTML view of your sales page in WordPress (described in Chapter 9), creating a button that customers can click to buy your e-book. To do so, follow these steps:
1. Highlight the red HTML code in the wide yellow box, as shown in Figure 12-2.
Click and drag the mouse to highlight the code.
2. Press Ctrl+C on the keyboard to copy the code.
3. Go to your sales page and open HTML view; decide where to place the Buy Now button, and position the cursor there; and press Ctrl+V to paste (insert) the Buy Now button code.
 4. Click Preview to see your page (and the Buy Now button) as it will appear live.
When you click the button, you should be directed to a payment page for your e-book. The button looks like this:
![]()
Replacing the default Buy Now button graphic with your own
You may not like the default E-junkie Buy Now button. (I prefer one that’s larger and more inviting, and, for variety, I often change its label.) If you search online for the phrase free Buy Now button, you can find plenty of sites offering different options. If you want a high-quality range of sales page buttons, you can purchase an inexpensive, downloadable pack of them. I use the Big Shiny Buttons pack, available from www.bigshinybuttons.com
for $9.97.
If you have graphics software installed on your computer, such as Photoshop or Paint.NET (free to download from www.getpaint.net
; see Chapter 5), you can even create your own Buy Now button. See Creating Web Graphics For Dummies, by Bud E. Smith and Peter Frazier (Wiley), for full instructions and guidance on designing buttons, banners, and other items.
After you have the Buy Now button, you can upload it to your sales page by using the WordPress media uploader. Follow these steps:
1. Log in to WordPress, and choose the Pages⇒All Pages menu command.
2. Find your sales page, and click the title to edit it.
3. Position the cursor wherever you want the Buy Now button to appear.
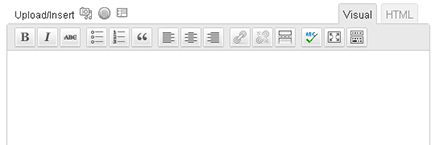
4. Click the Add Media icon above the posting box, as shown in Figure 12-3.
The icon, which is the first of the three Upload/Insert buttons, looks like a camera lying on a musical note.
After you click the Add Media icon, you can upload your image on the screen that appears.
Figure 12-3: The editing box in WordPress.com.
5. Drag and drop the Buy Now button file into the box, or browse for the file on your computer.
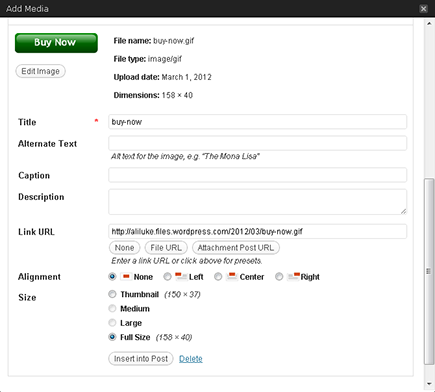
After the button is uploaded, you see the Add Media dialog box, which shows the details of an image, as shown in Figure 12-4.
In the Link URL text box, which defaults to the URL of the image itself, you enter the URL for the E-junkie Buy Now button, as described next.
Figure 12-4: The Add Media dialog box, where you enter the web address of the E-junkie button.
To turn the button graphic into a clickable button that readers can use to buy your e-book, follow the steps in the earlier section “Getting and using the Buy Now button code from E-junkie.” This time, though, you need only part of the code — the first hyperlink, which is in the <a href> tag.
To copy the hyperlink shown in Figure 12-5, highlight the hyperlink and press Ctrl+C.
 Don’t enter the hyperlink shown in Figure 12-5 on your sales page for use in your e-book — it represents one of my products.
Figure 12-5: The E-junkie button code for the Buy Now button.
6. To add the link to your button, enter it in the Link URL text box, as shown in Figure 12-6.
Figure 12-6: Adding the E-junkie link to an image.

7. Click the Insert into Post button, toward the bottom of the Add Media dialog box.
The Buy Now button appears in your post.
Letting the shopping cart handle multiple items
If you have several e-books available for sale, your customers don’t want to have to pay for each one separately. A shopping cart is useful because it holds multiple items before the customer completes the virtual checkout.
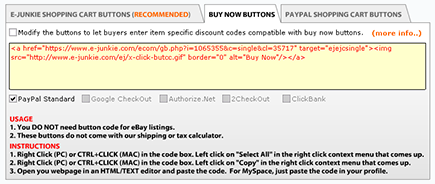
E-junkie provides code for a simple shopping cart, and you can access it from the E-junkie Shopping Cart Buttons tab, shown in Figure 12-7. One section of code creates the Add to Cart button (on the left), and the other section creates the View Cart button (on the right).
Figure 12-7: The E-junkie shopping cart buttons.

These buttons, which can be “stacked” one above the other, work similarly to the Buy Now button, and you can copy and paste their code in HTML view on your sales page. E-junkie recommends adding at least one View Cart button on every sales page, though the Add to Cart buttons still work if you don’t do it.
The default Add to Cart and View Cart buttons look like this:

As with the Buy Now buttons, you can use your own images for Add to Cart and View Cart. In both cases, you need the first hyperlink, shown in Figure 12-7 as
https://www.e-junkie.com/ecom/gb.php?c=cart&i=1065355&cl=35717&ejc=2
https://www.e-junkie.com/ecom/gb.php?c=cart&cl=35717&ecj=2
 Request your own URLs from E-junkie. The URLs shown in Figure 12-7 work only for my e-book, not yours.
 The Add to Cart and View Cart buttons use JavaScript to open a new window during checkout (which doesn’t happen if you create your own button and use only the hyperlink). If you prefer, you can copy and paste the code instead, and then replace these URLs with your own image URLs:
..................Content has been hidden....................
You can't read the all page of ebook, please click here login for view all page.