Figure 4-4: The Word Styles gallery, with the cursor positioned over Normal.
Applying Styles in Microsoft Word
You might not know that Microsoft Word has a styles feature, allowing you to instruct the program to always format a certain type of text (such as a chapter header or a quotation) in a certain way, for every instance of that type of text. Many people use Word for years without experimenting with its incredibly useful styles. I’m one of those people. In fact, the first time I had to use styles, I couldn’t quite see the point. Now I cannot imagine creating e-books, or even writing blog posts, without using styles.
The styles feature allows you to format paragraphs of text. (Note that these may be single lines, which is commonly the case with headers.) You can also format individual words or characters within your text using bold, italic, underline, and strikethrough formatting — this is separate from the paragraph styles feature.
 Before you convert your document into a PDF, MOBI, or EPUB file, be sure that every paragraph is formatted as Normal text. You aren’t deleting italic or bold formatting, but you are changing entire paragraphs to ensure that each one is formatted in the same consistent way, by removing any unusual fonts or line spacing. (For example, if some sections of your manuscript are double-spaced or in a different font, applying the Normal style will turn them all back to the default text.) To set everything to Normal, open your document and follow these steps:
1. Press Ctrl+A to highlight the entire document.
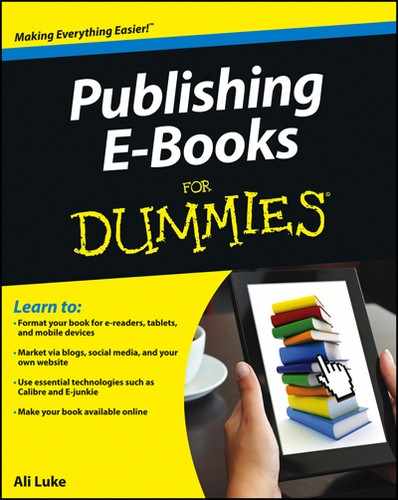
2. On the Home tab, select the Normal style in the Styles gallery, as shown in Figure 4-4.
All the paragraphs in your document are now styled as Normal.
If your document still seems to have several different types of formatting, take a look at the “Fixing a Disaster of a Manuscript by Reformatting the Entire Document” section, later in this chapter.
The following sections take a closer look at applying styles in Word.

Using headings and subheadings to represent chapters and subsections
One helpful use of styles is to apply them to headings to create chapter titles (and subtitles with several heading sublevels) in your documents. If you normally format chapter titles individually, you have to click to set each one in a particular font or size. By using styles, you can create an already-formatted chapter title in a single click. Even better, if you change your mind about how you want things to look, you can change all chapter titles in your document at one time.
Follow these steps to apply a heading style to your chapter title in Word:
1. Open your e-book manuscript, and find the first chapter title.
2. Click to position the cursor anywhere on that line.
3. In the Styles gallery (refer to Figure 4-4), click Heading 1.
The chapter title is now large and bold and (likely) in a different font from the one you were using. Depending on your version of Word, the title may also be a different color.
You can apply a style to an existing heading by highlighting it first (click and drag with the mouse), or to a new heading by first clicking to select the style in the Styles gallery before typing your heading text.
If the chapters in your document have subsections, you can use the Heading 2 style to distinguish them from Heading 1 paragraphs. The standard style has the same font as Heading 1 but in a smaller size. You can create sub-subsections by applying the Heading 3 style. If you see no Heading 3 style listed on the Styles menu, remember that it appears only after you create a subheading by applying Heading 2.
If your e-book is divided into parts, you may want to reserve the Heading 1 style for part titles and apply Heading 2 to chapter titles. This strategy lets you easily create a table of contents for your e-book. You can advance all the way to Heading 9, though you’re unlikely to need that many heading levels.
 All heading styles are correctly preserved when you convert your Word document into HTML format. In fact, if you’ve ever used HTML, the heading descriptions in this section might sound familiar. Heading 1 corresponds to the
 <h1> tag in HTML; Heading 2, to <h2>; and so on.
Modifying a style to change all instances in your document
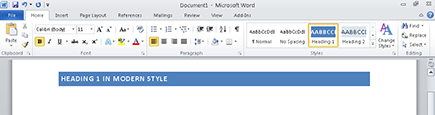
You can tweak the default Word styles to suit your word processing preferences. For example, you can use the Change Styles drop-down menu (on the Home tab, select Change Styles from the Styles group) to select a style set or a color palette. The headers you’ve already styled automatically change to the selected style. For example, you can switch to the Modern style in Word 2010 to place white headings on a colored background, as shown in Figure 4-5.
Figure 4-5: A Heading 1 in Word 2010’s Modern style.
You don’t have to stick with the built-in style or color combinations in Word, though. You can easily tweak a style by following these steps:
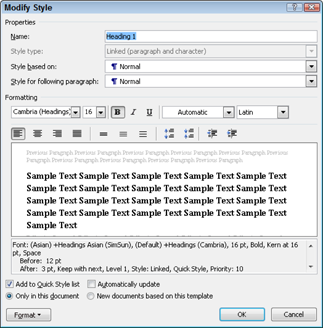
1. Right-click the name of the style in the Styles gallery, and select Modify from the context menu, as shown in Figure 4-6.
Figure 4-6: Altering a style in Word.

The Modify Style dialog box appears, as shown in Figure 4-7.
Figure 4-7: The Modify Style dialog box.
2. Change any aspect of the style that you want.
For example, choose a different font. Or, if you want to add extra spacing before or after a header, click the Format button in the lower-left corner and select Paragraph from the drop-down list. In the Paragraph dialog box that appears, make your changes.
3. After you’ve made all the changes you want, click OK to save them.
Word updates all instances of that style in your document.
 Styles aren’t useful only for headers — you might want to format other sections in a particular way. For example, if your chapters begin with quotations, you can use the Quote style to emphasize them.
Indenting the first line of a paragraph without using tabs
Most documents and web pages have unindented paragraphs divided by blank lines. This formatting strategy can work for nonfiction e-books in PDF format, but most e-books should use indented paragraphs with no blank lines between them. This is what readers expect. (Pick up any book, or take a look at any e-book from a major publisher, to see how the paragraphs are formatted, and you’ll find that they’re indented in this way.)
 Many authors create an indent by pressing the Tab key to start a paragraph or by pressing the spacebar several times. Both (somewhat inefficient) methods can cause problems in your e-book manuscript. Converting it into the MOBI and EPUB formats makes the tabs disappear. Extra spaces usually are preserved, but they make your manuscript look messy. Smashwords, a site that distributes your e-book in various formats (as explained in Chapter 14), displays an automatic error message if you use tabs, and your e-book may not display correctly in some formats, such as HTML.
If you need to remove tabs from your document, turn on the display of formatting marks (as described in the earlier section “Viewing formatting marks”), look in your document’s text for the small right-pointing arrows (they’re tabs), and delete them. Tabs positioned on a blank line rather than at the start of a paragraph can still cause problems when you convert your manuscript into an e-book document. Figure 4-8 shows an example of two paragraphs that begin with tabs, and it shows three tabs on a blank line.
Figure 4-8: A document with formatting marks turned on, showing tab characters.

In Word 2010, you may find that single tabs at the start of paragraphs are automatically turned into indents for you. If this is the case, it’s still a good idea to set up the Normal paragraph style correctly (you may have missed some paragraphs, or you may experience conversion problems) — but you don’t have to find and remove tab characters.
To create indented paragraphs without using tabs, simply modify the Normal style by following these steps:
1. Right-click the Normal style in the Styles gallery, and select Modify from the context menu (refer to Figure 4-6).
2. In the Modify Style dialog box, click the Format button, and select Paragraph from the drop-down list.
The Paragraph dialog box appears.
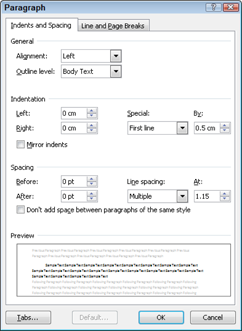
3. Change the style so that no space appears after the paragraph (set Spacing to After to 0pt).
4. Change the style to create a suitable indent at the start of each line (under Indentation, choose First Line from the Special drop-down list and then set the By option to the indent you want).
The exact indent size you choose depends on the font size, so try a few different positions. You can see an example of the changes you need to make in the Paragraph dialog box, shown in Figure 4-9, where the First Line option is set to 0.5 centimeters and the Spacing option is set to 0 points before and after the paragraph.
5. When you finish, click OK to save your changes and then click OK again to close the Modify Style dialog box.
Figure 4-9: Modifying the Normal style so that paragraphs are indented with no space between them.
Not indenting the first line of the first paragraph in a new chapter or section is standard procedure. You can create a custom style for these paragraphs, as described in the next section.
Creating a custom style for your manuscript
You can create as many styles as you like in a Word document. You may want to create an extra style to use for a particular purpose, which works well on the unindented first paragraph of a new chapter or on more complex styles. For example, you might specifically format an exercise at the end of every chapter of your nonfiction e-book or display different fonts in fictional newspaper reports or diary excerpts in your novel.
To create a style for the first paragraph, for example, follow these steps:
1. Position the cursor within a snippet of text that’s similarly formatted.
It’s likely text formatted as Normal in your document.
2. Click the More button in the Styles gallery, in the lower-right corner of the Styles section (refer to Figure 4-4).
Additional styles are revealed, as shown in Figure 4-10.
Figure 4-10: Creating a new style.
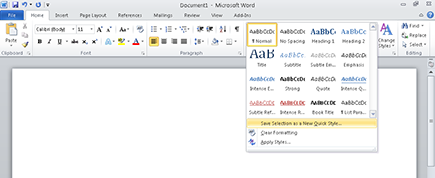
3. Select the Save Selection As a New Quick Style option.
The Create New Style from Formatting dialog box appears, as shown in Figure 4-11.
Figure 4-11: Naming and previewing your new style.
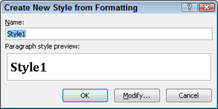
4. Type a name for your style.
Use either a single word or two words with no space between them to help in formatting your document as a MOBI file or an EPUB file. First or FirstLine works well, for example.
5. Click the Modify button to set other features of this style.
To create your first paragraph styling, simply set the indentation to 0. For more complex styles, choose a different font or set italics, for example. You can even choose a border for the text.
6. Click OK.
You should see your new style in the Styles gallery.
Now, whenever you want to format the first paragraph or a special section of text, you can simply apply the custom style. You don’t have to remember how you originally created the section of text (and introduce inconsistencies as a result), and you don’t have to navigate the formatting menus every time.
..................Content has been hidden....................
You can't read the all page of ebook, please click here login for view all page.