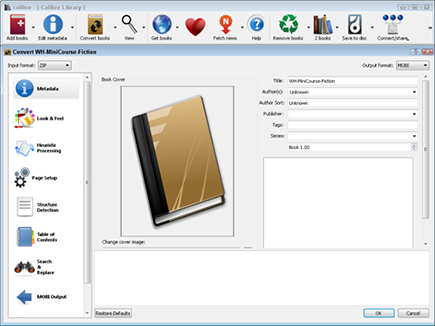
Figure 8-2: A newly imported file in Calibre.
Converting Your E-Book Using Calibre
After your e-book is in HTML format and you’ve previewed it in a web browser to ensure that everything looks good, you’re ready to import it into Calibre.
Open Calibre on your computer, and follow these steps:
1. Click the Add Books button along the top of the screen.
The Select Books dialog box opens.
2. Select the HTML file you created, and click Open.
The HTML file should have the extension .html or .htm.
After you click Open, your file is added to the Calibre library, as shown in Figure 8-2.

3. Click to select the title of the file you added in Step 1 and then click the Convert Books button at the top of the page.
You should now see the Convert window, with nine tabs along the left side. (You can see eight of them in Figure 8-3.) The Metadata tab opens by default. The default input format, in the upper-left corner, is ZIP; the output format, in the upper-right corner, should default to MOBI. (If it doesn’t, select MOBI or EPUB.)
4. Enter all necessary data on the tabs (see the next section for details).
5. After you’ve set all the options for your e-book, click the OK button in the lower-right corner of the screen to start the conversion process.
The Convert window disappears, and a spinning wheel of spokes appears in the lower-right corner of the Calibre window. When the conversion is complete, the new MOBI or EPUB file is listed on the right side of the screen.
In the following sections, I discuss in detail what information you need to (or may want to) enter on the Calibre tabs and explain how to preview your new file.
Figure 8-3: The Convert window in Calibre.
Getting to know the Calibre tabs
Here are explanations of all the tabs and the options that you may want to select when converting your e-book.
 To take advantage of the more advanced Calibre features, which are beyond the scope of this book, see the Calibre online manual at
http://manual.calibre-ebook.com
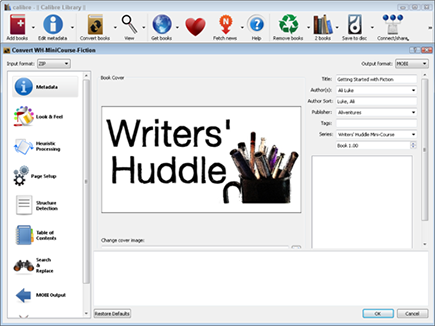
Metadata
The following list details the information you may want to include on the Metadata tab:
![]() Title: Enter your e-book’s title.
Title: Enter your e-book’s title.
![]() Author(s): Enter your name or pen name, as it appears on the cover of your e-book.
Author(s): Enter your name or pen name, as it appears on the cover of your e-book.
![]() Author Sort: This line should populate (fill in) automatically, with your surname first.
Author Sort: This line should populate (fill in) automatically, with your surname first.
![]() Publisher: If your publishing company has a name, enter it.
Publisher: If your publishing company has a name, enter it.
![]() Tags: You don’t need to enter anything here, because this is mainly used within Calibre itself. You will have the option to enter tags on Amazon for your e-book when you upload it (see Chapter 13).
Tags: You don’t need to enter anything here, because this is mainly used within Calibre itself. You will have the option to enter tags on Amazon for your e-book when you upload it (see Chapter 13).
![]() Series: If your e-book is part of a series, enter the series name.
Series: If your e-book is part of a series, enter the series name.
![]() Change Cover Image: Browse for, and select, a cover image for your e-book. If the cover image is stored within a file, select the Use Cover from Source File check box.
Change Cover Image: Browse for, and select, a cover image for your e-book. If the cover image is stored within a file, select the Use Cover from Source File check box.
You can see all these settings in the Metadata tab, shown in Figure 8-4.
Look & Feel
You can leave most of the default settings on the Look & Feel tab — though you may want to experiment with converting your e-book at different settings if the exact layout is important to you. The options in the following list are the ones you’re likely to use:
Figure 8-4: The Metadata tab.
![]() Remove Spacing Between Paragraphs: By default, a blank line separates paragraphs in HTML. Select this check box if you want to indent paragraphs instead.
Remove Spacing Between Paragraphs: By default, a blank line separates paragraphs in HTML. Select this check box if you want to indent paragraphs instead.
![]() Insert Blank Line Between Paragraphs: If you want to insert a space between paragraphs because they look too close together, select this option. (Understandably, you can’t select this option in tandem with the Remove Spacing Between Paragraphs option.)
Insert Blank Line Between Paragraphs: If you want to insert a space between paragraphs because they look too close together, select this option. (Understandably, you can’t select this option in tandem with the Remove Spacing Between Paragraphs option.)
![]() Smarten Punctuation: Add smart (“curly”) quotes and apostrophes to your file, if you’ve used straight quotes and apostrophes.
Smarten Punctuation: Add smart (“curly”) quotes and apostrophes to your file, if you’ve used straight quotes and apostrophes.
![]() UnSmarten Punctuation: Change smart (“curly”) quotes and apostrophes to straight quotes and apostrophes.
UnSmarten Punctuation: Change smart (“curly”) quotes and apostrophes to straight quotes and apostrophes.
![]() Extra CSS: Enter styling code, if you want. You can easily adjust styles and reconvert your file without needing to import your e-book again.
Extra CSS: Enter styling code, if you want. You can easily adjust styles and reconvert your file without needing to import your e-book again.
You can see all these settings in the Look & Feel tab, shown in Figure 8-5. The example code shown on the Extra CSS tab, toward the bottom of the window, places all <h1> and <h2> styled text in the center of the page. (Note that you do not need to add any Extra CSS unless you wish to do so.)
Figure 8-5: The Look & Feel tab.

Heuristic Processing
If you have followed the instructions in Chapter 4 and have a clean Word manuscript that uses styles, you are very unlikely to need this option. Refer to the Calibre manual if you want more information.
Page Setup
On the Page Setup tab, keep the default settings under Output Profile and Input Profile. Also, leave the margins at their defaults.
Structure Detection
For a standard e-book that’s split into chapters (and assuming that your chapters are marked with H1 or H2 tags), you can leave all the settings alone on this tab.
If the chapter and section headings in your e-book contain only numbers or titles (and not the word chapter or section), remove the middle section of the Detect Chapters At (XPath Expression) code, indicated in bold type:
//*[((name()=’h1’ or name()=’h2’) and re:test(., ‘s*((chapter|book|section|part)s+)|((prolog|prologue|epilogue)(s+|$))’, ‘i’)) or @class = ‘chapter’]
The code now reads this way:
//*[((name()=’h1’ or name()=’h2’)) or @class = ‘chapter’]
Table of Contents
Calibre automatically creates a table of contents, so you can leave this tab alone — unless your table of contents doesn’t appear the way you want.
Search & Replace
Avoid using this tab, if possible. Edit the text in your original file instead.
MOBI Output
The MOBI Output tab is shown on the left side whenever MOBI is selected as the output format in the upper-right corner of the window.
Normally, you can leave all these options at their default settings. You might choose to place the table of contents at the beginning of the e-book — a good idea for nonfiction works or short-story collections. Otherwise, the table of contents will appear at the end. You may even want to remove the table of contents, which is appropriate for many novels.
EPUB Output
The EPUB Output tab is shown on the left side whenever EPUB is selected as the output format, in the upper-right corner of the window.
You can leave all the EPUB Output options at their default settings.
Debug
If you want to dig deeply into the technicalities of the conversion process, select a folder on this tab, and the debug output will be sent to this file.
Previewing your new file
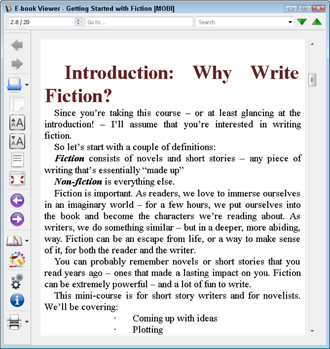
When the conversion is complete, you see the new MOBI or EPUB format listed in blue on the right side of the screen, as shown in Figure 8-6. When you click the format link, Calibre opens an e-book viewer that lets you preview the file, as shown in Figure 8-7.
Figure 8-6: The link to the MOBI file.
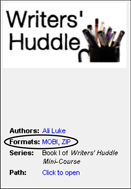
Figure 8-7: Previewing the MOBI file.
View your file on an e-reader or at least on an e-reader app. You can download the Kindle app for free for your PC or Mac, for example. The Calibre previewer doesn’t make page breaks clear.
After you’ve completed the conversion process once to create your first file, you can simply select your e-book and click the Convert Books button again (in the row along the top of the Calibre screen) to create the other type of file. All your selected options remain intact, as do all the text and code you’ve entered. Simply select EPUB (or MOBI, if you started with the EPUB version) in the upper-right corner of the screen, and change any necessary settings under EPUB Output (or MOBI Output). As before, you can preview the file in the Calibre e-book viewer, as shown in Figure 8-8.
Figure 8-8: Previewing the EPUB file.
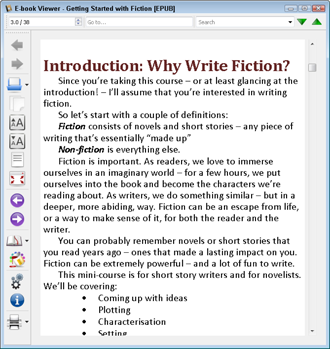
Note that the MOBI and EPUB files look slightly different from each other in Calibre. (In Figure 8-7, the MOBI file has indented headers, whereas the EPUB file in Figure 8-8 has none.) You may notice a few minor cosmetic differences like this, but all the fundamental formatting of your text (chapter headings, bold text, italics, and so on) will be the same in both files.
..................Content has been hidden....................
You can't read the all page of ebook, please click here login for view all page.