Figure 9-3: Themes in WordPress.com.
Changing the Design of Your Website
Your brand-new site is fresh out of the box, and it’s using the default design. You might be perfectly happy with it — or you might want to customize it. (After all, a few thousand other blogs will also have the WordPress default look.) You may want to add a fresh new look, add new pages, arrange the menu differently, or change the elements that appear in the sidebar. All these tasks are simple and straightforward in WordPress, and I describe how to do them in the following sections.
Switching to a new WordPress theme
There’s no need to be a technical or design expert to have a great-looking blog: WordPress comes with lots of themes, or custom-made designs. You can switch to a new theme with only a few clicks. When you change themes, all your website content remains the same — everything you’ve written is still there, even if it’s in a different font or in a different place on the screen.
Follow these steps to change your WordPress theme:
1. Log in to your site so that you can see the dashboard.
2. Hover your cursor over the Appearance link in the panel on the left and then select Themes.
3. Scroll down to see the available themes.
You can see a few in Figure 9-3.
4. Choose a theme to try, and click the Activate link.
If you prefer, you can preview the theme using the Live Preview button. WordPress shows you how your site would look with the new theme, but it won’t make any actual changes to your site. In the Live Preview, you can choose to Cancel or adopt the new theme by clicking Save & Activate.
5. View your site to see the new theme in action.
Refresh the page if it’s already open.
By default, themes are randomized. You can choose to sort them in a different order, or you can search them, which is useful if you’re looking for a specific sort of design. For example, you might want to look for colorful themes or for designs with one sidebar.

Adding a new page
To add a new page to your site, follow these steps in the dashboard:
1. Click Pages and then Add New.
The Add New Page page appears.
2. In the text box at the top of the page, enter a title for your page.
You may want to create the suggested pages in the section “Planning and Writing Your Website’s Pages,” later in this chapter.
3. Enter placeholder text in the Visual editor (which is the large box in the center of the screen).
At this point, you may find it easiest to enter a line of text like Page coming soon. If you prefer, you can start writing your pages, as described in “Planning and Writing Your Website’s Pages.”
4. Click Publish in the column on the right.
 WordPress has many different options to allow people to use the software in lots of different ways. At this stage of creating your site, stay focused on getting a few pages in place. It’s very easy to edit a page after creating it, and WordPress has comprehensive documentation online — so you can adjust and amend your website as you learn more.
Arranging your WordPress menu
After you’ve created the pages for your website (see the previous section), you see that those pages appear on the default navigation menu of your site. You might want to put them in a different order, though — and you may have pages that you don’t want to include in the menu. (If you have a page that includes a copyright notice or disclaimer about your website, you might prefer to link to it from your footer or sidebar.)
For now, you might simply want to create blank pages to fill in later. (You can easily edit them by hovering your cursor over the Pages link and then clicking the All Pages link. You will see a list of your pages. Click the title of a page to edit it.) Later in this chapter, I cover the key pages that your site needs: About and Contact and a page for your e-book, perhaps named My Book or given the same title as your e-book.
To create a customized menu, follow these steps:
1. On the dashboard, click the Appearance link and then the Menus link.
The Menus page appears.
2. In the Menu Name text box, enter a menu name and then click the Create Menu button.
The name is for your own administrative purposes, so make it simple and descriptive. After you click Create Menu, the new menu appears on the right of the Menus page.
3. In the Theme Locations panel, select your newly created menu from the drop-down list and click the Save button.
4. In the Pages panel, select the check boxes for the pages that you want to include in your navigation and then click the Add to Menu button.
5. Drag each page name on the menu to change its position.
Items at the top appear on the left side of the menu, if you have a horizontal navigation menu.
You can also create subpages this way, by dragging one page so that it’s indented beneath another.
Figure 9-4 shows a custom menu, with six pages. The Novels and Non-Fiction pages are subpages of the Ebooks page. Figure 9-5 shows that menu as it appears on the website.
Figure 9-4: Custom menu being created.
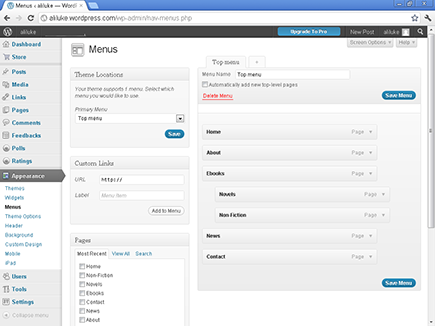
Figure 9-5: Custom menu on the live website.

Modifying your sidebar
You may want to modify the sidebar of your site (or the footer, if your chosen theme has no sidebar). WordPress uses widgets to form the sidebar — each widget acts as a separate block, and you can easily omit or add widgets.
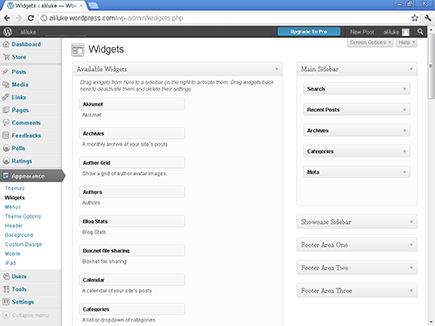
To add a widget, on the dashboard, click the Appearance link and then the Widgets link. You see the screen shown in Figure 9-6, with standard widgets in the center and your site’s sidebar widgets on the right. You can drag and drop widgets to add or remove them or to change the order of the widgets within the sidebar.
Figure 9-6: The default widgets on a WordPress.com site.
..................Content has been hidden....................
You can't read the all page of ebook, please click here login for view all page.