
Manually Binding Windows Forms Controls
In many situations, you don’t want Visual Studio to create your data-bound controls for you, or you might need to bind existing controls to a data source. Data binding in these cases is just as simple and starts with the same step: creating or selecting a data source. Some controls, such as the DataGridView, have smart tag options for selecting a data source. Others don’t have intrinsic data dialog boxes associated with them but can be bound to data just as easily by working, again, with the Data Sources window.
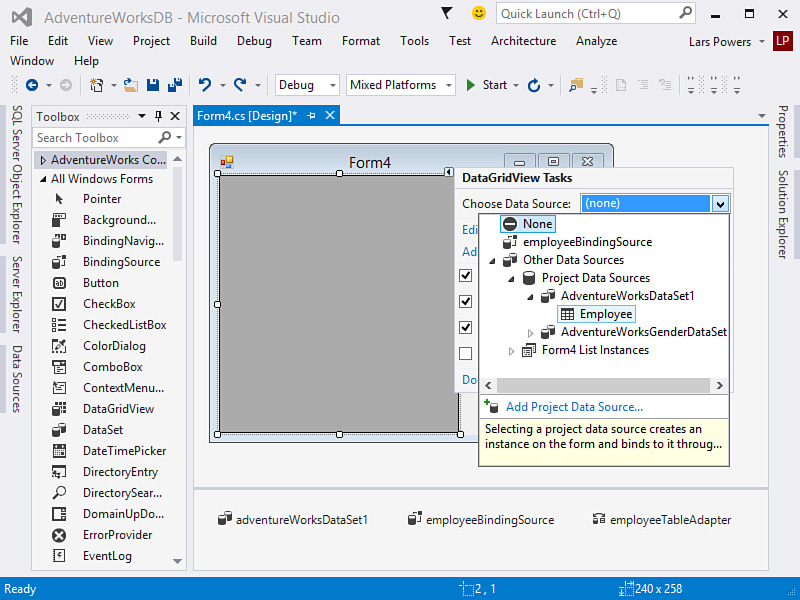
Binding the DataGridView
Grab a DataGridView from the Toolbox and drag it onto the form’s surface. After you’ve created the control, select its smart tag glyph and use the drop-down at the top of the task list to select the data source to bind to (see Figure 13.37).
With a data source selected, you have again managed to develop a fully functional application with two-way database access. All the code to handle the population of the grid and to handle committing changes back to the database has been written for you.
Customizing Cell Edits
The power of the DataGridView lies in its capability to both quickly bind to and display data in a tabular format and provide a highly customized editing experience. As one small example of what is possible in terms of cell editing, follow through with the Employee table example. When you auto-generated form controls to handle Employee table edits, you ended up with DateTimePicker controls to accommodate the date- and time-based data in the table. With the DataGridView, the cell editing experience is a simple text box experience. Each cell contains text, and you can edit the text and save it to the database. But you can provide a more tailored editing experience. You can use various stock controls (such as the DataGridViewButtonColumn, DataGridViewComboBoxColumn, and others that inherit from DataGridViewColumn; see Chapter 20, “Building Windows Forms Applications”) to display data within the columns of the grid.
For example, you can use the DataGridViewComboBoxColumn class to provide a drop-down edit for the Gender column in the grid. To do this, you first need to change the default column type. Select the grid control, open the smart tag glyph, and select the Edit Columns action. In the Edit Columns dialog box, find the column for the employee gender data and change its column type to DataGridViewComboBoxColumn (see Figure 13.38).

With the column type changed, you now need to specify how the grid should retrieve the list of possible values to display in the drop-down; the grid is smart enough to already know to use the underlying gender values from the table to select the one value to display in the grid. To handle the list of possible values, you could hard-code them in the column, or you could wire up a separate query (something along the lines of SELECT DISTINCT(Gender) FROM Employees) and have that query provide the list of possible values. Because constructing another query or data source is easy and doesn’t lead to a brittle hard-coded solution, that’s the approach we investigate here. To create a query to feed the combo-box column, you can visit the Data Sources window, select the Add New Data Source action, and follow the same steps you followed before to add the original Employee data source. This time, though, select only the Gender column.
After the data source is created, right-click the data source and select Edit DataSet with Designer. We use the data set designer to modify our query appropriately. In the designer (see Figure 13.39), you can see the Fill query and TableAdapter used to populate the data set. If you click the query (that is, click the last row in the table graphic in the designer window), you can use the Properties window to directly edit the SQL for the query. By modifying this to reflect SELECT DISTINCT syntax, you can return the valid gender values for inclusion in the grid.

There are two more steps needed. We need a new binding source to connect to our gender data set, and then we need to set our gender column drop-down to point to that binding source. We already have one binding source that was automatically added to our form when we added the DataGridView and connected it to a data set. Now we need another binding source to connect to the new data set that is retrieving the distinct gender values. From the Toolbox window, under the Data category, select the BindingSource component and drag it onto your form. This will add a new binding instance to the component tray. Click the binding source, and in the property window set its data source to the gender data set that we just created.
Last step: go back to the GridView control, use the smart tag to select the Edit columns option, go back to the Gender column, and then set the DataSource, DisplayMember, and ValueMember properties. The DataSource will be set to the binding source we just configured (here, we have called it simply genderBindingSource), as shown in Figure 13.40.

Figure 13.41 shows the results. If you need to implement a cell edit control that doesn’t currently exist, you can create your own by inheriting from the DataGridViewColumn base control. This employee grid could benefit from a DateTimePicker control for the date- and time-based data, such as birth date and hire date.

Note
If you look in the MSDN documentation, there is a specific example of creating a DataGridViewDateTimePickerColumn control and then wiring it up within the grid. Search for “How to: Host Controls in Windows Forms DataGridView Cells.”
Binding Other Controls
For other controls that don’t have convenient access to binding via their smart tag, you can leverage the Data Sources window. Drag a data source from the Data Sources window and drop it onto an existing control. The designer creates a new binding source, sets it appropriately, and then makes an entry in the control’s DataBinding collection. If you try to drag a data element onto a control that doesn’t match up (for instance, dragging a character field onto a check box), the drop operation isn’t allowed.