
Control Layout and Positioning
When a few controls are on a form, the Windows Forms Designer can help automate some of the more common layout tasks, such as aligning a group of controls vertically to one another. Again, refer to Chapter 6 to see how you can leverage these productivity tools. But these layout functions, although nice from a design perspective, do nothing for you at runtime.
As previously noted, a control’s runtime behavior within its parent form is an important area that needs attention if you are to implement your form according to your design intent. That is, you not only want controls to look a certain way; you also want them to act a certain way when the form is resized.
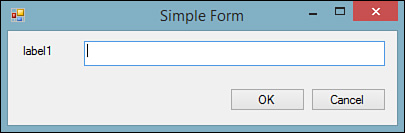
The simplest way to underscore the issue presented during a form resize is to look at a few figures. Figure 20.6 shows the simplest of forms: a label, a text box, and OK and Cancel buttons. The controls on the form have been carefully placed to maintain equal spacing; the controls are nicely aligned in the vertical and horizontal planes; and, in short, this form looks just like the developer intended it to look.
But then a user becomes involved. Figure 20.7 shows the results of resizing the form horizontally and vertically.

This appearance is clearly not what was intended; the nice clean design of the form has failed to keep up with the form’s size. Perhaps the user resized the form in an attempt to get more room to type in the text box. Or perhaps the user tiled this application’s window with other applications, causing its size to change. Whatever the reason, it is clear that further intervention by the developer is needed to keep the design “valid,” regardless of the size of the form.
Just by viewing the before and after figures, you can decide on a strategy and answer the question, “What should happen when a user resizes the form?” Figure 20.8 is a snapshot of the ideal; the text box has “kept pace” with the resize by horizontally extending or shrinking its width. The command buttons have kept their alignment with one another and with the text box, but they have not altered their overall dimensions. Plus, the label has stayed in its original location.

Every form object has a resize event that fires whenever the form boundary size changes (most commonly as the result of a user dragging the form’s border to increase or decrease the size of the form). Because every control has positioning properties such as Top, Left, Height, and Width, you could implement a brute-force approach to achieving the form shown in Figure 20.8. By writing several lines of code for each control, you can manually move or redimension the controls in response to the form size and the position of the other controls. But this approach is tedious at best and results in brittle code that has to be touched every time the layout and placement of controls are tweaked.
Thankfully, the Visual Studio Windows Forms Designer, in conjunction with some standard control properties, enables you to take all the common resize optimizations into account during the layout of the form. By anchoring and docking your controls, you can dictate their position relative to one another and to their position within the borders of the form.
Anchoring
Anchoring, as its name implies, is the concept of forcing a control’s left, top, right, or bottom border to maintain a static, anchored position within the borders of the form. For instance, anchoring a label control to the top and left of a form (this is the default) causes the label to maintain its exact position regardless of how the form is resized. Each control’s Anchor property can be set to any combination of Top, Left, Bottom, and Right. The control’s property browser provides a convenient property editor widget, shown in Figure 20.9, which graphically indicates the sides of the control that are anchored.

Anchoring opposite sides of a control has an interesting effect. Because each side must maintain its position relative to the sides of the form, the control itself stretches either vertically or horizontally depending on whether the Top and Bottom or Right and Left anchors have been set. In fact, this is the exact behavior you want with the text box: you want its width and height to adjust whenever the form is resized. By anchoring all sides of the control, you get the behavior shown with the TextBox control in Figure 20.8; the control has automatically adjusted its dimensions (by stretching both horizontally and vertically) with no code required from the developer.
By default, controls are typically anchored on their top and left sides. You might be wondering what happens if no anchors are specified at all. In that case, the control maintains its exact position regardless of form resize actions. This is, in effect, the same behavior as top and left anchors would have because forms have their top-leftmost points as their “origin.”
Anchoring also solves the positioning problem with the OK and Cancel buttons. If you change their Anchor properties to Bottom, Right, they anchor themselves to the bottom right of the form, which is consistent with their recommended placement on a form. Because you aren’t anchoring opposing sides of the control, you aren’t forcing the buttons to resize; the buttons are merely repositioned to keep station with the right and bottom edge of the form. Contrast this with the anchoring performed for the text box: because you anchored all sides, you are not only keeping a uniform border between the edge of the text box and the form but also causing the text box to stretch itself in both dimensions.
Docking
For the simple form in Figure 20.8, you can implement most of your layout logic using the Anchor property. But if you refer to the overall plan for the CSR screen (refer to Figure 20.1), you can see that you have some positioning needs that would be cumbersome to solve using anchors. For instance, the data entry region of the form should automatically expand vertically and horizontally to fill any space left between the list of requests, the status bar, and the command bar. This is where the concept of docking comes to the rescue. Docking is used either to stick a control to a neighboring control’s edge or the form’s edge or to force a control to fill all the available space not taken by other controls.
As with the Anchor property, the property browser provides a graphical tool to set a control’s Dock property (shown in Figure 20.10).

Control Auto Scaling
The Windows Forms engine supports the capability to dynamically adjust a control’s dimensions to preserve its original design proportions. This capability is useful if the form or control is displayed at runtime on a system with different display characteristics (resolution, DPI, and so on) than the system the form or control was designed on.
A simple example of this occurs when an application that uses a reasonable 9-pt. font during design becomes almost unusable when displayed on a system whose default font size is larger. Because many UI elements auto-adjust based on the font of their displayed text (such as window title bars and menus), this can affect nearly every visual aspect of a form application.
Container controls (for example, those deriving from the ContainerControl class, including the Form class and UserControl among others) starting with .NET 2.0 support two properties that enable them to counter these issues automatically without a lot of developer intervention: AutoScale and AutoScaleDimensions. AutoScaleMode specifies an enumeration value indicating what the scaling process should use as its base reference (DPI or resolution). Table 20.2 shows the possible AutoScaleMode values.

AutoScaleDimensions sets the dimensions (via a SizeF structure) that the control was originally designed to. This could refer to a font size or the DPI.