
Code Snippets and Template Code
Code snippets are prestocked lines of code available for selection and insertion into the text editor. Each code snippet is referenced by a name referred to as its alias. Code snippets are used to automate what would normally be non-value-added, repetitive typing. You can create your own code snippets or use the default library of common code elements that Visual Studio provides.
Using the Code Snippet Inserter
You insert snippets by right-clicking at the intended insertion point within an open text editor window and then selecting Insert Snippet from the shortcut menu. This launches the Code Snippet Inserter, which is a drop-down (or series of drop-downs) that works much like the IntelliSense Complete Word feature. Each item in the inserter represents a snippet, represented by its alias. Selecting an alias expands the snippet into the active document.
Each snippet is categorized to make it easier to find the specific piece of code you are looking for. As an example, to insert a constructor snippet into a C# class, we would right-click within the class definition, select Insert Snippet, select Visual C# from the list of snippet categories, and then select ctor. Figure 7.18 shows this workflow in process; note that as you select a snippet category, a placeholder is displayed in the text editor window to help establish a breadcrumb trail.

After the constructor snippet is expanded into the text editor, you still, of course, have to write meaningful code inside the constructor; but, in general, snippets eliminate the process of tedious coding that really doesn’t require much intellectual horsepower to generate.
Figure 7.19 shows the same process being followed for a Visual Basic code window. The process is identical with the exception that Visual Basic makes more extensive use of categories.

Tip
If you are coding in Visual Basic, a quick, alternative way to display the Code Snippet Inserter is to type a question mark and then press the Tab key.
Visual Basic also exhibits slightly different behavior than C# after a snippet has been expanded into the code window. Figure 7.20 shows the results of drilling down through multiple categories and, in this example, selecting the Create Transparent Windows Form snippet. Notice that the inserter has injected the template code into the Visual Basic code for you, but the inserter (at least in this case) wasn’t intelligent enough to know the name of the form you are trying to make transparent.
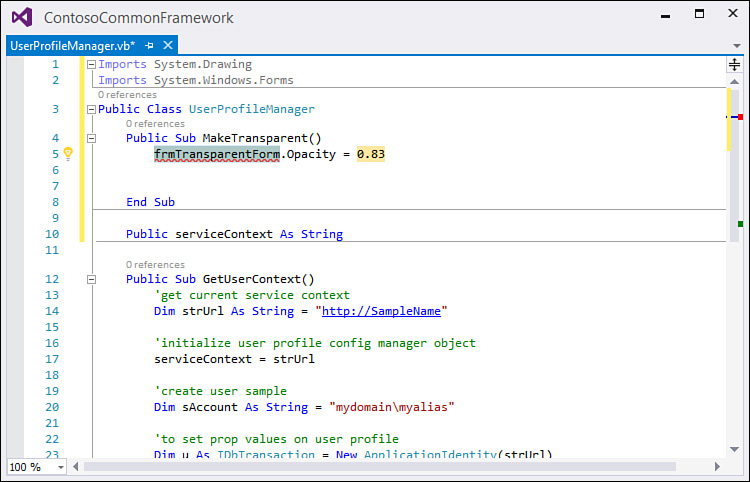
The snippet code has the form name filled in with a default, dummy name that is already highlighted. You merely start typing the form name you need, and it replaces the dummy name. The opacity value is also a dummy value that you can quickly correct at this time.
Tip
Snippets may have one or more placeholder values: fragments of code that you will want and probably need to change. You can cycle through each of the placeholder values by pressing the Tab key. When a placeholder is highlighted (in blue), you can start typing to replace the syntax with something that makes sense for your specific code context.
Surrounding Code with Snippets
C# and XML documents have one additional style of code snippets that bears mentioning: Surround With snippets. Surround With snippets are still snippets at their core (again, these are simply prestocked lines of code), but they differ in how they are able to insert themselves into your code.
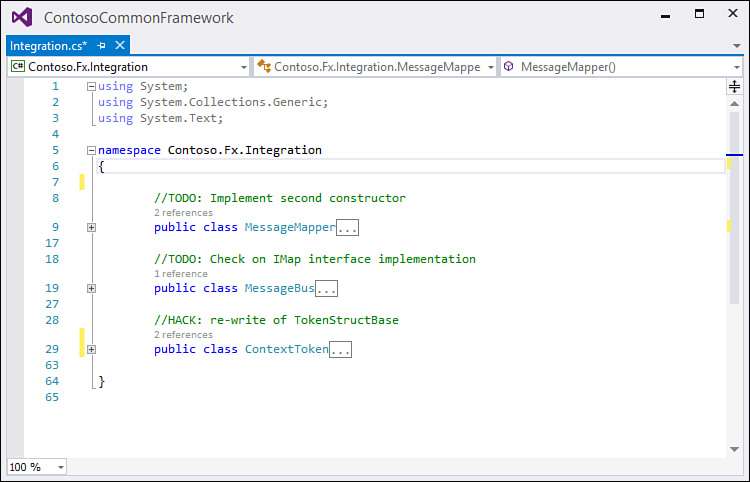
Using a Surround With snippet, you can stack enclosing text around a selection with the text editor. As an example, perhaps you have a few different class declarations that you would like to nest within a namespace. Using the Surround With snippet is a simple two-step process: highlight the class definitions and fire up the Code Snippet Inserter. This time, instead of selecting Insert Snippet from the shortcut menu, you select Surround With. The insert works the same way but this time has applied the snippet (in this case, a namespace snippet) in a different fashion. Compare the before and after text shown in Figures 7.21 and 7.22. We have encapsulated the class definitions within a new namespace that sits within yet another namespace (all with just a few mouse clicks).

Creating Your Own Code Snippets
Because code snippets are stored in XML files, you can create your own snippets quite easily. The key is understanding the XML schema that defines a snippet, and the best way to do that is to look at the XML source data for some of the snippets included with the IDE.
Snippets are stored on a per-language basis under the install directory for Visual Studio. For example, running Visual Studio 2015 with a U.S. English installation of x86 Windows, the Visual Basic snippets can be found, by default, in the folders under the C:Program FilesMicrosoft Visual Studio 14.0VbSnippets1033 directory. Although snippet files are XML, they carry a .Snippet extension.
The XML Snippet Format
Listing 7.1 provides the XML for the C# constructor snippet.
LISTING 7.1 C# Constructor Snippet
<?xml version="1.0" encoding="utf-8" ?>
<CodeSnippets xmlns="http://schemas.microsoft.com/VisualStudio/2005/CodeSnippet">
<CodeSnippet Format="1.0.0">
<Header>
<Title>ctor</Title>
<Shortcut>ctor</Shortcut>
<Description>Code snippet for constructor</Description>
<Author>Microsoft Corporation</Author>
<SnippetTypes>
<SnippetType>Expansion</SnippetType>
</SnippetTypes>
</Header>
<Snippet>
<Declarations>
<Literal Editable="false">
<ID>classname</ID>
<ToolTip>Class name</ToolTip>
<Function>ClassName()</Function>
<Default>ClassNamePlaceholder</Default>
</Literal>
</Declarations>
<Code Language="csharp"><![CDATA[public $classname$ ()
{
$end$
}]]>
</Code>
</Snippet>
</CodeSnippet>
</CodeSnippets>
The basic structure of this particular snippet declaration is described in Table 7.2. A more complete schema reference is available as part of the Visual Studio Microsoft Developer Network (MSDN) library; it is located under Visual Studio 2015, Reference, XML Schema References, Code Snippets Schema Reference.


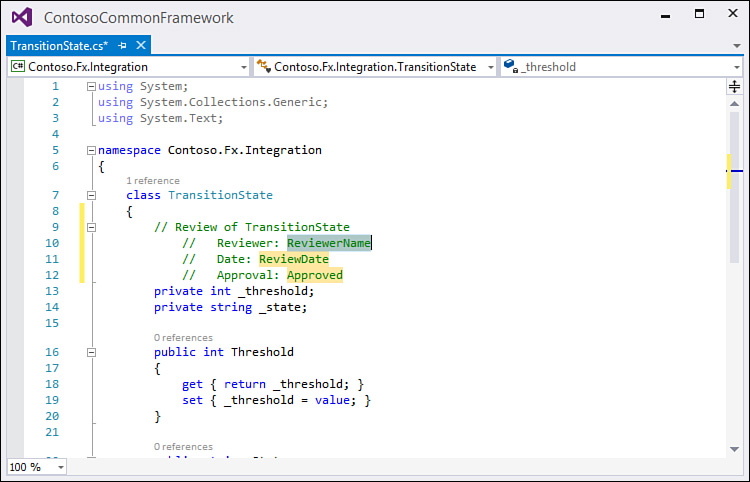
The trick to writing a snippet is to understand how literals and variable replacement work. Suppose, for instance, that you want to create a C# snippet that writes out a simple code comment indicating that a class has been reviewed and approved as part of a code review process. In other words, you want something like this.
// Code review of ContextToken.
// Reviewer: Lars Powers
// Date: 12/1/2015
// Approval: Approved
In this snippet, you need to treat four literals as variable; they can change each time the snippet is used: the classname, the reviewer’s name, the date, and the approval. You can set them up within the declarations section like this:
<Declarations>
<Literal Editable="False">
<ID>classname</ID>
<ToolTip>Class name/type being reviewed</ToolTip>
<Function>ClassName()</Function>
<Default>ClassNameGoesHere</Default>
</Literal>
<Literal Editable="True">
<ID>reviewer</ID>
<ToolTip>Replace with the reviewer's name</ToolTip>
<Default>ReviewerName</Default>
</Literal>
<Literal Editable="True">
<ID>currdate</ID>
<ToolTip>Replace with the review date</ToolTip>
<Default>ReviewDate</Default>
</Literal>
<Literal Editable="True">
<ID>approval</ID>
<ToolTip>Replace with Approved or Rejected</ToolTip>
<Default>Approved</Default>
</Literal>
</Declarations>
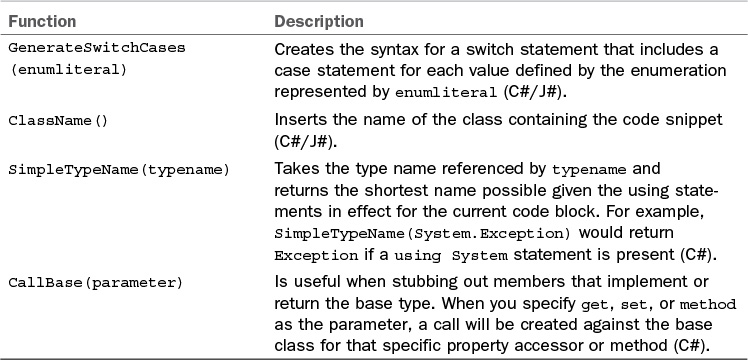
Notice that you are actually calling a function to prepopulate the class name within the snippet. Functions are available only with C#; they are documented in Table 7.3. The rest of the literals rely on the developer to type over the placeholder value with the correct value.
You should also provide some basic header information for the snippet.
<Header>
<Title>review</Title>
<Shortcut>review</Shortcut>
<Description>Code review comment</Description>
<Author>L. Powers</Author>
<SnippetTypes>
<SnippetType>Expansion</SnippetType>
</SnippetTypes>
</Header>
The last remaining task is to implement the <Code> element, which contains the actual text of the snippet and references the literals that we have previously defined.
<Code Language="csharp">
<![CDATA[// Review of $classname$
// Reviewer: $reviewer$
// Date: $currdate$
// Approval: $approval$]]>
</Code>
When you put all this together, you end up with the custom snippet shown in Listing 7.2.
LISTING 7.2 A Custom C# Snippet
<?xml version="1.0" encoding="utf-8" ?>
<CodeSnippet Format="1.0.0">
<Header>
<Title>review</Title>
<Shortcut>review</Shortcut>
<Description>Code review comment</Description>
<Author>L. Powers</Author>
<SnippetTypes>
<SnippetType>Expansion</SnippetType>
</SnippetTypes>
</Header>
<Snippet>
<Declarations>
<Literal Editable="False">
<ID>classname</ID>
<ToolTip>Class name/type being reviewed</ToolTip>
<Function>ClassName()</Function>
<Default>ClassNameGoesHere</Default>
</Literal>
<Literal Editable="True">
<ID>reviewer</ID>
<ToolTip>Replace with the reviewer's name</ToolTip>
<Default>ReviewerName</Default>
</Literal>
<Literal Editable="True">
<ID>currdate</ID>
<ToolTip>Replace with the review date</ToolTip>
<Default>ReviewDate</Default>
</Literal>
<Literal Editable="True">
<ID>approval</ID>
<ToolTip>Replace with Approved or Rejected</ToolTip>
<Default>Approved</Default>
</Literal>
</Declarations>
<Code Language="csharp">
<![CDATA[// Review of $classname$
// Reviewer: $reviewer$
// Date: $currdate$
// Approval: $approval$]]>
</Code>
</Snippet>
/CodeSnippet>
</CodeSnippets>
When the code snippet is executed, our literals (bracketed by the $ symbols in the preceding code) are replaced by their specified default values and are highlighted to allow the snippet user to easily replace them after they are in the editor. Our $classname$ literal is a bit different in that it places a call to the ClassName() function to get the name of the current, enclosing class.
At this point, the snippet is syntactically complete. Although this snippet is writing comments into the editor, the same process and structure applies for emitting code into the editor. If you want to write a Surround With snippet, you change the <SnippetType> to SurroundsWith.
Now you need to make Visual Studio aware of the snippet.
Adding a Snippet to Visual Studio
You can use Visual Studio’s own XML editor to create the XML document and save it to a directory. (A big bonus for doing so is that you can leverage IntelliSense triggered by the XML snippet schema to help you with your element names and relationships.) The Visual Studio installer creates a default directory to place your custom snippets located in your Documents folder: userDocumentsVisual Studio 2015Code SnippetsVisual C#My Code Snippets. If you place your XML template here, Visual Studio automatically includes your snippet for use.
Tip
If you have placed your snippet file in the correct folder and it still doesn’t show up within the Code Snippets Manager dialog box, you probably have a syntax error within the file. A good way to check this is to try to import the snippet file using the Import button. Visual Studio immediately tells you whether the snippet file is valid.
The Code Snippets Manager, which is launched from the Tools menu, is the central control dialog box for browsing the available snippets, adding new ones, or removing a snippet (see Figure 7.23). As you can see, the review snippet shows up under the My Code Snippets folder.

You can also opt to include other folders besides the standard ones. To do so, click the Add button to enter additional folders for Visual Studio to use when displaying the list of snippets.
Figure 7.24 shows the results of the custom snippet.
Tip
Snippets can also be browsed and shared online. A great way to further your understanding of code snippet structure and functions is to browse your way through the snippet files included in Visual Studio, as well as those created by the developer community as a whole.
Snippets in the Toolbox
Although this capability is technically not part of the official code snippet technology within Visual Studio, you can store snippets of code in the Toolbox. Select the text in the editor and then drag and drop it onto the Toolbox. You can then reuse this snippet at any time by dragging it back from the Toolbox into an open editor window.