
View Components, View Models, and Partial Views
The customer example presented thus far shows working with a complete model class (Customer) and single views (Index, Create, Edit) that represent a full page. However, there are times when you need to reuse part of a view across different pages. For these occasions, ASP.NET allows you to create partial views and the new view components. Similarly, you may find yourself needing only a portion of a model class or a mix of a couple different objects and their properties. This is often the result of a specific view that does not map well to your individual model classes. In this case, you can create a view model. Let’s take a look at each of these modular components.
Partial View
A partial view is markup that does not represent a full body section of your page. Instead, the markup is meant to be used inside another view. This solves the problem of view reuse across multiple pages in your site. Partial views can also be strongly typed to a model (or a view model). The convention for creating partial views is using the underscore in front of the file name, as in _LoginPartial.cshtml.
A common way that partial views are added to a page is using an @Html helper inside the parent page’s markup. The helpers for displaying partial views are @Html.Partial and @Html.RenderPartialAsync.
An action method on your controller can also return partial views. This is typically used when sending an AJAX (asynchronous JavaScript) request from your page to the server (controller). The partial result is returned, and only a portion of the page is updated. (The page does not fully refresh.) In this case, you use the PartialViewResult action.
Let’s consider an example. Suppose you are writing a page to allow a user to look up a customer by name. You might then display the results as a partial view. Creating a partial view that shows customer details may also be useful on other views where customer details are needed. The following walks you through creating this partial view and calling it asynchronously from the client.
1. This walkthrough builds on the site previously created called, AspNet5AppSample. It uses an ASP.NET 5 MVC 6 Web Site template. It also is configured with a model, controller, and views for working with customer data. If you have not created this site, you can also download this example from the source code for this book.
2. You can store all your partial views in the Shared folder as a common convention. Or you can reserve this folder just for site-wide partial views. In this case, the partial view is specific to the customer domain; therefore, we will store it in the Customer folder.
Right-click the Customer folder and choose Add, New Item.
From the Add New Item dialog, select the MVC View Page template. Name the page _DetailsPartial.cshtml and click the Add button.
Remove the default contents from the view.
3. The markup for this partial view is straightforward. You start by strongly typing the partial view to a Customer instance. You then use the @Html helpers to create labels and values for the customer object. You can wrap the results in an If statement to verify a valid customer. Listing 17.10 shows an example.
LISTING 17.10 The _DetailsPartial.cshtml Partial View
@model AspNet5AppSample.Models.Customer
<hr />
<h3>Customer Details:</h3>
@if (Model != null)
{
<div>
@Html.LabelFor(model => Model.Name): @Html.DisplayFor(model => Model.Name)
<br />
@Html.LabelFor(model => Model.Email): @Html.DisplayFor(model => Model.Email)
<br />
@Html.LabelFor(model => Model.Notes): @Html.DisplayFor(model => Model.Notes)
</div>
}
else
{
<div>Customer not found.</div>
}
4. Next, create a view for entering a customer name and looking up the results. Create the view as an MVC View Page inside the Customer folder; name it Lookup.cshtml.
The markup should include a text box for entering a customer name, a button for submitting a request, and a <div> tag to be a placeholder for the partial view. Listing 17.11 shows an example.
Notice that the button is set to <input type="button" ... /> instead of Submit. This is to prevent the form from submitting to the server. Instead, we will add some JavaScript code to load the partial view when the button is pressed.
LISTING 17.11 The Lookup.cshtml View
@{ ViewBag.Title = "Lookup Customer"; }
<h2>Lookup Customer</h2>
<form id="form-lookup">
<div class="form-horizontal">
<hr />
<div class="form-group">
@Html.Label("LookupName", "Customer name",
htmlAttributes: new { @class = "control-label col-md-2" })
<div class="col-md-10">
@Html.TextBox("LookupText", "",
htmlAttributes: new { @class = "form-control" })
</div>
</div>
<div class="form-group">
<div class="col-md-offset-2 col-md-10">
<input type="button" id="buttonLookup" value="Lookup"
class="btn btn-default" />
</div>
</div>
</div>
</form>
<!--placeholder for the customer details-->
<div id="CustomerDetails">
</div>
5. Add a Scripts section to the bottom of Lookup.cshtml. Here you will use jQuery to trap the button click event. (jQuery is covered in greater detail in the following two chapters.) The jQuery load event will also be used to call the controller and load the partial view into the tag <div id="CustomerDetails">. Listing 17.12 shows an example.
Notice the use of @Url.Action. This is server-side Razor code to create a URL for the partial view. The jQuery load event takes this URL along with any parameters you want to send. In this case, the parameters come from a jQuery selector for the text box. The parameter is defined as an object in the load method. Therefore, the jQuery method will send the request as an HTTP POST to the controller.
This call maps to the controller method DetailsPartial(string lookupText), which you will create in a moment. This method returns a partial view to be loaded into the <div> tag asynchronously (thanks to jQuery).
LISTING 17.12 The Button Click Event Loads the Partial View into the <div> Tag
@section Scripts {
<script type="text/javascript">
$('#buttonLookup').click(function () {
//clear customer details
$('#CustomerDetails').html("");
$('#CustomerDetails').load(
'@Url.Action("DetailsPartial", "Customer")',
{ lookupText: $('#LookupText').val() }
);
});
</script>
}
6. Now let’s add a method to the CustomerController to return the customer lookup page. This method is named Lookup and is straightforward, as shown here.
public IActionResult Lookup()
{
return View();
}
7. Next, add another controller method for returning the partial view. Name this method DetailsPartial. It should take a string parameter to hold the text to look up from the customer database.
Decorate the method with HttpPost to indicate it should be called using a POST method.
After looking up the customer, use PartialView as the return value. This method can take the name of the partial view (_DetailsPartial) and the object you want to bind to this view (a Customer instance).
The following shows an example of this controller method.
[HttpPost]
public IActionResult DetailsPartial(string lookupText)
{
//get customer based on name
Customer customer =
db.Customers.FirstOrDefault(n => n.Name == lookupText);
//return partial view
return PartialView("_DetailsPartial", customer);
}
This partial view example is now complete. Run the application and navigate to http://localhost:[your-port]/Customer/lookup (you can also add a link to this page). Type a name in the text box and click the Lookup button. Figure 17.27 shows the results.
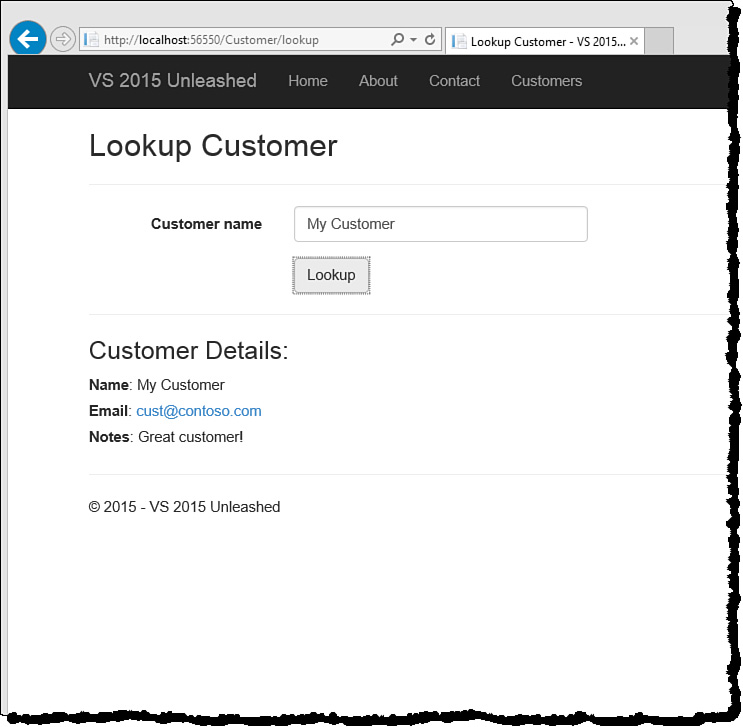
FIGURE 17.27 The _DetailsPartial.cshtml view being rendered inside the Lookup.cshtml view via the jQuery.load call to the controller.
View Component
ASP.NET 5 MVC introduces the concept of view components. A view component is a class that is responsible for rendering a portion of the response. This is similar to a partial view as discussed in the prior section. However, a view component has its own class that works like a controller. This keeps the code for the component separate from your regular controllers and self-contained. In addition, the class derives from ViewComponent, which makes coding and using these component views for complex tasks a bit easier.
Let’s look at an example. The following builds on the customer example we created previously. Here, we will add a view to confirm the user’s request to delete a customer. This page will use a view component we create. The view component consists of a class that derives from ViewComponent and a Razor view. The view can be any markup; in this case, we will leverage the _DetailsPartial.cshtml created in the earlier partial view example. Let’s get started:
1. You can store your view components anywhere in your project. You might create a separate folder in which you store all of them, for example. In this case, we will simply store it inside the existing Controllers folder.
Right-click the Controllers folder and choose Add, New Item.
From the Add New Item dialog, select the class template. Name the class file CustomerDetailsViewComponent.cs and press the Add button.
2. Add using statements to the top of the class file for all of the following.
using Microsoft.AspNet.Mvc;
using System.Linq;
using AspNet5AppSample.Models;
3. Mark the class as inhering from ViewComponent, as in the following.
public class CustomerDetailsViewComponent : ViewComponent
4. Like the CustomerController, this ViewComponent will require a database context. Add a local variable to hold the CustomerDbContext instance and a constructor to set this instance. Listing 17.12 includes this code.
5. The ViewComponent class uses the methods Invoke and InvokeAsync to create and return an instance of the view.
Add an Invoke method that takes an id parameter as int. The method should return the IViewComponentResult interface.
Listing 17.13 shows the completed ViewComponent class.
LISTING 17.13 The CustomerDetailsViewComponent Class
using Microsoft.AspNet.Mvc;
using System.Linq;
using AspNet5Unleashed.Models;
namespace AspNet5AppSample.Controllers
{
public class CustomerDetailsViewComponent : ViewComponent
{
private CustomerDbContext db;
public CustomerDetailsViewComponent(CustomerDbContext context)
{
db = context;
}
public IViewComponentResult Invoke(int id)
{
Customer customer =
db.Customers.FirstOrDefault(x => x.Id == id);
return View("_DetailsPartial", customer);
}
}
}
6. You can use the _DetailsPartial.cshtml created in the prior example as the actual view markup. However, this page must be placed in a specific directory for ASP.NET to find your view based on the view component.
Add a Components folder under Views/Customer. Then add a folder called CutomerDetails under the newly created Components folder.
Copy a version of _DetailsPartial.cshtml into the CustomerDetails folder. We make a copy so as not to break the prior example. Figure 17.28 shows what Solution Explorer should look like.

FIGURE 17.28 Place your view components in a folder named the same as your actual view component class (minus the words ViewComponent). This folder should itself be in a Components folder.
7. Add a new MVC View Page to the Views/Customer folder. Name the page ConfirmDelete.cshtml. This will serve as a confirmation page for deleting a customer (and not a view component or partial view).
This view can be strongly typed to an int (customer ID). The customer ID will be bound to this page. The page will then use Component.Invoke method to call the view component, pass the customer ID, and display the partial view. Listing 17.14 shows an example of this view page.
Note also that this page used an ActionLink to delete the customer. This calls the CustomerController.Delete method discussed earlier in the chapter.
LISTING 17.14 The ConfimDelete.cshtml File
@model int?
<hr />
<h3>Confirm Delete</h3>
@if (Model != null || Model != 0)
{
<p>Are you sure you wish to delete this customer?</p>
@Component.Invoke("CustomerDetails", Model)
<br/>
<b>@Html.ActionLink("Delete", "Delete", new { id= Model })</b>
}
else
{
<div>Customer not found.</div>
}
8. Open the CustomerController class and add a method to show the ConfirmDelete.cshtml page. This method should take an id parameter and pass that id parameter to the page (which will then pass it to the view component). The following shows an example.
public IActionResult ConfirmDelete(int id)
{
return View(id);
}
9. Open the CustomerIndex.cshtml page and add another link to the navigational elements inside the table rows (near the bottom). This will be for the Confirm Delete view. You can leave the other Delete link in the table as a reference to the prior example. This markup should look like this:
<a asp-controller="Customer" asp-action="ConfirmDelete"
asp-route-id="@item.Id">Confirm Delete</a>
Run the application to see the results. Select Customers from the top-level navigation. Select Confirm Delete for one of the existing customers. You should be presented with the page, as shown in Figure 17.29. Click the Delete button to delete the selected customer.

View Models
Not all your models will align directly to your views as they have thus far in the Customer model sample. Many times, you will have a page that needs to use multiple model classes to show a complete picture to the user. In this case, you create a view model with one property for each required model. It is called a view model because it only exists to service your views (and is not a representation of your data domain).
A view may also need page-specific values or calculations that have little to do with your model. Again, the approach here is to create a view model with properties specific to the requirements of the view.
View models are typically stored in their own folder in the solution called ViewModels. You create a view model by simply defining a class file (like other POCO models). This class will contain the properties for your view-specific model. These properties often extend one or more existing models from your regular model classes. You can then use that view model (in lieu of your actual model classes).
Using a view model involves strongly typing your view (as you have seen in the other examples) to this view model class. You then pass it to the view inside your controller method that handles the request. When the data is posted back to the controller, the controller is responsible for dealing with the model and making sure any database records are updated accordingly.