
Using Knockout
Knockout is a popular JavaScript library that simplifies writing dynamic web user interfaces that rely heavily on data. It provides client-side, declarative data binding that works to keep the user interface updated as data changes. This includes data that changes in response to a user action or an update from the server. Knockout works to keep your UI and data in sync.
Knockout is a small JavaScript library that all browsers support. You can use it with jQuery, but Knockout does not require jQuery. Instead, Knockout works using data binding to automatically keep your UI and data in sync (versus using jQuery to find DOM elements, track them, and update them for every action).
Understanding Knockout Basic
Knockout uses the MVVM pattern to keep your UI in synch with your data. This pattern splits your UI concerns from your data into three separate parts:
![]() Model—Like the MVC pattern, this is the model for the data in your application. The model works to retrieve and store data. In ASP.NET MVC, we typically create this model using Entity Framework (see Chapter 17). We may then expose this data through a Web API interface (see Chapter 19). Your client code makes AJAX calls to the Web API (and thus your model) for retrieving and storing data. Once the data is on the client, you convert it to a view model (see below) using JavaScript.
Model—Like the MVC pattern, this is the model for the data in your application. The model works to retrieve and store data. In ASP.NET MVC, we typically create this model using Entity Framework (see Chapter 17). We may then expose this data through a Web API interface (see Chapter 19). Your client code makes AJAX calls to the Web API (and thus your model) for retrieving and storing data. Once the data is on the client, you convert it to a view model (see below) using JavaScript.
![]() View—The view is the actual UI markup as HTML. In Knockout, your view will contain declarative bindings to link the UI elements to the view model. The view will often send an event to the view model, such as a user entering a value or clicking a button. Knockout works to keep your view updated based on changes to the view model.
View—The view is the actual UI markup as HTML. In Knockout, your view will contain declarative bindings to link the UI elements to the view model. The view will often send an event to the view model, such as a user entering a value or clicking a button. Knockout works to keep your view updated based on changes to the view model.
![]() View Model—The view model is a client-side JavaScript class representing the model required for the given view (user interface or page). The view model does not deal with the actual view, nor does it know how to retrieve and persist your data. Instead, it simply is a set of properties and methods for working with data as either a single item or a list of items.
View Model—The view model is a client-side JavaScript class representing the model required for the given view (user interface or page). The view model does not deal with the actual view, nor does it know how to retrieve and persist your data. Instead, it simply is a set of properties and methods for working with data as either a single item or a list of items.
One item not mentioned is Knockout itself. Knockout is a JavaScript library that keeps your data bound views in synch with your view models. There is no need to customize or extend Knockout. Instead, you call Knockout to apply your data binding on the client. Let’s look at a basic example.
We will leverage the calculate speed example from the JavaScript and jQuery sections earlier in this chapter. Here, however, we will create the example inside an ASP.NET 5 site (see the next section for creating the site and adding Knockout) and use Knockout to do all the work. Let’s start with a simple view page (called BasicSample.cshtml) as defined here.
@{
ViewBag.Title = "Basic Knockout Sample";
}
<h2>@ViewBag.Title</h2>
<p>Distance (miles): <span data-bind="text: distance"></span></p>
<p>Time (minutes): <span data-bind="text: time"></span></p>
<hr />
<p><strong>Calculated pace (mins/mile): <span></span></strong></p>
This view uses <span> tags to set up data binding in Knockout using the Knockout text data binder, as in <span data-bind="text: distance">.
Next, we need to define a view model. A Knockout view model is defined as a JavaScript class typically using function/constructor notation. In this case, we need only two properties to start: time and distance (the properties bound to the view above). The following shows an example of the JavaScript embedded in the BasicSample.cshtml page.
@section Scripts {
<script type="text/javascript">
function BasicViewModel() {
this.time = '100';
this.distance = '10';
}
//Activates knockout.js
ko.applyBindings(new BasicViewModel());
</script>
}
Notice the ko.applyBindings() method call in the preceding JavaScript. This tells Knockout to apply the defined bindings for the page. You can now run this page in the browser (after adding a simple MVC controller and method for the page). When run, the page will display the model. However, we want to allow a user to enter both time and distance and see it automatically calculated and updated by Knockout. Let’s do that next.
We start by updating the view markup to use <input> text boxes instead of <span> tags. This will allow a user to enter the time and distance on the page. The following shows an example.
<p>Distance (miles): <input type="text" data-bind="value: distance" /></p>
<p>Time (minutes): <input type="text" data-bind="value: time" /></p>
<hr />
<p><strong>Calculated pace (mins/mile):
<span data-bind="text: pace"></span></strong>
</p>
Notice when using <input> tags that we switch from the Knockout text binder to its value binder. In addition, we added the binder for the calculated speed as a text binder inside a <span> tag.
The form is now bound to the view model. However, we need to modify the view model to add the pace (minutes/mile) attribute as a calculated value. We also need to understand another piece of Knockout called observables. An observable is a special Knockout property definition that works like an event to update any items that are bound to the property when the property value changes. To define an observable, you use ko.observable() as a method call. The following shows these changes to the view model along with the calculated field pace. Notice that the calculated field is defined using ko.computed(), which takes a function.
function BasicViewModel() {
this.time = ko.observable('100'),
this.distance = ko.observable('10'),
this.pace = ko.computed(function () {
return (this.time() / this.distance()).toFixed(2);
}, this);
}
Running this application results in an immediate update to the calculated pace as a user changes a value (and navigates off the input box as in lost focus or blur). Knockout handles all the binding from the view model to the view. Making the property observables ensures that updates occur as values change. Figure 18.22 shows an example running in the browser. We will look at a more detailed example in the coming sections.

Adding Knockout to Your ASP.NET Project
Knockout is not installed by default in the ASP.NET Visual Studio templates. However, thanks to Bower support in ASP.NET, it is easy to add to your project. The following walks you through adding Knockout to an ASP.NET 5 MVC 6 template:
1. Start with a new or existing site built off the ASP.NET 5 Web Site template (which includes support for Bower, Gulp, and other items).
2. Open bower.json from Solution Explorer. Recall from Chapter 17 that this is where you can add client framework dependencies.
3. Inside the “Dependencies” section at the top of the file, add Knockout as a dependency. You should get IntelliSense here and see the Knockout framework as well as version 3.3.0 (latest at the time of writing). Figure 18.23 shows an example.

4. Saving bower.json should install the package. You can check by going to Solution Explorer and navigating to the Dependencies, Bower folder. You can also right-click the folder and choose Restore Packages to force Visual Studio to download Knockout.
Knockout is now installed. You can see it as a package under Dependencies/Bower. Figure 18.24 shows both inside Solution Explorer. You can also see the actual source files inside bower_components/knockout/dist. This folder is hidden in Solution Explorer by default (requires Show All Files from the toolbar).

5. The next step is to add Knockout to the copy task in gulpfile.js. Gulp will use the copy task to move the knockout.js and knockout.debug.js files to the wwwroot/lib folder.
Open gulpfile.js and find the code for gulp.task("copy")...; add the following to the end of the list in this method call:
"Knockout": "knockout/dist/knockout*.js"
This tells the Gulp task to copy the knockout.js source from the bower_components folder to the wwwroot/lib.
6. Open Task Runner Explorer and run the clean and copy tasks to move the knockout.js file into wwwroot/lib.
7. You also need to add Knockout to your page before you can use it. In ASP.NET MVC, this can be done site-wide inside the _Layout.cshtml page provided you intend to use the framework across your site. (Otherwise, you can add to specific pages where you intend to use it.).
Inside the _Layout.cshtml, scroll to near the bottom of the page. Find the <environment names="Development"> tag. Add the following <script> tag inside this tag to include a reference to the Knockout library.
<script src="~/lib/knockout/knockout.debug.js"></script>
As an optional step, you can add Knockout to the <environment names="Staging,Production"> section of the page. Here you can point to a CDN (content delivery network) and use your local source as a backup. In both cases, you should pint to the minified version of Knockout. The following shows this <script/> tag:
<script src="//ajax.aspnetcdn.com/ajax/knockout/knockout-3.3.0.js"
asp-fallback-src="~/lib/knockout/knockout.js"
asp-fallback-test="window.Knockout">
</script>
Creating an App with Knockout
Let’s look at a larger example using Knockout. We will start with an ASP.NET 5 MVC 6 project based on the ASP.NET 5 Web Site Template. We assume Knockout is installed to start (see prior section). In this example, we will continue building on the bike ride log sample used earlier in the book. However, we will use Knockout to bind data to an editable list, allow new entries, and support delete.
Create the Model (on the Server)
To get started, let’s first create the code that runs on the server. This is an ASP.NET MVC project (see Chapter 17), so this code will include a model to represent the server-side data and a controller for displaying pages and exposing a Web API. Creating these classes should be familiar to you from the prior chapter, so we will not walk through each step here. Listing 18.4 shows the model for a bike log entry.
Knockout and Destroy
Knockout can add an additional property to your objects called _destroy to help you work with arrays of data. For example, suppose you are working with a list of data on the client and want to remove one or more items from the list. This works fine with the .remove() method. However, you may need to know these items were removed when submitted back to the server. For this case, Knockout provides the .destroy() method.
Knockout will add the property _destroy: true to your object when you call the .destroy() method on a Knockout collection. The Knockout binding knows to ignore these items in your collection. However, these items are passed back to the server for update.
You need to add a _destroy property to your server-side model to account for this instance (provided you need this functionality). You can do so by creating a view model on the client or by adding the property and marking it as NotMapped to indicate to Entity Framework that it should ignore this property when mapping to your database. Listing 18.4 takes this approach as this example uses bulk updates on the array (including deletes).
LISTING 18.4 The BikeLog Model Inside an ASP.NET MVC Application
using System;
using System.ComponentModel.DataAnnotations;
using System.ComponentModel.DataAnnotations.Schema;
namespace KnockoutSample.Models
{
public class BikeLogModel
{
[Required, Key]
public int Id { get; set; }
[Required]
public string Description { get; set; }
public double TimeMinutes { get; set; }
public double DistanceMiles { get; set; }
[NotMapped]
public bool _destroy { get; set; }
}
}
Create the Controller
Next, we need to add a controller (called BikeLogController) to the application for working with the bike log pages. In this example, we will include all features on a single page called Index.cshtml. Therefore, we only need a single method in the controller to return this view: Index() (see Figure 18.25).
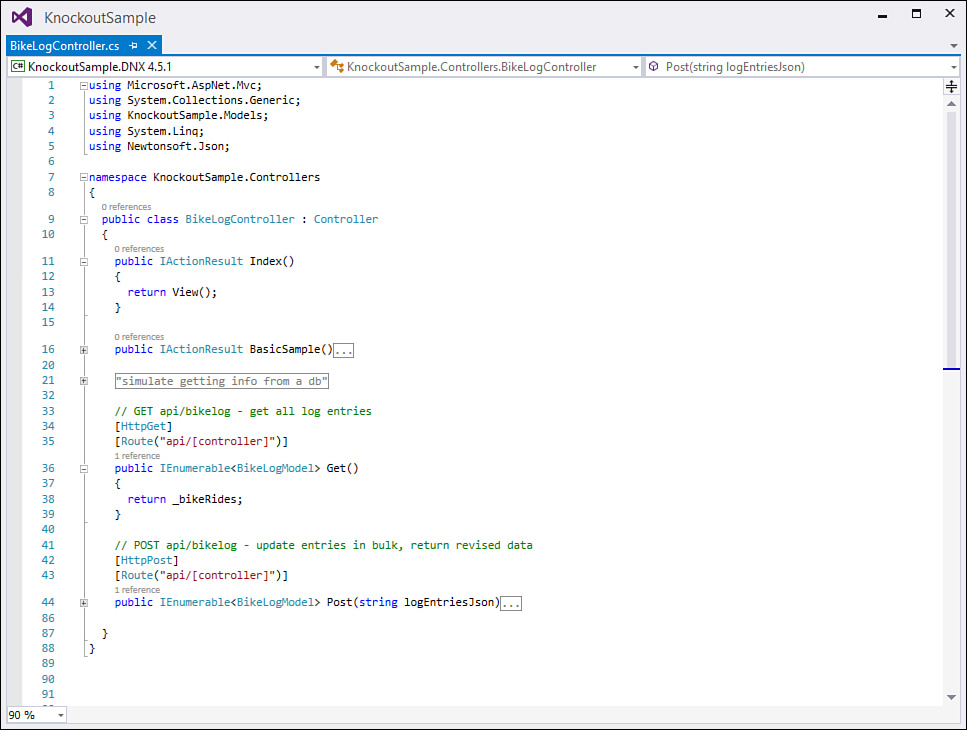
FIGURE 18.25 Use the BikeLogController to contain both methods to show pages as well as Web API methods for working with BikeLogModel data.
We can use Knockout with traditional GET and POST HTTP page calls or AJAX calls against web services (using Web API) for retrieving and saving data. Web API is covered in the next chapter; therefore, we do not cover it here. However, Figure 18.25 shows the BikeLogController where we have combined both page calls (Index and BasicSample) and the Web API methods Get and Post. This controller works with a static collection (instead of a database) to simulate working with the bike log data. The Get method returns the collection of bike log entries. The Post method takes a string formatted as JSON as an argument. It then uses the Newtonsoft.Json library (included with the ASP.NET 5 template) to deserialize the JSON string into an IEnumerable<BikeLogModel> list. The method then iterates over this list and makes the appropriate updates (add, remove, update). We do not cover these methods in detail here because Web API is covered in the next chapter. However, you can download the sample from this book’s website for reference.
Create Bike Log List View
Now that we have an ASP.NET MVC model and controller, let’s look at creating the view and view model. The view will use Knockout and the MVVM pattern on the client. Recall that the model in MVVM is the model we created on the server (BikeLog and the collection class used to work with it). We will call this model through the Web API using AJAX and jQuery on the client. The view represents our page markup. We also need to create the view model as JavaScript that runs on the client. The following walks you through creating the initial view model and related view for displaying an editable list of bike log entries.
1. Create the view model. The view model will be JavaScript stored in a separate .js file. In Solution Explorer, right-click the project names and choose Add, New Folder. Name this folder Assets. We will use it to store our project source code for JavaScript files.
Next, configure Gulp to copy the JavaScript files to wwwroot upon project build. See the prior section “Minify Your JavaScript with Gulp” for defining this exact configuration. Be sure to use Task Runner Explorer to bind the compress task to After Build.
2. Right-click the newly created Assets folder and choose Add, New Item. Select the JavaScript File template. Name this file app.js.
3. Create a JavaScript class with constructor notation called BikeLog. This class takes an argument that passes in data for creating a new instance of BikeLog. This object will be similar to the object created in the earlier sample.
Add properties for description, timeMinutes, and distanceMiles as Knockout observables. Include an id property and the computed field pace. Listing 18.5 shows an example.
LISTING 18.5 The BikeLog Knockout Object
function BikeLog(logEntry) {
this.id= logEntry.Id;
this.description = ko.observable(logEntry.Description);
this.timeMinutes = ko.observable(logEntry.TimeMinutes);
this.distanceMiles = ko.observable(logEntry.DistanceMiles);
this.pace = ko.computed(function () {
return (this.timeMinutes() / this.distanceMiles()).toFixed(2);
}, this);
}
4. Create the actual view model to work with the BikeLog class. Define a new class in the same app.js file; call this class BikeLogListVm.
This class should include a Knockout array of BikeLog entries as a property; name this property logItems. Knockout defines the object observableArray. This allows you to create an array in which each item in the array is an observable.
The view model should also include a jQuery call to $.getJSON(). This method will self-execute when a new instance of the class is created. It will use AJAX to call the Web API created previously in the controller class to return the current list of bike log entries.
The results from $.getJSON() can be passed into a function for mapping the results to the Knockout array. Create this function as a separate method on the object called mapRides. You will need to reuse this function following a post to the server to update the data.
The mapRides function should use the jQuery function $.map() to map each item returned from the Web API call to a BikeLog instance. This method maps JSON data to JavaScript objects. Finally, we will update the array logItems with these mapped objects.
Listing 18.6 shows the Knockout view model object.
LISTING 18.6 The BikeLogListVm Knockout View Model Object
function BikeLogListVm() {
var self = this;
self.logItems = ko.observableArray([]);
//Get data from server.
$.getJSON("/api/bikelog/", function (rides) {
self.mapRides(rides);
});
self.mapRides = function(rideData){
var mappedRides = $.map(rideData, function (item) {
return new BikeLog(item)
});
self.logItems(mappedRides);
};
}
Note
Note that JavaScript and the $.map jQuery function are case sensitive. Therefore, if your MVC model uses uppercase (as in Id and not id), your JSON data will be returned as uppercase. Also, your mapping will look for uppercase values in your JavaScript code. Notice that BikeLog (Listing 18.5) takes the logEntry parameter and then uses these uppercase values for mapping.
5. Add the Knockout call to applyBindings to the JavaScript file (outside the class definitions) as follows.
ko.applyBindings(new BikeLogListVm());
6. Define the actual view page, its markup, and Knockout binding. Inside Solution Explorer, navigate to the Views folder. Right-click this folder to add a new folder called BikeLog.
7. Right-click the BikeLog folder and choose Add, New Item. Select the template MVC View Page. Name this new page Index.cshtml and click the Add button.
8. Add a <script> tag pointing to the app.js file at the end of the page, inside a Scripts section. Recall that the file will be the one output to wwwroot by Gulp. The file will include the view model JavaScript created previously. This script section should look as follows.
@section Scripts {
<script src="~/app.js"></script>
}
9. Next, create a <table> to hold each bike log entry as a row. We will use the Knockout foreach data binder. This binds to an array (logItems) and will loop for each item in the array. In this case, we will apply that binder to the <tbody> tag, which indicates that each row <tr> inside the <tbody> represents an item in the collection.
Next, we create the template row and its columns. Each column will use a Knockout binder to bind to the view model. For id and pace, use the text binder. We want to allow editing of other properties, so there you use <input> tags and the value binder.
Listing 18.7 shows the completed view page bound to the view model (minus a few style class definitions).
LISTING 18.7 The Markup for the Bike Log Index.cshtml Page Bound to the View Model Using Knockout
@{
ViewBag.Title = "Bike Log Sample App";
}
<h2>@ViewBag.Title</h2>
<p>See the bike log data for recent rides and track new ones.</p>
<div class="row">
<div class="col-md-12">
<hr />
<table>
<thead>
<tr>
<td>Id</td>
<td>Description</td>
<td>Time (minutes)</td>
<td>Distance (miles)</td>
<td align="center">Pace (min/mile)</td>
</tr>
</thead>
<tbody data-bind="foreach: logItems, visible: logItems().length > 0">
<tr>
<td data-bind="text: id"></td>
<td>
<input type="text" data-bind="value: description" />
</td>
<td>
<input type="text" data-bind="value: timeMinutes" />
</td>
<td>
<input type="text" data-bind="value: distanceMiles" />
</td>
<td align="center" data-bind="text: pace"></td>
<td><a href="#" data-bind="click: $parent.removeEntry">delete</a></td>
</tr>
</tbody>
</table>
<hr />
</div>
</div>
@section Scripts {
<script src="~/app.js"></script>
}
You can now run the application and view the results. Figure 18.26 shows an example. Notice that the computed field pace is automatically updated by Knockout as you change values in the grid. The next steps are to allow a user to add, edit, and delete items and then save their changes.
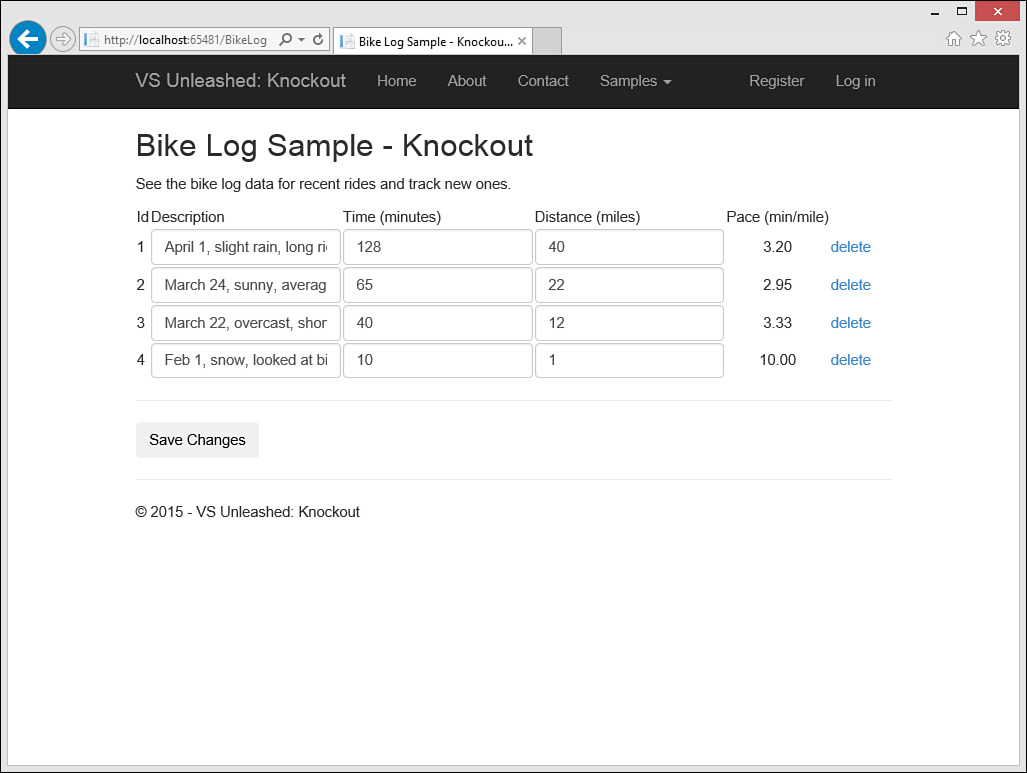
FIGURE 18.26 The bike log view page bound to model data from the server using an AJAX call and Knockout.
Add a New Ride Entry
This sample will do all the adds, edits, and deletes in the memory of the browser. We will then ask the user to click the Save button to commit his changes. Of course, we could write this to work one data item at a time if we preferred. The following walks you through including support for adding an item.
1. Add a button near the top of the Index page (after the <div> tag). This button will allow a user to add a new item to the grid. Use the Knockout click binding to bind the button to a method on the view model called addEntry (which you will write next). The following shows an example of this markup.
<button type="button" data-bind="click: addEntry"
class="btn">Add New Entry</button>
2. Open the App.js file and add the addEntry method to the BikeLogListVm object. This method will simply use the .push method of the array to add a new instance of the BikeLog class to the collection. Knockout binding will take care of the rest (adding the item to the bound grid on the page). The following shows this method.
//Add a new entry to the collection.
self.addEntry = function () {
self.logItems.push(new BikeLog({
Id: 0,
Description: "",
TimeMinutes: 0,
DistanceMiles: 0
}));
};
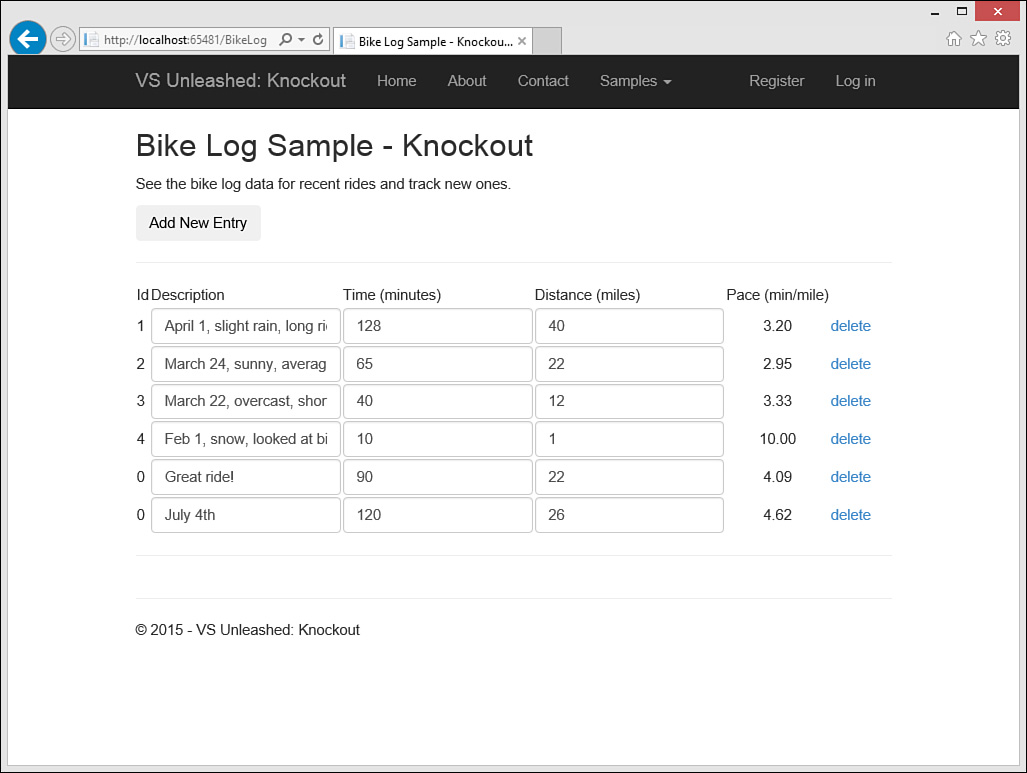
Run the code and view the results. You can now add entries to the grid by clicking the Add New Entry button. Figure 18.27 shows an example. Notice that these items work like the others in the list. However, they do not have a value for their ID. We will fix this when we add support for saving the view model updates back on the server.
Delete an Entry
Deleting an entry with Knockout is just a matter of removing the item from the collection. Knockout will handle the rest. In this case we will use .destroy and not .remove (see the Knockout and Destroy sidebar above). The following walks you through adding this feature:
1. On the Index page, add a new column to the table to hold an <a> tag for allowing a user to delete a row. This will also use the Knockout click binder. Here we will point to a function named removeEntry that you will write in a minute. The following shows the markup.
<td><a href="#" data-bind="click: $parent.removeEntry">delete</a></td>
2. Open the App.js file and add the removeEntry method to the BikeLogListVm object. This method uses the Knockout destroy method to mark the item in the collection as removed. The Knockout binding takes care of keeping the UI up to date. The following shows this method.
//Remove item from collection.
self.removeEntry = function (bikeLog) {
self.logItems.destroy(bikeLog);
};
You can now run the code again and see the results. You should be able to add, edit, and delete records from the table. However, there is still no means for a user to save her changes. Let’s add that feature now.
Save Changes
Changes will be saved back to the server in bulk. Recall that the controller contains the method Post that takes a JSON string and deserializes it into bike log entries for processing. It then returns the updated collection as a result of the Web API call. Let’s look at adding the save feature.
1. Add a button to the Index page after the </table> tag. This button should use the Knockout click binding to bind to a saveChanges method you will write in a moment.
In addition, after the button, add a <span> tag to bind to a new property you will create called saveResult. This will show results to the user when saving the data.
The following shows these two additional markup elements.
<button type="button" data-bind="click: saveChanges"
class="btn">Save Changes</button>
<span data-bind="text: saveResult"
class="text-success" id="success"></span>
2. Open the App.js file and add the property saveResult to BikeLogListVm as follows:
self.saveResult = ko.observable(''),
3. Add the saveChanges method to the BikeLogListVm object. This method will use $.ajax to call the Web API controller’s Post method. When doing so, you pass the array data using Knockout’s utility method toJson, which converts the array to JSON.
After the call to the Web API succeeds, update the collection with the results from the server. This will add the Id field values for new entries and resynch the collection with the right data.
Finally, write code to update saveResult upon success of saving the data. In the next example, we use the jQuery show and fadeout methods to first show saveResult to the user and then fade the message off the screen.
//Save data back to the server.
self.saveChanges = function () {
self.saveResult(''),
$.ajax({
type: "POST",
url: "/api/bikelog/",
data: { logEntriesJson: ko.toJSON(self.logItems) },
success: function (response) {
self.mapRides(response);
self.saveResult('Saved'),
$('#success').show();
$('#success').fadeOut(3000);
}
});
};
You can now run the completed application. Figure 18.28 shows the application in action. Notice that item 2 has been deleted; items 5 and 6 were added. Save Changes was executed (and is fading away in the image).

FIGURE 18.28 The completed bike log view page demonstrating a Knockout application working with JavaScript, jQuery, MVC, and the Web API.
Doing More with Knockout
You should now have a solid foundation on using the power of Knockout for form binding with MVVM. Knockout provides even more binding options. Thankfully, all the bindings work in a similar way to what you have seen thus far. The following lists a few additional Knockout bindings to go with those you have used thus far (text, value, click, foreach). This is not a complete reference, but an overview. See the Knockout documentation on its website for a complete reference to all other bindings.
![]()
visible—This binding makes the element show or hide based on a Boolean value you pass to the binding from the view model. The values false, 0, null, and undefined cause the element not to display.
![]()
css and style—The css binding will bind a new class value to an estimate based on the data in your view model. Similarly, the style binder adds an inline to an element based on a view model binding. This is similar to using jQuery selectors in your JavaScript to change a style. However, it makes use of the binding in Knockout to do so.
![]()
attr—The attr binding allows you to set an attribute of an element based on view model data.
![]()
if/ifnot—The Knockout if binder works to display a section only if a certain value from your view model is true. You can apply it to a <div>, for example, to show and hide the content contained in the <div> if the view model property is true. This is similar to visible. However, the if binding actually adds or removes the markup from the DOM based on binding (whereas visible simply uses CSS to show or hide an element).
![]()
enable/disable—These bindings enable or disable elements based on the value of the bound item in the view model.
![]()
textInput—Works like the value binding to bind an <input> element to a property of the view model. However, textInput will update the view model real time as a user types in the input. This is useful for situations such as real-time validation and autocomplete (among others).
![]()
hasFocus—This binding will set focus to an item on the page when the value from the view model is true. In addition, should the user manually set focus to the element, the view model will update the property to true (and you may then take additional action if required, such as changing the items style).
There are additional bindings available beyond those just listed and shown thus far. Knockout also support creating your own custom bindings using its binding framework.
More Info
This section introduced the core features of Knockout. However, there are more details about binding, control flow, and extensions with Knockout. To learn more, you can visit the Knockout site at knockoutjs.com, where you’ll find good documentation of key techniques.