 Selecting the Project Type
by Mike Snell, Lars Powers
Microsoft Visual Studio 2015 Unleashed, Third Edition
Selecting the Project Type
by Mike Snell, Lars Powers
Microsoft Visual Studio 2015 Unleashed, Third Edition
- About This eBook
- Title Page
- Copyright Page
- Contents at a Glance
- Table of Contents
- About the Authors
- Dedication
- Acknowledgments
- We Want to Hear from You!
- Reader Services
- Introduction
- Part I: Introducing Visual Studio 2015
- Chapter 1. A Quick Tour of Visual Studio 2015
- Chapter 2. The Visual Studio IDE
- Chapter 3. The .NET Languages
- What’s New in C# 6.0 and VB 14
- Language Primer
- Language Features
- Infer a Variable’s Data Type Based on Assignment
- Create an Object and Initialize Its Values (Object Initializers)
- Define a Collection and Initialize Its Values
- Creating an Instance of a Nonexistent Class
- Add Methods to Existing Classes (Extension Methods)
- Add Business Logic to Generated Code (Partial Methods)
- Access and Query Data Using the .NET Languages
- Write Simple Unnamed Functions Within Your Code (Lambda Expressions)
- Splitting an Assembly Across Multiple Files
- Working with XML Directly Within Your Code (VB Only)
- Removing Unused Arguments from Event Handlers (VB Only)
- Creating an Automatically Implemented Property
- Dropping the Underscore in VB for Line Continuation
- Working with Dynamic Languages/Objects
- Covariance and Contravariance
- Asynchronous Programming
- The .NET Framework
- Summary
- Part II: An In-Depth Look at the IDE
- Chapter 4. Solutions and Projects
- Chapter 5. Browsers and Explorers
- Chapter 6. Introducing the Editors and Designers
- Part III: Working with the Visual Studio Tools
- Chapter 7. Working with Visual Studio’s Productivity Aids
- Chapter 8. Testing Code
- Chapter 9. Refactoring Code
- Chapter 10. Debugging Code
- Chapter 11. Deploying Code
- Chapter 12. Developing Applications in the Cloud with Windows Azure
- Chapter 13. Working with Databases
- Part IV: Extending Visual Studio
- Part V: Building Web Applications
- Chapter 17. Building Modern Websites with ASP.NET 5
- Chapter 18. Using JavaScript and Client-Side Frameworks
- Chapter 19. Building and Consuming Services with Web API and WCF
- Part VI: Building Windows Client Apps
- Chapter 20. Building Windows Forms Applications
- Chapter 21. Building WPF Applications
- Chapter 22. Developing Office Business Applications
- Part VII: Creating Mobile Apps
- Chapter 23. Developing Windows Store Applications
- Chapter 24. Creating Windows Phone Applications
- Chapter 25. Writing Cross-Platform Mobile Applications with Apache Cordova
- Index
- Code Snippets
Selecting the Project Type
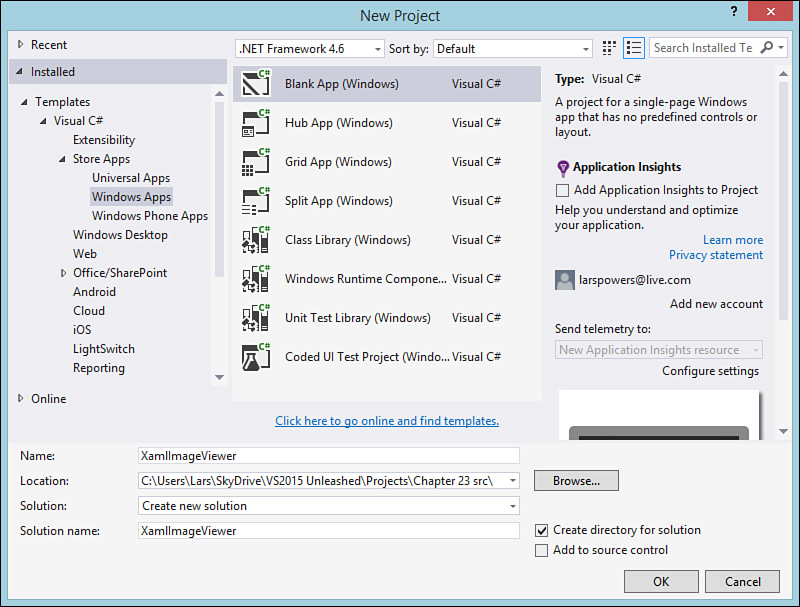
The language selection for us is easy. Because we are starting with an existing XAML-based C# WPF application, we should select a XAML-based C# WinRT project. Click File, New Project, Visual C# (as the language), and then under the Windows Store template, select the Blank App template. We’ll call this XamlImageViewer (see Figure 23.12). Click OK to create the project structure.
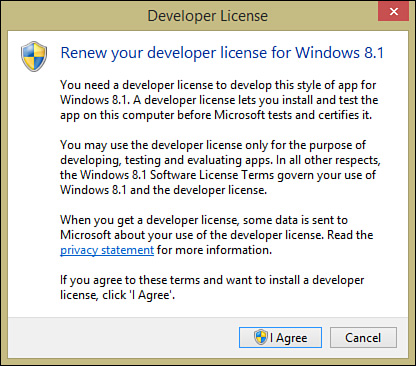
As mentioned previously, the only way to install Windows Store applications is via the Windows Store itself. Each application published to the Windows Store is actually validated, verified, and then certified by Microsoft before it is made available. This has some ramifications. One is that you need a developer license to even deploy things to your own Windows 8 device as part of the normal code and debug process.
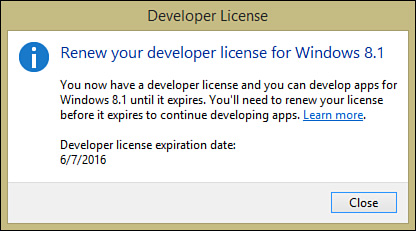
During the new project operation, if you don’t have an existing and valid developer license, you are prompted to get one (see Figure 23.13). The process itself is automated; you merely need to click through a series of dialogs before your project will be created. These culminate in a notification dialog (see Figure 23.14) that indicates if your request for a license was successful or not and what the expiration date is for that license.
With the license out of the way and the project structure in place, let’s worry about the design and layout.
-
No Comment