Data Binding in WPF Applications
Just as with Windows Forms applications, Visual Studio supports drag-and-drop data binding with WPF projects. The process is identical to the one we just covered for binding Windows Forms controls; we first need a data source added to our project. To change things up a bit, let’s quickly build out a form that shows purchase orders and their detail line items.
First, create a new WPF project. Refer to Chapter 21, “Building WPF Applications,” if you want to first refresh your knowledge of the WPF project type and its designers/editors. Add the data sources in the same fashion as we did previously by using the Data Sources Wizard. This time, instead of employee data, let’s focus on purchase order data. From the AdventureWorks database, select both the PurchaseOrderHeader and PurchaseOrderDetail tables to be included in the data set. Call the data set AdventureWorksPurchasingDataSet.
With the data source added, we build out a simple UI. Using the default window created for us, MainWindow, create a two-column grid and place a list box in the left column of the grid. Name the list box listBoxPurchaseOrders. At this point, your workspace should look similar to the one depicted in Figure 13.42.

Now drag the PurchaseOrderID field from the PurchaseOrderHeader data source to the list box. Although nothing appears to have changed visually, the list box has actually been bound with a few lines of XAML:
![]() First, our data source has been referenced as a resource with the key
First, our data source has been referenced as a resource with the key adventure-WorksPurchasingDataSet (picking up from the name we gave the data set in the wizard).
![]() Additionally, a
Additionally, a CollectionViewSource has been added with the appropriate binding path into the data set to pick up the Department table data.
![]() Finally, the
Finally, the DisplayMemberPath and ItemsSource properties have been set on the list box itself.
Besides the XAML modifications that we made, a series of statements have been added to the code file, within the Window_Loaded event handler. These statements are responsible for loading the data from the database via a table adapter object.
Listing 13.4 shows the current state of our XAML.
LISTING 13.4 XAML with Visual Studio-Generated Data Binding
<Window x:Class="AdventureWorksWPF.MainWindow"
xmlns="http://schemas.microsoft.com/winfx/2006/xaml/presentation"
xmlns:x="http://schemas.microsoft.com/winfx/2006/xaml"
Title="MainWindow" Height="350" Width="525"
xmlns:my="clr-namespace:AdventureWorksWPF"
Loaded="Window_Loaded">
<Window.Resources>
<my:AdventureWorksPurchasingDataSet
x:Key=" adventureWorksPurchasingDataSet" />
<CollectionViewSource x:Key="purchaseOrderHeaderViewSource"
Source="{Binding Path=PurchaseOrderHeader,
Source={StaticResource adventureWorksPurchasingDataSet}}" />
</Window.Resources>
<Grid DataContext="{StaticResource purchaseOrderHeaderViewSource}">
<Grid.ColumnDefinitions>
<ColumnDefinition Width="150" />
<ColumnDefinition Width="*" />
</Grid.ColumnDefinitions>
<ListBox Grid.Column="0" Margin="5"
X:Name="listBoxPurchaseOrders"
VerticalAlignment="Stretch"
DisplayMemberPath="PurchaseOrderID" ItemsSource="{Binding}"
/>
</Grid>
</Window>
If we run the application at this stage, we see that we have a list of all the purchase order IDs displayed in our list box (see Figure 13.43).

Now every time we select a purchase order ID in the list box, we want to see its line items in the right column of our window. This is another, easy drag-and-drop operation requiring no hand-coding on our part. Grab the PurchaseOrderDetail data source column that sits under the PurchaseOrderHeader data source, and drag it over into the rightmost column of our WPF window. (Figure 13.44 shows the result within our WPF designer of this drag-drop action.) This has the net effect of creating a DataGrid control bound to the PurchaseOrderDetail rows that correspond to the currently selected PurchaseOrderHeader object in the list box.

It’s important that you grab the correct PurchaseOrderDetail column object from the Data Sources window; by selecting the one that lies under the PurchaseOrderHeader, you are also grabbing the foreign key relationship between those two tables in the database, and that provides the context necessary for the WPF designer and editor to wire up the correct code to respond to selections in the list box and display related records in the DataGrid.
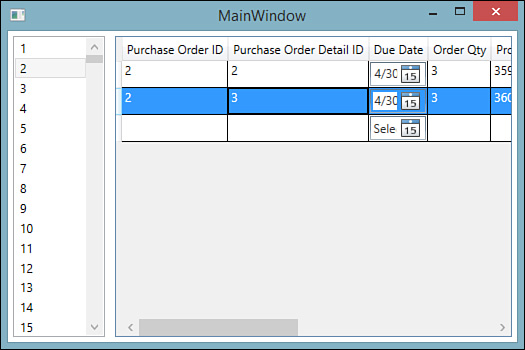
Figure 13.45 shows the complete app that was accomplished with absolutely no coding required!