Darling, You Send Me (E-Mail)
So now that you’re a whiz at reading and organizing incoming messages, let’s look at how to use your iPhone to send e-mail.
Makin’ messages
Several subspecies of messages are available: pure text, text with a photo, a partially finished message (a draft) that you want to save and complete later, a reply to an incoming message, and a message you want to forward to someone else. The following sections examine these subsets one at a time.
Sending an all-text message
To compose a new e-mail message, tap Mail on the Home screen to open the Mailboxes screen (refer to Figure 12-6) or whichever screen was up when you last left the app.
Now, to create a new message, follow these steps:
1. Tap the new message icon (refer to Figure 12-8), in the lower-right corner of the screen.
The icon appears on all the Mail screens, so don’t worry if you’re not at the main Mailboxes screen. A screen like the one shown in Figure 12-15 appears.
2. Enter the names or e-mail addresses of the recipients in one of the following ways:
• Type the names or e-mail addresses of the recipients in the To field.
• Tap the microphone icon on the virtual keyboard to dictate the names or e-mail addresses of the recipients in the To field.
• Tap the + button to the right of the To field to select a contact or contacts from your iPhone’s address book.
 You can rearrange names in the address field by dragging them around, moving, say, a name from the To field to the Cc field
3. (Optional) Enter a name in the Cc field, Bcc field, or both fields. Or choose to send mail from a different account in the From field, as follows:
a. Tap the field labeled Cc/Bcc, From.
Doing so breaks the single field into separate Cc, Bcc, and From fields. The Cc label stands for carbon copy, and Bcc stands for blind carbon copy. Bcc enables you to include a recipient on the message that other recipients can’t see has been included. It’s great for those secret agent e-mails!
b. Tap the respective Cc or Bcc field and type the name.
Or tap the + symbol that appears in one of those fields to add a contact.
If you start typing an e-mail address, e-mail addresses that match what you typed appear in a list, temporarily covering up the To, Cc, or Bcc field. If the correct one is in the list, tap it to use it.
c. Tap the From field to send the message from any of your e-mail accounts on-the-fly.
This step assumes that you have more than one account and want to send mail from an account different from the one already shown.
4. Type a subject in the Subject field.
The subject is optional, but it’s considered poor form to send an e-mail message without one.
5. Type your message in the message area.
The message area is immediately below the Subject field.
6. Tap the Send button in the upper-right corner of the screen.

Figure 12-15: The New Message screen appears, ready for you to start typing the recipient’s name.
Your message wings its way to its recipients almost immediately. If you aren’t in range of a Wi-Fi network or a cellular data network when you tap Send, the message is sent the next time you’re in range of one of these networks.
Apple includes a bunch of landscape orientation keyboards for various apps, including Mail. When you rotate the phone to its side, you can compose a new message using a wider-format virtual keyboard. Consult Chapter 2 for more on the various keyboards that may show up on your phone.
Sending a photo with a text message
Forgive the cliché, but sometimes a picture truly is worth a thousand words. When that’s the case, here’s how to send an e-mail message with a photo enclosed.
 Apple made this process simpler with the iOS 6 upgrade. After addressing a message and perhaps composing a few words, press your finger against the screen and let go. At first you see options for Select, Select All, and Paste. Ignore these for now and instead tap on the right-pointing arrow. Doing so leads you to the Insert Photo or Video option, as shown in Figure 12-16, left. Tap that and you’re transported to a list of your photo albums, from which you can select a picture or video. When you find the one you want, tap Choose.
If you selected a video, it will be compressed and an icon for the movie will be inserted into the body of the message, as shown in Figure 12-16, right. (The recipient would tap that icon to play the movie.)
If you choose a photo, you will see the actual picture inserted in the message body, as shown in Figure 12-17. When you’re ready to send your e-mail off, tap Send and choose an appropriate file size for the image. Off it goes.
 The alternate way to include pictures in an e-mail is the way it was done on the iPhone before the iOS 6 upgrade. If you’re more comfortable doing it this way, so be it. Tap the Photos icon on the Home screen, and then find the photo you want to send. Tap the action icon (see the margin), in the lower-left corner of the screen, and then tap the Email Photo button.
An e-mail message appears on-screen with the photo already attached. The image appears to be embedded in the body of the message, but the recipient receives the image as a regular e-mail attachment. Just address the message and type whatever text you like, as you did for an all-text message in the preceding section, and then tap the Send button. You have the option to choose a file size for your picture: Small, Medium, Large, or Actual Size.
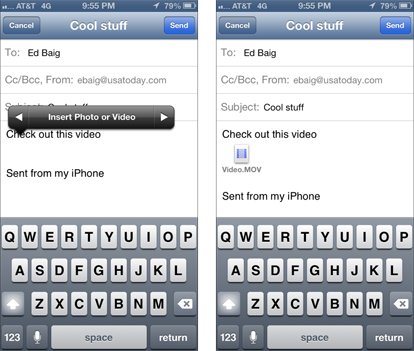
Figure 12-16: Inserting a video into an e-mail message.

Figure 12-17: You can admire an inserted picture before sending it in an e-mail.
Saving an e-mail message so that you can send it later
Sometimes you start an e-mail message but don’t have time to finish it. When that happens, you can save it as a draft and finish it some other time.
Here’s how: Start an e-mail message as described in one of the two preceding sections. When you’re ready to save the message as a draft, tap the Cancel button in the upper-left corner of the screen and three buttons appear. Tap the Save Draft button if you want to save this message as a draft and complete it another time; tap the Delete Draft button to ditch your efforts; or tap Cancel to return to the message and continue crafting it to perfection.
 If you tap the Delete Draft button, the message disappears immediately without a second chance. Don’t tap Delete Draft unless you mean it.
To work on the message again, tap the Drafts mailbox for the account in question. All messages you saved as drafts hang out in that mailbox. Tap the one you want to resume working on so that it reappears on the screen. When you’re finished, tap Send to send it or Cancel to go through the drill of saving it as a draft again.
The number of drafts appears to the right of the Drafts folder, the same way that the number of unread messages appears to the right of other mail folders, such as your inbox.
Formatting text in an e-mail
One of the goodies that arrived with iOS 5 is the capability to format e-mail text by underlining, bolding, or italicizing it. First you select the text by pressing your finger against the screen until you see the options shown in Figure 12-18, left. Next, tap the right-pointing arrow in that list of options to display the additional options shown in Figure 12-18, center. Then tap the BIU button. Apply whichever style (Bold, Italics, Underline) suits your fancy.
If you tap Quote Level, another option that appears when you tap the right-pointing arrow after selecting a word (it’s not shown Figure 12-18), you can quote a portion of a message you’re responding to. You can also increase or decrease the indentation in your outgoing message.
Replying to or forwarding an e-mail message
When you receive a message and want to reply to it, open the message and then tap the reply/reply all/forward/print icon (labeled in Figure 12-8). Then tap the Reply, Reply All, Forward, or Print button.
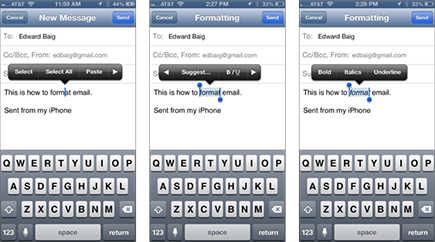
Figure 12-18: Select your text (left), tap the BIU button (center), and apply bold, italic, or underline (right).
The Reply button creates a new e-mail message addressed to the sender of the original message. The Reply All button creates an outgoing e-mail message addressed to the sender and all other recipients of the original message. In both cases, the Subject line is retained with a Re: prefix added. So if the original Subject line were iPhone Tips, the reply’s Subject line would be Re: iPhone Tips. You also see text from the original message in the body of your reply (whether you are replying to one person or more than one person).
Tapping the Forward button creates an unaddressed e-mail message that contains the text of the original message. Add the e-mail address(es) of the person or people to whom you want to forward the message, and then tap Send. In this case, rather than a Re: prefix, the Subject line begins with Fwd:. So this time the Subject line reads Fwd: iPhone Tips.
You can edit the Subject line of a reply or a forwarded message or edit the body text of a forwarded message the same way you would edit any other text. It’s usually considered good form to leave the Subject lines alone (with the Re: or Fwd: prefix intact), but you may want to change them sometimes. Now you know that you can.
To send your reply or forwarded message, tap the Send button as usual.
Printing requires an AirPrint printer. If you have one, tap the Print option.
Apple has included a Send Again option for a message you’ve already replied to but for some reason want to send again. Maybe you want to be doubly sure that the person sees the message.
Settings for sending e-mail
You can customize the mail you send and receive in lots of ways. In this section, we explore settings for sending e-mail. Later in this chapter, we show you settings that affect the way you receive and read messages. In each instance, you start by tapping Settings on the Home screen. Then:
![]() To hear an alert when you successfully send a message: Tap the Sounds option on the main Settings screen, and then turn on the Sent Mail setting. You choose what that alert sounds like, from a Suspense sound to Swoosh (the default). If you want to change other settings, tap the Settings button in the upper-left corner of the screen. If you’re finished setting settings, press the Home button on the front of your iPhone.
To hear an alert when you successfully send a message: Tap the Sounds option on the main Settings screen, and then turn on the Sent Mail setting. You choose what that alert sounds like, from a Suspense sound to Swoosh (the default). If you want to change other settings, tap the Settings button in the upper-left corner of the screen. If you’re finished setting settings, press the Home button on the front of your iPhone.
 The instructions in the preceding paragraph are similar for all the settings we discuss in this section and later sections, so we won’t repeat them. To summarize, if you want to continue using settings, you tap whichever button appears in the upper-left corner of the screen — it might be named Settings, Mail, Accounts, or something else. The point is that the upper-left button always returns you to the preceding screen so that you can change other settings. The same concept applies to pressing the Home button on the front of your iPhone when you’re finished setting a setting. That action always saves the change you just made and returns you to the Home screen.
![]() To add a signature line, phrase, or block of text to every e-mail message you send: Tap Settings⇒Mail, Contacts, Calendars⇒Signature. (You may need to scroll down to see the Signature option.) The default signature is Sent from my iPhone. You can add text before or after it, or delete it and type something else, keeping your signature no longer than four lines max if you want to follow the unwritten rules of netiquette. Your signature is now affixed to the end of all your outgoing e-mail.
To add a signature line, phrase, or block of text to every e-mail message you send: Tap Settings⇒Mail, Contacts, Calendars⇒Signature. (You may need to scroll down to see the Signature option.) The default signature is Sent from my iPhone. You can add text before or after it, or delete it and type something else, keeping your signature no longer than four lines max if you want to follow the unwritten rules of netiquette. Your signature is now affixed to the end of all your outgoing e-mail.
![]() To have your iPhone send you a copy of every message you send: Tap Settings⇒Mail, Contacts, Calendars, and then turn on the Always Bcc Myself setting.
To have your iPhone send you a copy of every message you send: Tap Settings⇒Mail, Contacts, Calendars, and then turn on the Always Bcc Myself setting.
![]() To add an indentation when you forward or reply to a message: Tap Increase Quote Level and tap or slide the switch from Off to On.
To add an indentation when you forward or reply to a message: Tap Increase Quote Level and tap or slide the switch from Off to On.
![]() To set the default e-mail account for sending e-mail from outside the Mail app: On the Home screen, tap Settings⇒Mail, Contact, Calendars⇒Default Account. Tap the account you want to use as the default. For example, when you want to e-mail a picture directly from the Photos app, this designated default e-mail account is used. Note that this setting applies only if you have more than one e-mail account on your iPhone.
To set the default e-mail account for sending e-mail from outside the Mail app: On the Home screen, tap Settings⇒Mail, Contact, Calendars⇒Default Account. Tap the account you want to use as the default. For example, when you want to e-mail a picture directly from the Photos app, this designated default e-mail account is used. Note that this setting applies only if you have more than one e-mail account on your iPhone.
That’s what you need to know about the settings that apply to sending e-mail.
Setting your message and account settings
This final discussion of Mail involves more settings that deal with your various e-mail accounts.
Checking and viewing e-mail settings
Several settings affect the way you check and view e-mail. You might want to modify one or more, so we describe what they do and where to find them:
![]() To specify how often the iPhone checks for new messages: On the Home screen, tap Settings⇒Mail, Contacts, Calendars⇒Fetch New Data. You’re entering the world of fetching and pushing. Check out Figure 12-19 to glance at your options. If your e-mail program supports push and you have it turned on (the On button is showing), fresh messages are sent to your iPhone automatically as soon as they reach the server. If you turned off push (Off is showing) or your e-mail program doesn’t support it, the iPhone fetches data instead (that is, messages are batched before they are sent). Choices for fetching are Every 15 Minutes, Every 30 Minutes, Hourly, and Manually. Tap the one you prefer.
To specify how often the iPhone checks for new messages: On the Home screen, tap Settings⇒Mail, Contacts, Calendars⇒Fetch New Data. You’re entering the world of fetching and pushing. Check out Figure 12-19 to glance at your options. If your e-mail program supports push and you have it turned on (the On button is showing), fresh messages are sent to your iPhone automatically as soon as they reach the server. If you turned off push (Off is showing) or your e-mail program doesn’t support it, the iPhone fetches data instead (that is, messages are batched before they are sent). Choices for fetching are Every 15 Minutes, Every 30 Minutes, Hourly, and Manually. Tap the one you prefer.
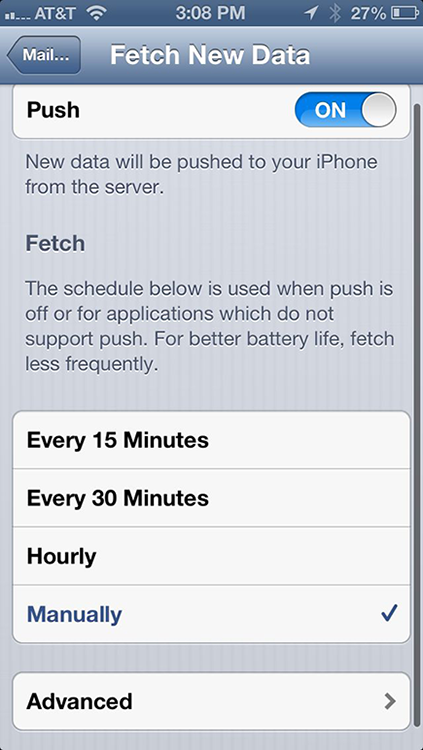
Figure 12-19: Fetch or push? Your call.
To determine these push and fetch settings for each account, tap Advanced at the bottom of the screen. Then tap the account in question. Push is shown as an option only if the e-mail account you tapped supports the feature.
As of this writing, Yahoo!, iCloud, Google, and Microsoft Exchange ActiveSync were among the pushy e-mail accounts (but only in a good way).
![]() To hear an alert sound when you receive a new message: Tap the Sounds option on the main Settings screen and then turn on the New Mail setting. Again, you can choose from a variety of sound effects. The Ding sound is the default.
To hear an alert sound when you receive a new message: Tap the Sounds option on the main Settings screen and then turn on the New Mail setting. Again, you can choose from a variety of sound effects. The Ding sound is the default.
![]() To set the number of recent messages that appear in your inbox: On the Home screen, tap Settings⇒Mail, Contacts, Calendars⇒Show. Your choices are 50, 100, 200, 500, and 1,000 recent messages. Tap the number you prefer.
To set the number of recent messages that appear in your inbox: On the Home screen, tap Settings⇒Mail, Contacts, Calendars⇒Show. Your choices are 50, 100, 200, 500, and 1,000 recent messages. Tap the number you prefer.
You can see more messages in your inbox regardless of this setting by scrolling all the way to the bottom and tapping Load More Messages.
![]() To set the number of lines of each message to be displayed in the message list: On the Home screen, tap Settings⇒Mail, Contacts, Calendars⇒Preview, and then choose a number. Your choices are 0, 1, 2, 3, 4, and 5 lines of text. The more lines of text you display in the list, the fewer messages you can see at a time without scrolling. Think before you choose 4 or 5.
To set the number of lines of each message to be displayed in the message list: On the Home screen, tap Settings⇒Mail, Contacts, Calendars⇒Preview, and then choose a number. Your choices are 0, 1, 2, 3, 4, and 5 lines of text. The more lines of text you display in the list, the fewer messages you can see at a time without scrolling. Think before you choose 4 or 5.
![]() To specify whether the iPhone shows the To and Cc labels in message lists: On the Home screen, tap Settings⇒Mail, Contacts, Calendars, and then turn on or off the Show To/Cc Label setting.
To specify whether the iPhone shows the To and Cc labels in message lists: On the Home screen, tap Settings⇒Mail, Contacts, Calendars, and then turn on or off the Show To/Cc Label setting.
![]() To turn on or off the Ask before Deleting warning: On the Home screen, tap Settings⇒Mail, Contacts, Calendars, and then turn on or off the Ask before Deleting setting. If this setting is turned on, you need to tap the trash can icon at the bottom of the screen and then tap the red Delete button to confirm the deletion. When the setting is turned off, tapping the trash can icon deletes the message and you never see a red Delete button.
To turn on or off the Ask before Deleting warning: On the Home screen, tap Settings⇒Mail, Contacts, Calendars, and then turn on or off the Ask before Deleting setting. If this setting is turned on, you need to tap the trash can icon at the bottom of the screen and then tap the red Delete button to confirm the deletion. When the setting is turned off, tapping the trash can icon deletes the message and you never see a red Delete button.
![]() To archive messages rather than delete them: Tap an e-mail account that presents this option — Gmail is one — and slide the switch so that On is showing. If selected, the trash can icon that you’d normally see in an e-mail is replaced by an icon showing an arrow pointing downward into what looks like a little file cabinet.
To archive messages rather than delete them: Tap an e-mail account that presents this option — Gmail is one — and slide the switch so that On is showing. If selected, the trash can icon that you’d normally see in an e-mail is replaced by an icon showing an arrow pointing downward into what looks like a little file cabinet.
![]() To specify whether the phone will automatically load remote images: Tap Load Remote Images so that the On button is showing. If it’s off, you can still manually load remote images.
To specify whether the phone will automatically load remote images: Tap Load Remote Images so that the On button is showing. If it’s off, you can still manually load remote images.
Altering account settings
The next group of settings we explore in this chapter deals with your e-mail accounts. You most likely will never need most of these settings, but we’d be remiss if we didn’t at least mention them briefly. So here they are, whether you need ’em or not:
![]() To stop using an e-mail account: Tap the Settings icon on the Home screen, tap Mail, Contacts, Calendars, and then tap the account name. Tap the Mail switch to turn off the account. Depending on the account, you might also turn off other settings. For example, in Gmail, you can turn off the Calendars and Notes settings but leave Mail turned on.
To stop using an e-mail account: Tap the Settings icon on the Home screen, tap Mail, Contacts, Calendars, and then tap the account name. Tap the Mail switch to turn off the account. Depending on the account, you might also turn off other settings. For example, in Gmail, you can turn off the Calendars and Notes settings but leave Mail turned on.
When you turn off an account, you don’t delete it. You only hide the account from view and stop it from sending or checking e-mail until you turn it on again.
![]() To delete an e-mail account: Tap the Settings icon on the Home screen, tap Mail, Contacts, Calendars, and then tap the account name. Scroll to the bottom and tap the red button that reads Delete Account. You’re given a chance to reconsider by tapping either Delete Account a second time or Cancel.
To delete an e-mail account: Tap the Settings icon on the Home screen, tap Mail, Contacts, Calendars, and then tap the account name. Scroll to the bottom and tap the red button that reads Delete Account. You’re given a chance to reconsider by tapping either Delete Account a second time or Cancel.
The last settings are reached the same way: On the Home screen, tap Settings⇒Mail, Contacts, Calendars, and then tap the name of the account with which you want to work. Next, tap the Account Info button and then tap Advanced. The settings you see under Advanced and how they appear vary a little by account. This list describes some of the ones you see:
![]() To specify how long until deleted messages are removed permanently from your iPhone: Tap Advanced and then tap Remove. Your choices are Never, After One Day, After One Week, and After One Month. Tap the choice you prefer.
To specify how long until deleted messages are removed permanently from your iPhone: Tap Advanced and then tap Remove. Your choices are Never, After One Day, After One Week, and After One Month. Tap the choice you prefer.
![]() Send signed and encrypted messages: In an account that has an Advanced setting, tap S/MIME to turn on the setting and then indicate whether a message must be signed or require a certificate, which might be issued by a systems administrator at your job. This setting is under Advanced for a reason.
Send signed and encrypted messages: In an account that has an Advanced setting, tap S/MIME to turn on the setting and then indicate whether a message must be signed or require a certificate, which might be issued by a systems administrator at your job. This setting is under Advanced for a reason.
![]() To choose whether drafts, sent messages, and deleted messages are stored on your iPhone or on your mail server: Tap Advanced if this option is presented. Then, under the Mailbox Behaviors heading, choose various settings to determine whether you’re storing such messages on the iPhone or on the server. Your options vary according to your e-mail account. If you choose to store any or all of them on the server, you can’t see them unless you have an Internet connection (Wi-Fi or cellular). If you choose to store them on your iPhone, they’re always available, even if you don’t have Internet access.
To choose whether drafts, sent messages, and deleted messages are stored on your iPhone or on your mail server: Tap Advanced if this option is presented. Then, under the Mailbox Behaviors heading, choose various settings to determine whether you’re storing such messages on the iPhone or on the server. Your options vary according to your e-mail account. If you choose to store any or all of them on the server, you can’t see them unless you have an Internet connection (Wi-Fi or cellular). If you choose to store them on your iPhone, they’re always available, even if you don’t have Internet access.
We strongly recommend that you not change these next two items (again, assuming they are even presented) unless you know exactly what you’re doing and why. If you’re having problems with sending or receiving mail, start by contacting your ISP (Internet service provider), e-mail provider, or corporate IT person or department. Then change these settings only if they tell you to:
![]() To reconfigure mail server settings: Tap Host Name, User Name, or Password in the Incoming Mail Server or Outgoing Mail Server section of the account settings screen and make your changes.
To reconfigure mail server settings: Tap Host Name, User Name, or Password in the Incoming Mail Server or Outgoing Mail Server section of the account settings screen and make your changes.
![]() To adjust Use SSL, Authentication, IMAP Path Prefix, or Server Port: Tap Advanced, and then tap the appropriate item and make the necessary changes.
To adjust Use SSL, Authentication, IMAP Path Prefix, or Server Port: Tap Advanced, and then tap the appropriate item and make the necessary changes.
And that, as they say in baseball, retires the side. You’re now fully qualified to set up e-mail accounts and send and receive e-mail on your iPhone.