Figure 13-3: Satellite view of the map shown in Figure 13-2.
Maps Are Where It’s At
In the first edition of this book, we said that the Maps feature was one of the sleeper hits of our iPhone experience and an app we both use more than we expected because it’s so darn handy. Since then, Maps has become better and more capable with each iOS update. Or at least that was the case until the release of iOS 6, when Apple jettisoned the Google Maps-powered Maps app we’ve known and loved since the first iPhone and replaced it with an Apple-powered Maps app.
Some people abhor the new Maps app; many don’t notice much difference; and a (small) handful like it better. We think it’s pretty good already and will only get better.
If your maps don’t look like the ones you’re about to see, chances are you’re running iOS 5 or earlier. In any case, the new Maps app, like the one it supersedes, can quickly and easily discover exactly where you are; find nearby restaurants and businesses; get turn-by-turn directions for driving or walking from any address to any other address; and see real-time traffic information for many locations.
 Unlike the old Maps apps, the Maps app in iOS 6 doesn’t offer information about traveling via public transportation, or at least it didn’t when we wrote this chapter, though it seems likely this feature will be added sometime in the future. On the flip side, the new Maps app delivers significantly improved overall performance, spoken turn-by-turn directions (iPhone 4S and 5 only), and a nifty 3D flyover view for many locations.
Finding your current location with Maps
![]() Let’s start with something supremely simple yet extremely useful: determining your current location. At the risk of sounding like self-help gurus, here’s how to find yourself: Tap the Maps icon and then tap the show current location button, the little gray arrowhead shown in the margin and found in the lower-left corner of your screen.
Let’s start with something supremely simple yet extremely useful: determining your current location. At the risk of sounding like self-help gurus, here’s how to find yourself: Tap the Maps icon and then tap the show current location button, the little gray arrowhead shown in the margin and found in the lower-left corner of your screen.
A pulsating blue marker indicates your current location on the map when the phone’s GPS is used to find your location. In addition, the Location Services indicator, an arrowhead, appears to the left of the battery indicator in the status bar, as shown in Figure 13-1.

Figure 13-1: The blue marker shows your location; the arrowhead in the status bar means you’re using Location Services.
If GPS is not being used because you’re out of the satellite’s sight line, a somewhat larger pale blue circle shows your approximate location. Either way, when you move around, the iPhone updates your location and adjusts the map so that the location indicator stays in the middle of the screen.
 If you tap or drag the map, your iPhone continues to update your location but won’t recenter the marker, which means that the location indicator can move off the screen. Tap the show current location button in the lower-left corner again to move the current location marker back to the center.
 When you tap the show current location button, it turns purple, which indicates that your current location is in the middle of the screen. If you tap, drag, rotate, or zoom the map (that is, do anything that moves the current location indicator from the center of the screen), the button turns gray. So, if the button is purple, your current location is currently in the middle of the screen; if the button is gray, your current location is anywhere except the middle of the screen.
Finding a person, place, or thing
To find a person, place, or thing with Maps, tap the search field at the top of the screen to make the keyboard appear. Now type what you’re looking for. You can search for addresses, zip codes, intersections, towns, landmarks, and businesses by category and by name, or combinations, such as New York, NY 10022, pizza 60645, or Auditorium Shores Austin TX.
If the letters you type match names in your Contacts list, the matching contacts appear in a list below the search field. Tap a name to see a map of that contact’s location. The Maps app is smart about it, too, displaying only the names of contacts that have a street address.
When you finish typing, tap Search. After a few seconds, a map appears. If you searched for a single location, it’s marked with a single pushpin. If you searched for a category (Pizza 60645, for example), you see multiple pushpins, one for each matching location (pizza joints in or close to the 60645 zip code), as shown in Figure 13-2.
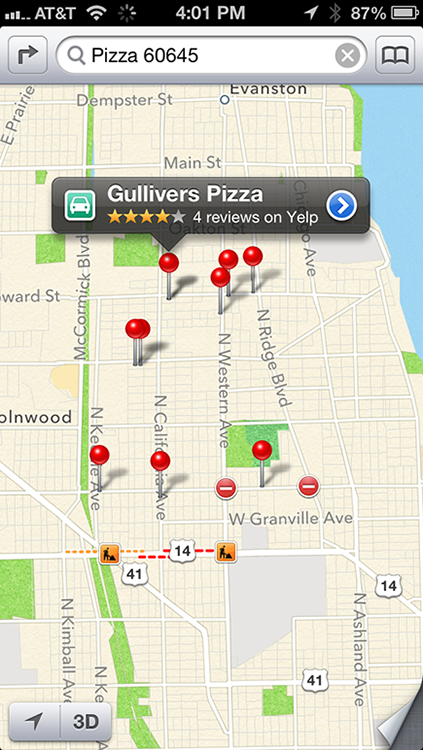
Figure 13-2: Search for Pizza 60645 and you see pushpins for all nearby pizza joints.
You can search for all sorts of things, including intersections, neighborhoods, landmarks, restaurants, and businesses. Furthermore, you can combine several items, as with our pizza-with-a-zip-code example. The Maps app is quite adept at interpreting search terms and finding the right place. After you’ve used the app a few times, we’re sure you’ll be as addicted as we are.
Views, zooms, and pans
The preceding section talks about how to find just about anything with Maps. Now here’s a look at some ways you can use what you find. But first, let’s take a little detour and explore how to work with what’s on the Maps screen.
Four views are available at any time: standard (map), satellite, hybrid, and list. Refer to Figure 13-2 for a standard view; Figure 13-3 shows the Satellite view. Select a view by first tapping the curling page in the lower-right corner of the screen. The map then curls back and reveals several buttons, as shown in Figure 13-4.
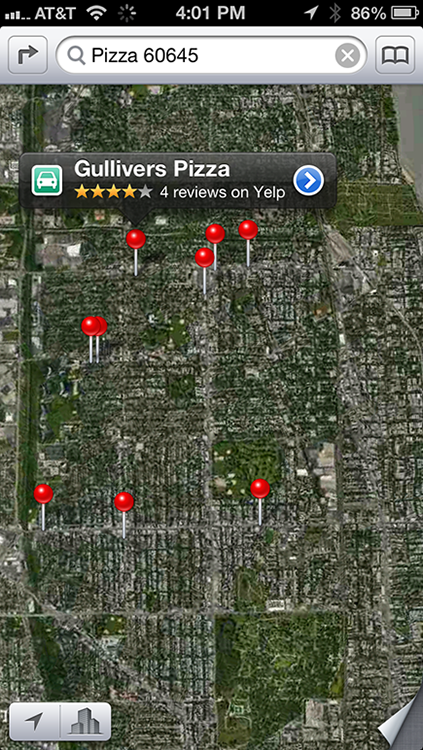
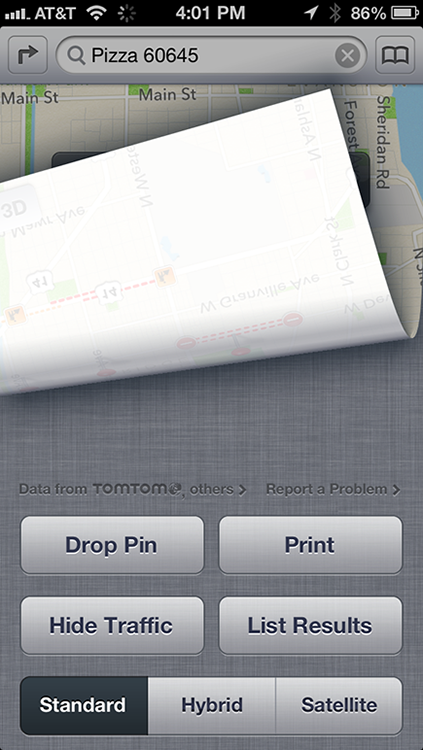
Figure 13-4: The map curls back to reveal these buttons.
In standard (map), satellite, or hybrid view, you can zoom to see either more or less of the map — or scroll (pan) to see what’s above, below, or to the left or right of what’s on the screen:
![]() To zoom out: Pinch the map or double-tap using two fingers. To zoom out even more, pinch or double-tap using two fingers again.
To zoom out: Pinch the map or double-tap using two fingers. To zoom out even more, pinch or double-tap using two fingers again.
Double-tapping with two fingers may be a new concept to you: Merely tap twice in rapid succession with two fingers rather than the usual one finger. That’s a total of four taps, input efficiently as two taps per finger.
![]() To zoom in: Unpinch the map or double-tap (the usual way — with just one finger) the spot you want to zoom in on. Unpinch or double-tap with one finger again to zoom in even more.
To zoom in: Unpinch the map or double-tap (the usual way — with just one finger) the spot you want to zoom in on. Unpinch or double-tap with one finger again to zoom in even more.
An unpinch is the opposite of a pinch. Start with your thumb and a finger together and then flick them apart.
You can also unpinch with two fingers or two thumbs, one from each hand, but you’ll probably find that a single-handed pinch and unpinch is handier.
![]() To rotate: Rotate two fingers on the screen. A compass appears in the upper-right corner of the screen to show the map’s orientation as you rotate.
To rotate: Rotate two fingers on the screen. A compass appears in the upper-right corner of the screen to show the map’s orientation as you rotate.
![]() To scroll: Flick or drag up, down, left, or right with one finger.
To scroll: Flick or drag up, down, left, or right with one finger.
Maps and contacts
 Maps and contacts go together like peanut butter and jelly. For example, if you want to see a map of a contact’s street address, tap the little bookmarks icon to the right of the search field, tap the Contacts button at the bottom of the screen, and then tap the contact’s name. Or type the first few letters of the contact’s name in the search field, and then tap the name in the list that automatically appears below the search field.
After you find a location by typing an address in Maps, you can add that location to one of your contacts. Or you can create a new contact with a location you’ve found. To do either, tap the location’s pushpin on the map, and then tap the little > in a blue circle to the right of the location’s name or description (shown for Gullivers in Figures 13-2 and 13-3) to display its Info screen, as shown in Figure 13-5.

Figure 13-5: The Info screens for Gullivers Pizza.
Now tap the Add to Contacts button on the Info screen. You’ll probably have to scroll to the bottom of the Info screen (see Figure 13-5, right) to see this button.
You work with your contacts in two ways. One way is to tap the Contacts icon, which is in the Utilities folder on the second page of icons on the Home screen. (Swipe from right to left on the Home screen to see this second page.) The other way is to tap the Phone icon on your Home screen, and then tap the Contacts icon in the Phone screen’s dock.
You can also get driving directions from most locations, including a contact’s address, to most other locations, including another contact’s address. You see how to do that in the “Smart map tricks” section, later in the chapter.
Timesaving map tools: Bookmarks, Recents, and Contacts
The Maps app offers three tools that can save you from having to type the same locations over and over. All three are in the Bookmarks screen, which appears when you tap the little gray bookmarks icon on the right side of the search field.
At the bottom of the Bookmarks screen, you find three buttons: Bookmarks, Recents, and Contacts. The following sections give you the lowdown on these buttons.
Bookmarks
Bookmarks in the Maps app, like bookmarks in Safari, let you return to a location without typing a single character. To bookmark a location, tap the little > in a blue circle to the right of the location’s name or description to display the Info screen for that location. Then tap the Add to Bookmarks button on the Info screen. (You may have to scroll down the Info screen to see the Add to Bookmarks button.)
You can also drop a pin (a kind of temporary bookmark) anywhere on the map by tapping the curling page button in the lower-right corner, and then tapping the Drop Pin button. After you’ve dropped a pin, you can press and drag it anywhere on the map. When the pin is where you want it, lift your finger to drop the pin and a banner with the location of the pin (if Maps can figure it out) and a little > in a blue circle appears. Tap the little > and the Info screen for the dropped pin appears. Now tap the Add to Bookmarks button on the Info screen.
The info screen for a dropped pin offers several buttons in addition to Add to Bookmarks, namely Directions to Here, Directions from Here, Add to Contacts, Share Location, Report a Problem, and Remove Pin.
After you add a bookmark, you can recall it at any time. To do so, tap the bookmarks icon to the right of the search field, tap the Bookmarks button at the bottom of the screen, and then tap the bookmark name to see it on a map.
The first things you should bookmark are your home and work addresses. You use these addresses all the time with Maps, so you might as well bookmark them now to avoid typing them over and over. Also create zip code bookmarks for your home, work, and other locations you frequently visit. Then when you want to find businesses near any of those locations, you can choose the zip code bookmark and type what you’re looking for, such as 78729 pizza, 60645 gas station, or 90201 Starbucks.
To manage your bookmarks, first tap the Edit button in the top-left corner of the Bookmarks screen. Then:
![]() To move a bookmark up or down in the Bookmarks list: Drag the little icon with three gray bars that appears to the right of the bookmark upward to move the bookmark higher in the list or downward to move the bookmark lower in the list.
To move a bookmark up or down in the Bookmarks list: Drag the little icon with three gray bars that appears to the right of the bookmark upward to move the bookmark higher in the list or downward to move the bookmark lower in the list.
![]() To delete a bookmark from the Bookmarks list: Tap the – button to the left of the bookmark’s name.
To delete a bookmark from the Bookmarks list: Tap the – button to the left of the bookmark’s name.
When you’re finished using bookmarks, tap the Done button in the top-right corner of the Bookmarks screen to return to the map.
Recents
The Maps app automatically remembers every location you’ve searched for in its Recents list (unless you’ve cleared it, as described next). To see this list, tap the bookmarks icon to the right of the search field, and then tap the Recents button at the bottom of the screen. To see a map of a recent item, tap the item’s name.
To clear the Recents list, tap the Clear button in the top-left corner of the screen, and then tap the Clear All Recents button. Sadly, removing a single entry is not possible; clearing the Recents list is an all-or-nothing deal.
When you’re finished using the Recents list, tap the Done button in the top-right corner of the screen to return to the map.
Contacts
To see a map of a contact’s location, tap the bookmarks icon to the right of the search field, and then tap the Contacts button at the bottom of the screen. To see a map of a contact’s location, tap the contact’s name in the list.
To limit the Contacts list to specific groups (assuming you have some groups in your Contacts list), tap the Groups button in the top-left corner of the screen and then tap the name of the group. Now only contacts in this group are displayed in the list.
When you’re finished using the Contacts list, tap the Done button in the top-right corner of the screen to return to the map.
Smart map tricks
The Maps app has more tricks up its sleeve. This section lists a few nifty features you may find useful.
Get route maps and driving directions
You can get route maps and driving directions to any location from any other location in a couple of ways:
![]() If a pushpin is already on the screen: Tap the pushpin and then tap the little > in a blue circle to the right of the name or description. This action displays the item’s Info screen. Now tap the Directions to Here or Directions from Here button to get directions to or from that location, respectively.
If a pushpin is already on the screen: Tap the pushpin and then tap the little > in a blue circle to the right of the name or description. This action displays the item’s Info screen. Now tap the Directions to Here or Directions from Here button to get directions to or from that location, respectively.

![]() When you’re looking at a map screen: Tap the Directions button on the left of the search field. The Start and End fields appear at the top of the screen. Type the start and end points or select them from your bookmarks, recent maps, or contacts if you prefer. If you want to swap the starting and ending locations, tap the little swirly arrow button to the left of the Start and End fields.
When you’re looking at a map screen: Tap the Directions button on the left of the search field. The Start and End fields appear at the top of the screen. Type the start and end points or select them from your bookmarks, recent maps, or contacts if you prefer. If you want to swap the starting and ending locations, tap the little swirly arrow button to the left of the Start and End fields.
If you need to change the start or end location, tap the Clear button in the top-left corner and try again.
When the start and end locations are correct, tap the Route button in the top-right corner of the screen and the route map appears.
Maps will often suggest several routes. The number of suggestions appears at the top of the screen and the routes appear on the map in blue with cartoon balloons denoting their route number. Tap the blue line or cartoon balloon to select a route, as in Figure 13-6, where Route 2 is selected.

Figure 13-6: Route maps from Bob’s first house in Skokie to Gullivers Pizza in Chicago.
Weird but true: If you type the end location, you’ll have to tap the Route button before you can proceed; but if you select the end location from your Bookmarks, Contacts, or Recents list, you won’t see the Route button and thus won’t have to tap it before you proceed.
Tap the curling page button in the lower-right corner of the map you’re viewing and then tap the Show Traffic button to help you decide which route will be most expedient.
The next step is to tap the Start button in the top-right corner to receive turn-by-turn driving directions, as shown in Figure 13-7. To see the next step in the directions, swipe the green instructional signs from right to left; to see the preceding step, swipe from left to right.
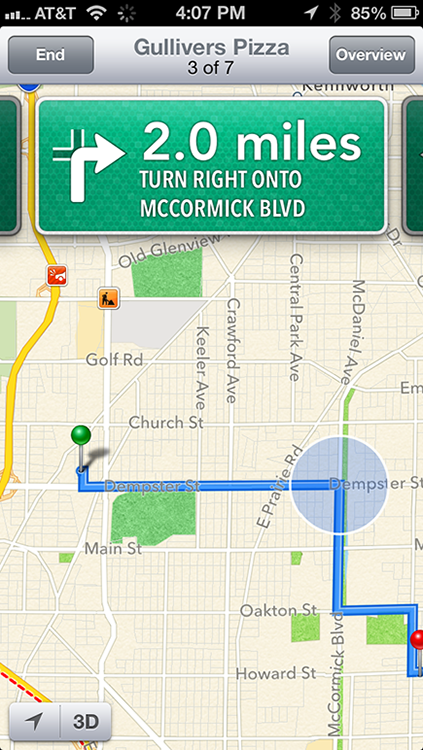
Figure 13-7: The third step in the step-by-step driving directions for the route to Gullivers.
If you prefer your driving directions displayed as a list with all the steps, as shown in Figure 13-8, tap the curling page button in the lower-right corner (refer to Figure 13-6) and then tap the List Results button.
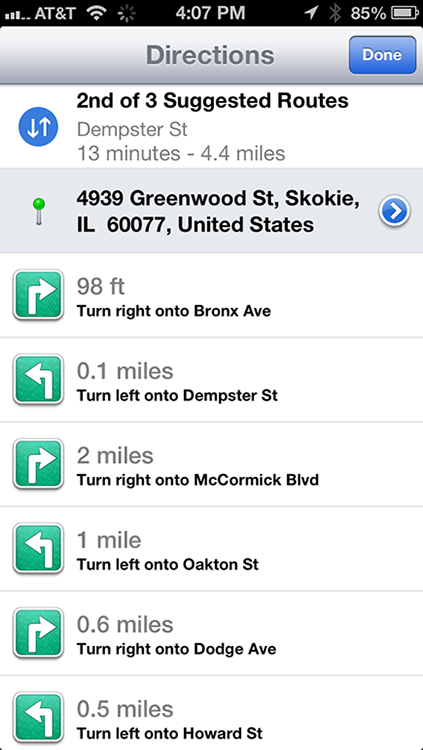
Figure 13-8: Step-by-step driving directions to Gullivers displayed as a list.
Older iPhones can speak directions if you purchase a third-party GPS app, such as TomTom U. S. A. ($39.99), Navigon ($24.99 and up), or MotionX GPS Drive (99¢ plus $2.99 per month or $9.99 per year for Live Voice Guidance), which are all decent. We advise plugging the iPhone into a power outlet if at all possible while driving because such apps can quickly drain the battery.
When you’re finished with the step-by-step directions, tap the Search button at the bottom of the screen to return to the regular map screen and single search field.
Get walking directions
For step-by-step directions for walking, tap the walking person icon above the Start and End fields that appear after you tap the Directions button. Walking directions generally look a lot like driving directions except for your travel time. For example, driving time in Figure 13-6 is approximately 13 minutes with traffic; walking time (not shown) is estimated at 1 hour and 24 minutes.
Get 3D and flyover views (iPhone 4S and 5)
New in iOS 6 are three-dimensional views for most metropolitan areas. You may have to zoom in to see the 3D or Flyover button, which appears on the right of the show current location button when available.
 In Standard view, the 3D button says (d’oh) 3D, as shown in the margin.
![]() In hybrid or satellite view, the Flyover button looks like a three-dimensional skyscraper, as shown in the margin.
In hybrid or satellite view, the Flyover button looks like a three-dimensional skyscraper, as shown in the margin.
Tap the 3D or Flyover button and the button turns blue while the map becomes three-dimensional, as shown on the right in Figures 13-9 and 13-10.

Figure 13-9: Downtown Austin in standard view (left) and with 3D enabled (right).
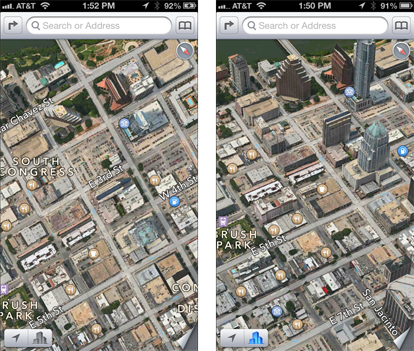
Figure 13-10: Downtown Austin in hybrid view (left) and with flyover enabled (right).
When 3D or flyover is enabled, you navigate and zoom as described earlier in the chapter. To change the camera angle, you drag up or down on the screen with two fingers.
Finally, note the compass in the upper-right corner of the screen when 3D or flyover is enabled. Tap it to return to north-facing orientation.
Get traffic info in real time
You can find out the traffic conditions for whatever map you’re viewing by tapping the curling page button in the lower-right corner and then tapping the Show Traffic button. When you do this, major roadways are color-coded to inform you of the current traffic speed, as shown in Figure 13-11.
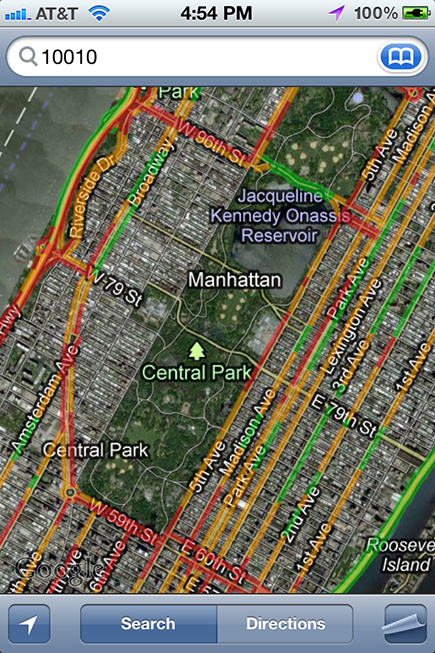
Figure 13-11: Traffic may be moving very slowly (red), kind of slowly (yellow), or nice and fast (green) in New York City.
Here’s the key to those colors:
![]() Green: More than 50 miles per hour
Green: More than 50 miles per hour
![]() Yellow: 25 to 50 miles per hour
Yellow: 25 to 50 miles per hour
![]() Red: Under 25 miles per hour
Red: Under 25 miles per hour
![]() Gray: No data available at this time
Gray: No data available at this time
 Traffic info isn’t available in every location, but the only way to find out is to give it a try. If no color codes appear, assume that traffic information doesn’t work for that particular location.
Do more on the Info screen
If a location has a little > in a blue circle to the right of its name or description (refer to Figure 13-2), you can tap the > to see the location’s Info screen.
As we explain earlier in this chapter, you can get directions to or from that location, add the location to your bookmarks or contacts, or create a new contact from it. But you can do three more things with a location from its Info screen:
![]() Tap the phone number to call it.
Tap the phone number to call it.
![]() Tap the e-mail address to launch the Mail app and send an e-mail to it.
Tap the e-mail address to launch the Mail app and send an e-mail to it.
![]() Tap the URL to launch Safari and view its website.
Tap the URL to launch Safari and view its website.
..................Content has been hidden....................
You can't read the all page of ebook, please click here login for view all page.