
The Kitchen Sync
If you’re using your iPhone PC-free because you don’t own or have access to a computer, you can skip the rest of the chapter. Why? If you don’t have a computer, you don’t have any data or media to sync with your iPhone and can skip ahead to Chapter 4 now.
First things first: About iPhone backups
Whether you know it or not, your iPhone backs up your settings, app data, and other information on your iPhone whenever you connect to a computer and use iTunes to:
![]() Sync with your iPhone
Sync with your iPhone
![]() Update your iPhone
Update your iPhone
![]() Restore your iPhone
Restore your iPhone
Every time you sync your iPhone and computer, most (but not all) of your iPhone content — photos in the camera roll, text messages, notes, contact favorites, sound settings, and more — is backed up to either your computer’s hard drive or iCloud before the sync begins. Most of your media, including songs, TV shows, and movies, isn’t backed up in this process. This shouldn’t be a problem because these files are usually restored when you sync with iTunes again.
Backups are saved automatically and stored on your computer by default. You can instead choose to back up to iCloud by clicking the appropriate button in the iTunes Summary pane.
To switch to backing up to iCloud using iTunes on your computer (or vice versa), follow these steps:
1. Connect the iPhone to the computer.
If iTunes doesn’t launch automatically when you connect the iPhone, launch it now.
2. In the sidebar on the left side of iTunes, select your iPhone.
3. Click the Summary tab.
4. Click Back Up to iCloud or Back Up to This Computer.
If you choose to back up to your computer, you can encrypt your backups with a password by selecting the Encrypt iPhone Backup check box.
If anything goes wonky or you get a new iPhone, you can restore most (if not all) of your settings and files that aren’t synced with iCloud or iTunes on your computer. Or, if you’ve backed up an iPhone, iPod touch, or another iPhone, you can restore the new iPhone from the older device’s backup.
If you’re using an iPhone computer-free, here’s how to enable backing up to iCloud from your iPhone, which we strongly suggest you do without further delay:
1. Tap Settings⇒iCloud⇒Storage & Backup.
2. Tap iCloud Backup to switch it on.
 Choosing this option means your iPhone no longer backs up automatically if you connect it to a computer.
If you’re a computer-free iPhone user, you don’t care because you never connect your iPhone to a computer. But if you sync your iPhone with your computer, as many folks do, give some thought to which option suits your needs. Restoring from a computer backup requires physical or Wi-Fi access to that computer, but you don’t need Internet access. Restoring from iCloud requires Internet access and can happen anywhere on Earth that has that access.
One last thing to look at in the Backup section: If you want to password-protect your iPhone backups (your iPhone creates a backup of its contents automatically every time you sync), be sure to also select the Encrypt iPhone Backup check box from the Backup area.
Backups are good; choose one or the other and move on.
Sync prep 101
For those who want to sync using iTunes on the computer, either with the included dock or Lightning connector–to–USB cable or wirelessly over Wi-Fi, follow the instructions in the rest of this chapter.
In other words, unless you don’t have a computer at all, just follow these steps and you’ll be ready to sync via cable or wirelessly in just a few minutes:
1. Start by connecting your iPhone to your computer with the Lightning or dock connector–to–USB cable included with your iPhone.
When you connect your iPhone to your computer, iTunes should launch automatically. If it doesn’t, chances are you plugged the cable into a USB port on your keyboard, monitor, or hub. Try plugging it into one of the USB ports on your computer instead. Why? Because USB ports on your computer supply more power to a connected device than other USB ports or most hubs.
If iTunes still doesn’t launch automatically, try launching it manually.
 If you don’t see an iPhone in the source list and you’re sure your iPhone is connected to a USB port on your computer (not on the keyboard, monitor, or hub), try restarting your computer.
2. If your photo management software launches, either import the photos you’ve taken with the iPhone or don’t.
If you’ve taken any photos with your iPhone since the last time you synced it, your photo management software (iPhoto, Image Capture, or Aperture on the Mac; Adobe Photoshop Elements on the PC) opens and ask whether you want to import the photos from your phone. (You find out all about this in the “Photos” section, later in this chapter.)
3. Select your iPhone in the iTunes source list.
If you’re setting up this iPhone for the first time, you’ll see the Set Up Your iPhone pane shown in Figure 3-1. If you’ve already named your iPhone, skip to Step 5.
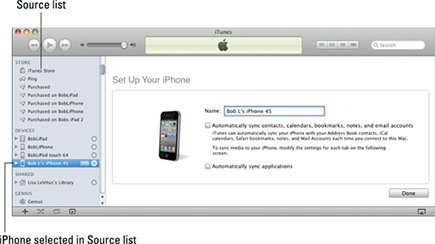
Figure 3-1: This is the first thing you see in iTunes.
4. Name your iPhone.
We’ve named this one Bob’s iPhone 4S.
5. Choose what, if anything, you want iTunes to automatically synchronize, and then click Done.
You can sync only your iPhone, or you can sync only your contacts, calendars, bookmarks, notes, e-mail accounts, and applications, or you can sync everything.
However, we suggest that you leave both boxes unchecked and set everything up manually, as described in the remainder of this section. That way, you’ll see additional options for syncing contacts, calendars, bookmarks, notes, e-mail accounts, and apps, as well as how to sync media including movies, TV shows, and podcasts.
6. Click the Summary tab near the top of the window, as shown in Figure 3-2.
If you don’t see a Summary tab, make sure your iPhone is still selected in the source list.
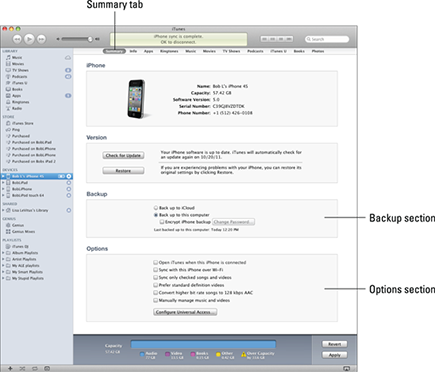
Figure 3-2: The Summary pane is pretty painless.
7. In the Backup section of the Summary pane, click either Back Up to iCloud or Back Up to This Computer.
Your iPhone creates a backup of its contents automatically every time you sync, regardless of whether you sync using a USB cable or wirelessly.
If you choose to store your backups locally, on your computer, you can encrypt and password-protect them by selecting the Encrypt iPhone Backup check box section.
That’s all there is to the Backup section. The remaining steps deal with the check boxes in the Options section (refer to Figure 3-2).
8. If you want iTunes to launch automatically and sync your iPhone whenever you connect it to your computer, click to put a check mark in the Open iTunes When This iPhone Is Connected check box (in the Options section).
If the Prevent iPods, iPhones, and iPads from Syncing Automatically option in the Devices pane of iTunes Preferences (iTunes⇒Preferences on a Mac; Edit⇒Preferences on a PC) is selected (checked), the Open iTunes When This iPhone Is Connected option in the Summary tab is deselected.
Your choice in this step is not set in stone. If you select the Open iTunes When This iPhone Is Connected check box, you can still prevent your iPhone from syncing automatically in two ways:
• Way #1: After you connect the iPhone to your computer, click the Summary tab in iTunes and deselect the Open iTunes When This iPhone Is Connected check box. Removing the check mark prevents iTunes from opening automatically when you connect the iPhone. If you use this method, you can still start a sync manually by clicking the Sync button.
• Way #2: Launch iTunes before you connect your iPhone to your computer. Then press and hold down ![]() +Option (Mac) or Shift+Ctrl (PC) and connect your iPhone. Keep pressing the keys until you see your iPhone appear in the iTunes source list. This method prevents your iPhone from syncing automatically without changing any settings.
+Option (Mac) or Shift+Ctrl (PC) and connect your iPhone. Keep pressing the keys until you see your iPhone appear in the iTunes source list. This method prevents your iPhone from syncing automatically without changing any settings.
9. If you want to sync automatically over your Wi-Fi connection, select the Sync with This iPhone over Wi-Fi check box.
10. If you want to sync only items that have check marks to the left of their names in your iTunes library, select the Sync Only Checked Songs and Videos check box.
11. If you want high-definition videos you import to be automatically converted into smaller standard-definition video files when you transfer them to your iPhone, select the Prefer Standard Definition Videos check box.
Standard-definition video files are significantly smaller than high-definition video files. You’ll hardly notice the difference when you watch the video on your iPhone, but you can have more video files on your iPhone because they take up less space.
That said, if you choose to watch video from your iPhone on an HDTV either with one of the A/V adapters for iPhone 4 or 4S (no such adapters were announced for the iPhone 5 at press time) mentioned next or wirelessly via AirPlay (as discussed in Chapter 8), you’ll definitely notice a big difference.
Finally, if you have a wireless network at home, you don’t need to sync video you intend to watch at home with your iPhone. Instead, you can stream it from your computer to your iPhone or your iPhone to your HDTV (with an Apple TV), as described in Chapter 8.
The conversion from HD to standard definition takes a long time, so be prepared for very long sync times when you sync new HD video and have this option enabled.
12. If you want iTunes to automatically create smaller audio files (so you can fit more music on your iPhone), select the Convert Higher Bit Rate Songs to 128Kbps AAC check box.
 A higher bit rate means that the song will have better sound quality but use more storage space. Songs that you buy at the iTunes Store or on Amazon, for example, have bit rates of around 256 Kbps. So, a 4-minute song with a 256 Kbps bit rate is around 8MB; convert it to 128 Kbps AAC and it’s roughly half that size (that is, around 4MB), while sounding almost as good.
Most people don’t notice much (if any) difference in audio quality when listening to music on most consumer audio gear. So unless you expect to hook your iPhone up to a great amplifier and superb speakers or headphones, you probably won’t hear much difference, but your iPhone will hold roughly twice as many tunes with this option enabled. Put another way, we’re very picky about our audio, and we both enable this option to allow us to carry more music around with us on our iPhones. And neither of us has noticed much impact on sound quality with the headphones or speakers we use with our iPhones.
13. If you want to turn off automatic syncing in just the Music and Video panes, select the Manually Manage Music and Videos check box.
And, of course, if you decide not to select the Open iTunes When This iPhone Is Connected check box, you can synchronize manually by clicking the Sync button in the bottom-right corner of the window. Note, however, that if you’ve changed any sync settings since the last time you synchronized, the Sync button will say Apply instead of Sync.