
Making a Call
Start by tapping the Phone icon on the Home screen. You can then make calls by tapping any of the icons that show up at the bottom of the screen: Favorites, Recents, Contacts, Keypad, or Voicemail, in that order. In this section, we describe these options one by one.
The iPhone 3GS and iPhone 4 have another way of calling, by using the aptly named Voice Control feature to dial a name or phone number by voice. As of the iOS 5 upgrade, the Siri feature on the iPhone 4S and iPhone 5 can also take on voice-dialing responsibilities. We discuss both these options in Chapter 7.
Contacts
If you read the chapter on syncing (Chapter 3), you know how to get the snail-mail addresses, e-mail addresses, and (most relevant for this chapter) phone numbers that reside on your PC or Mac into the iPhone. Assuming that you went through that drill already, all those addresses and phone numbers are hanging out in one place. Their not-so-secret hiding place is revealed when you tap the Contacts icon in the Phone app. Okay, so Contacts hangs out in the Utilities folder.
 As of iOS 6, if you enter your Facebook credentials in Settings, your Facebook friends — and their phone numbers, if they were made publicly available in Facebook — will automatically populate your list of contacts.
Here’s how to make those contacts work to your benefit:
1. In the Phone app, tap Contacts.
2. Flick your finger so the list of contacts on the screen scrolls rapidly up or down, loosely reminiscent of the spinning Lucky 7s on a Las Vegas slot machine.
Think of the payout on a One-Armed Bandit with that kind of power.
 Don’t feel like flicking? You can find a contact by
• Moving your fingers along the alphabet on the right edge of the Contacts list or tapping one of the letters to jump to names that begin with that letter, easier said than done given the tiny size of those letters.
• Starting to type in the search field near the top of the list. Try the name of the contact or the place where your contact works. You may have to flick to get the search field into view.
• Using Spotlight (refer to Chapter 2).
3. When you’re at or near the appropriate contact name, stop the scrolling by tapping the screen.
Note that when you tap to stop the scrolling, that tap doesn’t select an item in the list. This behavior may seem counterintuitive the first few times you try it, but we got used to it and now we really like it this way.
Tap the status bar to automatically scroll to the top of the list and bring the search field into view. Doing so is useful if you’re really popular (or influential) and have a whole bunch of names among your contacts.
4. Tap the name of the person you want to call.
As shown in Figure 4-1, you can see a bunch of fields with the individual’s phone numbers, physical and e-mail addresses, and possibly even a mug shot. You may have to scroll down to see more contact info.
If the person has more than one phone number, the hardest decision you must make is choosing which number to call.
5. Tap the phone number, and the iPhone initiates the call.
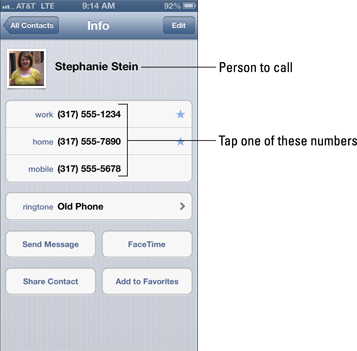
Figure 4-1: Contact me.
Your iPhone contacts reflect any groups you belong to, such as different departments in your company, friends from work, and friends from school. When you’re looking at the Contacts entry for an individual person, an All Contacts button appears in the upper-left corner. Tap All Contacts to bring up the roster of all your contacts, and the button at the upper-left corner changes to Groups. Tap that button to access contacts for a given group.
Among the Groups listings you see is one for all your iCloud contacts and one for all your friends on Facebook. In some cases, your contacts will be linked — that is, information supplied by Facebook, Microsoft Exchange, or some other source will be combined into a single entry. An obvious benefit of this linking is that you can cut down on duplicate contact listings. If the iPhone doesn’t automatically link appropriate contact entries, you can manually do the job from the given contact. Tap Edit, scroll to the bottom, tap Linked Contacts, and choose the appropriate entry to link with from among your entire list of contacts.
Your own iPhone phone number, lest you forget it, appears at the top of the Contacts list, provided you arrived in Contacts through the Phone app.
You can also initiate text messages and e-mails from within Contacts. Those topics are discussed in greater depth in Chapters 5 and 12, respectively.
Favorites
Favorites is where you can keep a list of the people and numbers you dial most often. Consider Favorites the iPhone equivalent of speed-dialing. Merely tap the person’s name in Favorites, and your iPhone calls the person.
You can set up as many favorites as you need for a person. So, for example, you may create separate favorite listings for your spouse’s office phone number, cell number, and FaceTime entry.
Setting up Favorites is a breeze. When looking at one of your contacts, you may have noticed the Add to Favorites button. When you tap this button, all the phone numbers you have for that person pop up. Tap the number you want to make into a favorite and it turns up on the list.
If any of your chosen folks happen to fall out of favor, you can easily kick them off the Favorites roster. Here’s how:
1. Tap the Edit button in the upper-left corner of the screen.
Note that a red circle with a horizontal white line appears to the left of each name in the list.
2. Tap the circle next to the A-lister getting the heave-ho.
The horizontal white line is now vertical and a red Delete button appears to the right of the name, as shown in Figure 4-2.
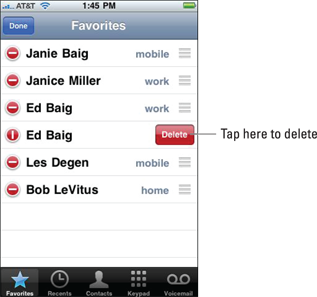
Figure 4-2: I don’t like you anymore.
3. Tap Delete.
The person (or one of his or her given phone numbers) is no longer afforded the privilege of being in your iPhone inner circle.
 Booting someone off the Favorites list does not remove that person from the main Contacts list.
You can rearrange the order in which your favorites are displayed. Tap Edit, and then, to the right of the person you want to move, press your finger against the symbol that looks like three short horizontal lines stacked on top of one another. Drag that symbol to the place on the list where you want your favorite contact to appear. Tap Done when the listings are as you like them.
You can designate new favorites by tapping the + symbol at the upper-right corner of the screen. Doing so brings you back to Contacts. From there, select the appropriate person and number. A star appears next to any contact’s number chosen as a favorite.
Recents
Tapping the Recents icon displays the iPhone call log. The Recents feature houses logs of all the, well, recent calls made or received, as well as calls you missed. Tap All to show all the recent calls and Missed to show just those you missed. Under the All list, completed calls and missed calls that have been returned by tapping the red entry are shown in black, and missed calls that haven’t been returned in this fashion are in red, along with a descriptor of the phone you were calling or received a call from (home, mobile, and so on).
By tapping the small blue circle with the right-pointing arrow next to an item in the list, you can find out the time calls were made or missed, as well as any known info about the caller from your Contacts information. Also shown is the length of the time you spoke to the person, assuming a conversation indeed took place.
To return a call, just tap anywhere on the name.
If one of the calls you missed came from someone who isn’t already in your Contacts, you can add that person. Tap the right-pointing arrow, and then tap the Create New Contact button. If the person is among your Contacts but has a new number, tap the Add to Existing Contact button.
Tap Share Contact to share a contact with a friend, family member, or colleague. You have the option to send that person an e-mail or a message (MMS, text, or iMessage message). The contact info is already embedded in the message that you send.
You can clear an individual entry from the Recents list by swiping in either direction on a name and tapping the red Delete button that appears.
Keypad
From time to time, of course, you have to dial the number of a person or company who hasn’t earned a spot in your Contacts. Or you need to access a keypad to navigate a voicemail system. That’s when you’ll want to tap the Keypad icon to bring up the large keys of the virtual touchtone keypad you see in Figure 4-3. Just tap the appropriate keys and tap Call to dial.
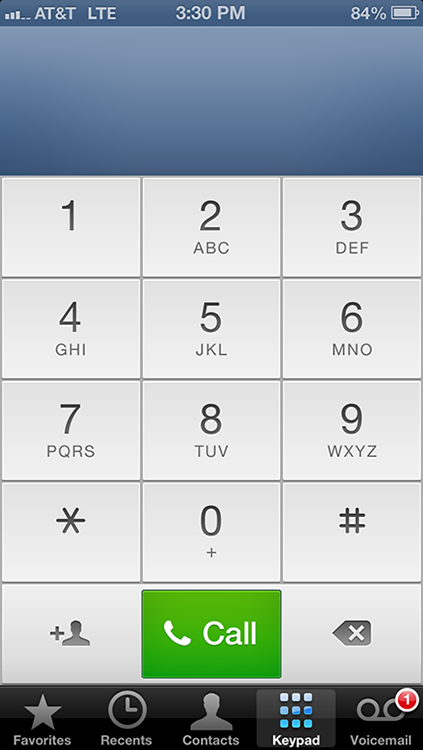
Figure 4-3: A virtually familiar way to dial.
To add this number to your Contacts, tap the + silhouette key (that’s a plus sign and the silhouette of a person) on the keypad and tap either Create New Contact or Add to Existing Contact.
You can use the iPhone’s keypad also to remotely check your voicemail at work or home.
Come to think of it, what a perfect segue into the next section. It’s on one of our favorite iPhone features, visual voicemail.
Visual voicemail
How often have you had to listen to four or five (or more) voicemail messages before getting to the message you really want, or need, to hear? As shown in Figure 4-4, the iPhone’s clever visual voicemail presents a list of your voicemail messages in the order in which calls were received. But you need not listen to those messages in order.

Figure 4-4: Visual voicemail in action.
You can tell if you even have voicemail in a few ways:
![]() A red circular badge showing the number of pending messages awaiting your attention appears above the Phone icon on the Home screen or above the Voicemail icon in the Phone app.
A red circular badge showing the number of pending messages awaiting your attention appears above the Phone icon on the Home screen or above the Voicemail icon in the Phone app.
![]() You may also see a message alert on the iPhone display that says something like New voicemail from Ed (or Bob) or a notification in Notification Center.
You may also see a message alert on the iPhone display that says something like New voicemail from Ed (or Bob) or a notification in Notification Center.
Whatever draws you in, tap that Voicemail icon to display the list of voicemails. You see the caller’s phone number, assuming this info is known through Caller ID, and in some cases, his or her name. Or you see the words Unknown or Private Caller.
The beauty of all this is that you can ignore (or at least put off listening to) certain messages. We are not in the advice-giving business on what calls you can safely avoid; disregard messages from the IRS or your parole officer at your own risk, okay?
A blue dot next to a name or number signifies that you haven’t heard the message yet.
To play back a voicemail, tap the name or number in question. Then tap the tiny play/pause button that shows up to the left. Tap once more to pause the message; tap again to resume. Tap the Speaker button if you want to hear the message through the iPhone’s speakerphone.
Tap the blue arrow next to a caller’s name or number to bring up any contact info on the person or to add the caller to your contacts.
The tiny playhead along the scrubber bar (labeled in Figure 4-4) shows you the length of the message and how much of the message you’ve heard. If you hate when callers ramble on forever, you can drag the playhead to rapidly advance through a message. Perhaps more importantly, if you miss something, you can replay that segment.
Returning a call is as simple as tapping the green Call Back button. If the caller’s number is unknown, the Call Back button appears dimmed. And you can delete a voicemail by pressing Delete.
If you have no phone service, you’ll see a message that says Visual Voicemail is currently unavailable.

You can listen to your iPhone voicemail from another phone. Just dial your iPhone number and, while the greeting plays, enter your voicemail password. You can set up such a password from the Home screen by tapping Settings⇒Phone⇒Change Voicemail Password. You’ll be asked to enter your current voicemail password, if you have one. If one doesn’t exist yet, tap Done. If you have a password, enter it and then tap Done. You’ll then be asked to type the new password and tap Done twice.
Recording a greeting
You have two choices when it comes to the voicemail greeting your callers will hear. You can accept a generic greeting with your phone number by default. Or you can create a custom greeting in your own voice as follows:
1. In Voicemail, tap the Greeting button.
2. Tap Custom.
3. Tap Record and dictate a clever, deserving-of-being-on-the-iPhone voicemail greeting.
4. When you’ve finished recording, tap Stop.
5. Review the greeting by pressing Play.
6. If the greeting is worthy, tap Save. If not, tap Cancel and start over at Step 1.
Voice dialing
You can make a call hands-free, just by opening your mouth. To read the details on voice control and Siri, the personal assistant who takes voice stuff to another level, see Chapter 7.