
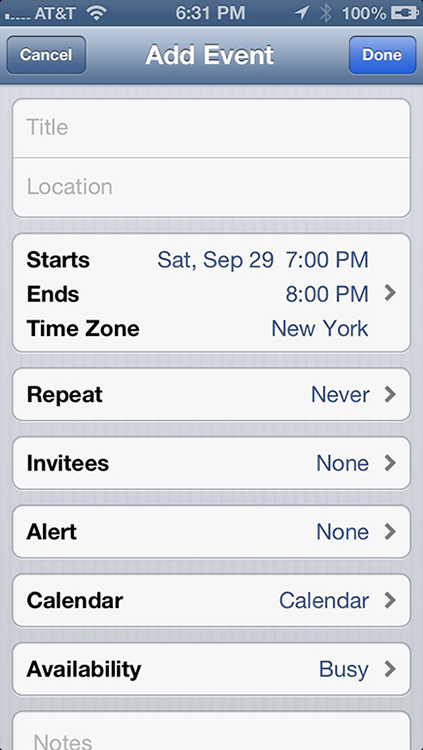
Figure 6-4: The screen looks like this just before you add an event to your iPhone.
Adding Calendar Entries
In Chapter 3, you discover pretty much everything there is to know about syncing your iPhone, including syncing calendar entries from your Windows machine (using the likes of Microsoft Outlook) or Mac (using iCal, Calendar, Microsoft Entourage, or Outlook).
 As part of the Facebook integration that came as part of iOS 6, any calendar entries on the popular social network can automatically show up in the Calendar app. You will have to visit Settings, enter your username and password, and then make sure the Calendar app in the Facbook setting is turned on.
In plenty of situations, you enter appointments on-the-fly. Adding appointments directly to the iPhone is easy:
1. Tap the Calendar icon at the top of the screen, and then tap the List, Day, or Month button.
2. Tap the + button in the upper-right corner of the screen.
The + button appears whether you’re in list, day, or month view. Tapping it displays the Add Event screen, shown in Figure 6-4.
3. Tap the Title/Location fields and finger-type as much (or as little) information as you feel is necessary or use dictation or Siri to employ your mouth and not your digits. Then tap Done.
Tapping displays the virtual keyboard (if it’s not already shown).
4. If your calendar entry has a start time or end time (or both):
a. Tap the Starts/Ends/Time Zone field.
b. In the bottom half of the screen that appears (see Figure 6-5), choose the time the event starts and then the time it ends.
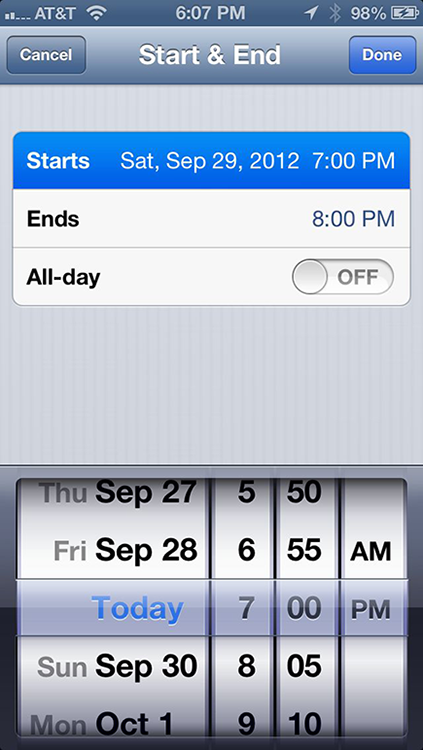
Figure 6-5: Controlling the Starts and Ends fields is like manipulating a bike lock.
Use your finger to roll separate wheels for the date, hour, and minute (in 5-minute intervals) and to specify AM or PM. It’s a little like manipulating one of those combination bicycle locks or an old-fashioned date stamp used with an inkpad.
c. Tap Done when you’re finished.
5. If you’re entering an all-day milestone (such as a birthday), tap the All-Day button so that On (rather than Off) is showing. Then tap Done.
 Because the time is no longer relevant for an all-day entry, note that the bottom half of the screen now has wheels for just the month, day, and year.
6. If you’re setting up a recurring entry, such as an anniversary, tap the Repeat field. Tap to indicate how often the event in question recurs, and then tap Done.
The options are Every Day, Every Week, Every 2 Weeks, Every Month, and Every Year.
7. If you want certain people to join you, tap Invitees to specify who among your Contacts will be attending the event.
8. If you want to set a reminder or alert for the entry, tap Alert, tap a time, and then tap Done.
Alerts can be set to arrive at the actual time of an event, or 2 days before, 1 day before, 2 hours before, 1 hour before, 30 minutes before, 15 minutes before, or 5 minutes before. If it’s an all-day entry, you can request alerts 1 day in advance (at 9 AM), 2 days in advance (at 9AM), or 1 week in advance.
When the appointment time rolls around, you hear a sound and see a message like the one shown in Figure 6-6.
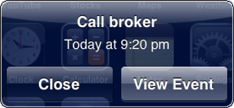
Figure 6-6: Alerts make it hard to forget.
 If you’re the kind of person who needs an extra nudge, set another reminder by tapping the Second Alert field (which you’ll see only if a first alert is already set).
9. If you want to assign the entry to a particular calendar, tap Calendar, and then tap the calendar you have in mind (Home or Work, for example). Then tap Done.
10. If you want to indicate whether you’re busy or free, tap Availability (if it’s shown on your phone). Then tap Done.
11. If you want to enter a web address, tap the URL field (at the bottom of the Add Event screen). Type the web address and then tap Done.
12. If you want to enter notes about the appointment or event, tap the Notes field (bottom of the screen). Type your note and then tap Done.
A virtual keyboard pops up so that you can type the note.
13. Tap Done after you finish entering everything.
We mentioned that you can use Siri for your calendar entries. In fact, we can’t think of any easier way to add an entry. You can instruct Siri along the lines of “Set a lunch appointment for tomorrow at noon with the Smiths.” Siri is pleased to comply.
Choose a default calendar by tapping Settings⇒Mail, Contacts, Calendars, and then flicking the screen until the Calendar section appears. Tap Default Calendar and select the calendar that you want to show up regularly.
If you travel long distances for your job, you can also make events appear according to whichever time zone you selected for your calendars. In the Calendar settings, tap Time Zone Support to turn it on, and then tap Time Zone. Type the time zone location using the keyboard that appears.
When Time Zone Support is turned off, events are displayed according to the time zone of your current location, and you won’t see any reference to Time Zone in the Starts/Ends/Time Zone field.
To turn off a calendar alert, tap Settings⇒Sounds, and then make sure that the Calendar Alerts button is turned off.
You can also set default alert times for birthdays, all-day events, or certain other events. Tap Settings⇒Mail, Contacts, Calendars, and scroll down to Default Alert Times. For birthdays or all-day events specifically, you can choose to be alerted at 9 AM on the day of the event, at 9 AM one day before, at 9 AM two days before, or a week before.
Back in the Calendar app, if you want to modify an existing calendar entry, tap the entry, tap Edit, and then make whichever changes need to be made. To wipe out a calendar entry, tap Edit⇒Delete Event. You have a chance to confirm your choice by tapping either Delete Event (again) or Cancel.
Calendar entries you create on your iPhone are synchronized with the calendar you specified in the iTunes Info pane.
Current and future Calendar events can be synchronized automatically through Apple’s iCloud service. In Settings, you can also sync past events. Your options are to sync events 6 months back, 3 months back, 1 month back, or 2 weeks back. Or you can sync all your events.
You can use iCloud to keep your calendars updated as well and in sync across all your iOS devices and computers. Go to Settings⇒iCloud and make sure the Calendars option is turned on.
Letting your calendar push you around
If you work for a company that uses Microsoft Exchange ActiveSync, calendar entries and meeting invitations from coworkers can be pushed to your device so that they show up on the screen moments after they’re entered, even if they’re entered on computers at work. Setting up an account to facilitate this pushing of calendar entries to your iPhone is a breeze, although you should check with your company’s tech or IT department to make sure that your employer allows it. Then follow these steps:
1. Tap Settings⇒Mail, Contacts, Calendars⇒Add Account.
2. From the Add Account list, tap Microsoft Exchange.
3. Fill in the e-mail address, username, password, and description fields, and then tap Next.
4. If required, enter your server address on the next screen that appears.
The iPhone supports something called the Microsoft Autodiscovery service, which uses your name and password to automatically determine the address of the Exchange server. The rest of the fields should be filled in with the e-mail address, username, password, and description you just entered.
5. Tap Next.
6. Tap the On switch for each information type that you want to synchronize using Microsoft Exchange.
The options are Mail, Contacts, and Calendars. You should be good to go now, although some employers may require you to add passcodes to safeguard company secrets.
If you have a business-issued iPhone and it is lost or stolen — or it turns out that you’re a double-agent working for a rival company — your employer’s IT administrators can remotely wipe your device clean.
Responding to meeting invitations
![]() The iPhone has one more important button, the Invitations button, located to the right of the Month button (and shown in the margin) — but you see it only under certain circumstances. For instance, you see the button when the Exchange calendar-syncing feature is turned on or when you have a calendar that adheres to the CalDAV Internet standard. You see the Invitations button also if you exploit iCloud, the free successor to Apple’s once $99-per-year MobileMe set of online subscription services.
The iPhone has one more important button, the Invitations button, located to the right of the Month button (and shown in the margin) — but you see it only under certain circumstances. For instance, you see the button when the Exchange calendar-syncing feature is turned on or when you have a calendar that adheres to the CalDAV Internet standard. You see the Invitations button also if you exploit iCloud, the free successor to Apple’s once $99-per-year MobileMe set of online subscription services.
If you have any pending invitations, tap the Invitations button now to view them, and then tap any of the items in the list to see more details.
Suppose that a meeting invitation arrives from your boss. You can see who else is attending the shindig, check scheduling conflicts, and more. Tap Accept to let the meeting organizer know you’re attending, tap Decline if you have something better to do (and aren’t worried about upsetting the person who signs your paycheck), or tap Maybe if you’re waiting for a better offer.
And if you do have a conflict, why not ask the Siri voice assistant to change your schedule? Visit Chapter 7 for more on this clever iPhone 4S and 5 feature.
You can choose to receive an alert every time someone sends you an invitation. In the Calendar settings, tap New Invitation Alerts so that the button displays On.
As mentioned, if you take advantage of iCloud, you can keep calendar entries synchronized between your iPhone, iPad, iPod touch, and Mac or PC. When you make a scheduling change on your iPhone, it’s automatically updated on your computer and other devices, and vice versa. Choose iCloud from the Add Account screen to get started, assuming you didn’t turn on iCloud when you first activated your phone.
You find out more about configuring iCloud when we discuss the iCloud setting in Chapter 14.
Subscribing to calendars
You can subscribe to calendars that adhere to the CalDAV and iCalendar (.ics) standards, which are supported by the popular Google and Yahoo! calendars and by the Mac’s iCal and Calendar. Although you can read entries on the iPhone from the calendars you subscribe to, you can’t create entries from the phone or edit the entries that are already present.
To subscribe to one of these calendars, tap Settings⇒Mail, Contacts, Calendars⇒Add Account⇒Other. You then choose Add CalDAV Account or Add Subscribed Calendar. Next, enter the server where the iPhone can find the calendar you have in mind, and if need be, a username, a password, and an optional description. Depending on the calendar you set up, you may have to dig into Advanced settings.
Searching calendars
You can search calendar entries, appointments, locations for events, and so on by using Spotlight search, a topic we address in Chapter 2. You can also search for events while in the calendar list view by typing text in the Search All Calendars field at the top of the screen.
..................Content has been hidden....................
You can't read the all page of ebook, please click here login for view all page.